
This follow-along tutorial covers most of the essential features modern prototype React Native apps need, including databases and authentication. It is written using modern JavaScript and React style, using only functional components and hooks. Like all follow-along tutorials, this is an introduction and source of example code, but does not test your ability to use them on your own. You are following a recipe for a simple application -- but there's much to learn as you do each step.
React Native shares many concepts with ReactJS, used for web development. For key concepts in React, see my React notes.
In the material below, I say "in React" for concepts that apply to both React and React Native. I say "in Expo" or "in React Native" for concepts that apply only to React Native and Expo.
If you want a preview of what running Expo is like, watch this video. Since the video was made the end of 2019, some details have changed.
Tracking Progress
This tutorial is long. There's a lot to learn. It will take days or more. The worst thing is to do nothing for days, then work in a panic. To encourage steady progress, your process for completing each task will be
- Read and code: This is the key learning step. The goal is not to copy and paste code, but to understand the many concepts introduced in JavaScript, React, and React Native, and assemble the code given into a working app.
- Test: Verify that the app works as intended in both a web build and a deployment to either an iOS or Android device.
- Deploy: Deploy the web version to a public host. Verify that the deployed version also works. How to deploy to Firebase will be described below.
- Push: Commit and push to your Github repository.
- Report: Fill in the data asked for on the progress report spreadsheet. A link to the spreadsheet is on Canvas.
Don't skip any of the above steps. Don't report success if there's not a working deployed version. Don't just copy code. That's of no value to anyone.
You do not have to use exactly the code given. Experiment. Document what you did differently and why in code comments or even better on Campuswire.
Set up Expo
Install a JavaScript-savvy editor
An editor that knows about React code can save hours of time. An up to date list of good choices is here.
I recommend Visual Studio Code — note: this is not Visual Studio! VS Code runs on MacOS, Windows, and Linux. That makes it very nice for teams with different development machines. VS Code has numerous plugins for working with JavaScript and React. You'll see VS Code used in many React tutorial videos.
Install Node
Install NodeJS. If you have NodeJS already installed, be sure it's the latest LTS (long-term support) version, i.e., at least version 12.
Decide: npm or yarn? All documentation in this course uses npm to install Node packages. yarn is a popular alternative. Avoid using both on the same project. Errors can occur when deploying if your repository has both package-lock.json and yarn.lock files. Every team needs to agree on which tool they will use.
npm comes with Node. yarn has to be installed separately.
Create an Expo account
One of the ways Expo simplfies React Native development is by providing free cloud services for deployment and testing. You need to have an Expo account and be logged into to use these services. It's free.
Install Expo
This step takes a while to run. Be patient.
npm install --global expo-cli
Install the Expo client
Expo Client is a simple app for iOS and Android devices. It is available on the Apple and Google app stores. After you use Expo to start your app on your development machine, you use the Expo Client to download and run the app on your phone. When you change the app code, the Client gets the new version automatically.
Report: Platform data
On your row of the report spreadsheet (link on Canvas), fill in the first few columns asking for information about your development platform and what versions of everything you have installed.
Create a new app
Create new applications with this command:
expo init newAppName
For this demonstration, make a course planning app that checks for time conflicts. Use Expo to create a new directory for it. Do not do this inside an existing Expo project! Call it Scheduler or some other simple name like that.
expo init Scheduler
Some sites recommend avoiding hyphenated app names for React Native. Use TitleCase.
Expo will ask what template you want to use. Choose blank.
The install downloads a ton of files. You may get warnings about missing peer dependencies. These can be ignored.
The Expo CLI is updated frequently. Update when asked to. On MacOS, if you still get warnings about Expo being out of date after updating, it may be because you are running zsh but the updated links are in ~/.bash_profile. You can fix this by adding source ~/.bash_profile to the start of the file ~/.zshrc.
Start the deployment server
To see if everything is working so far:
cd Scheduler
expo start
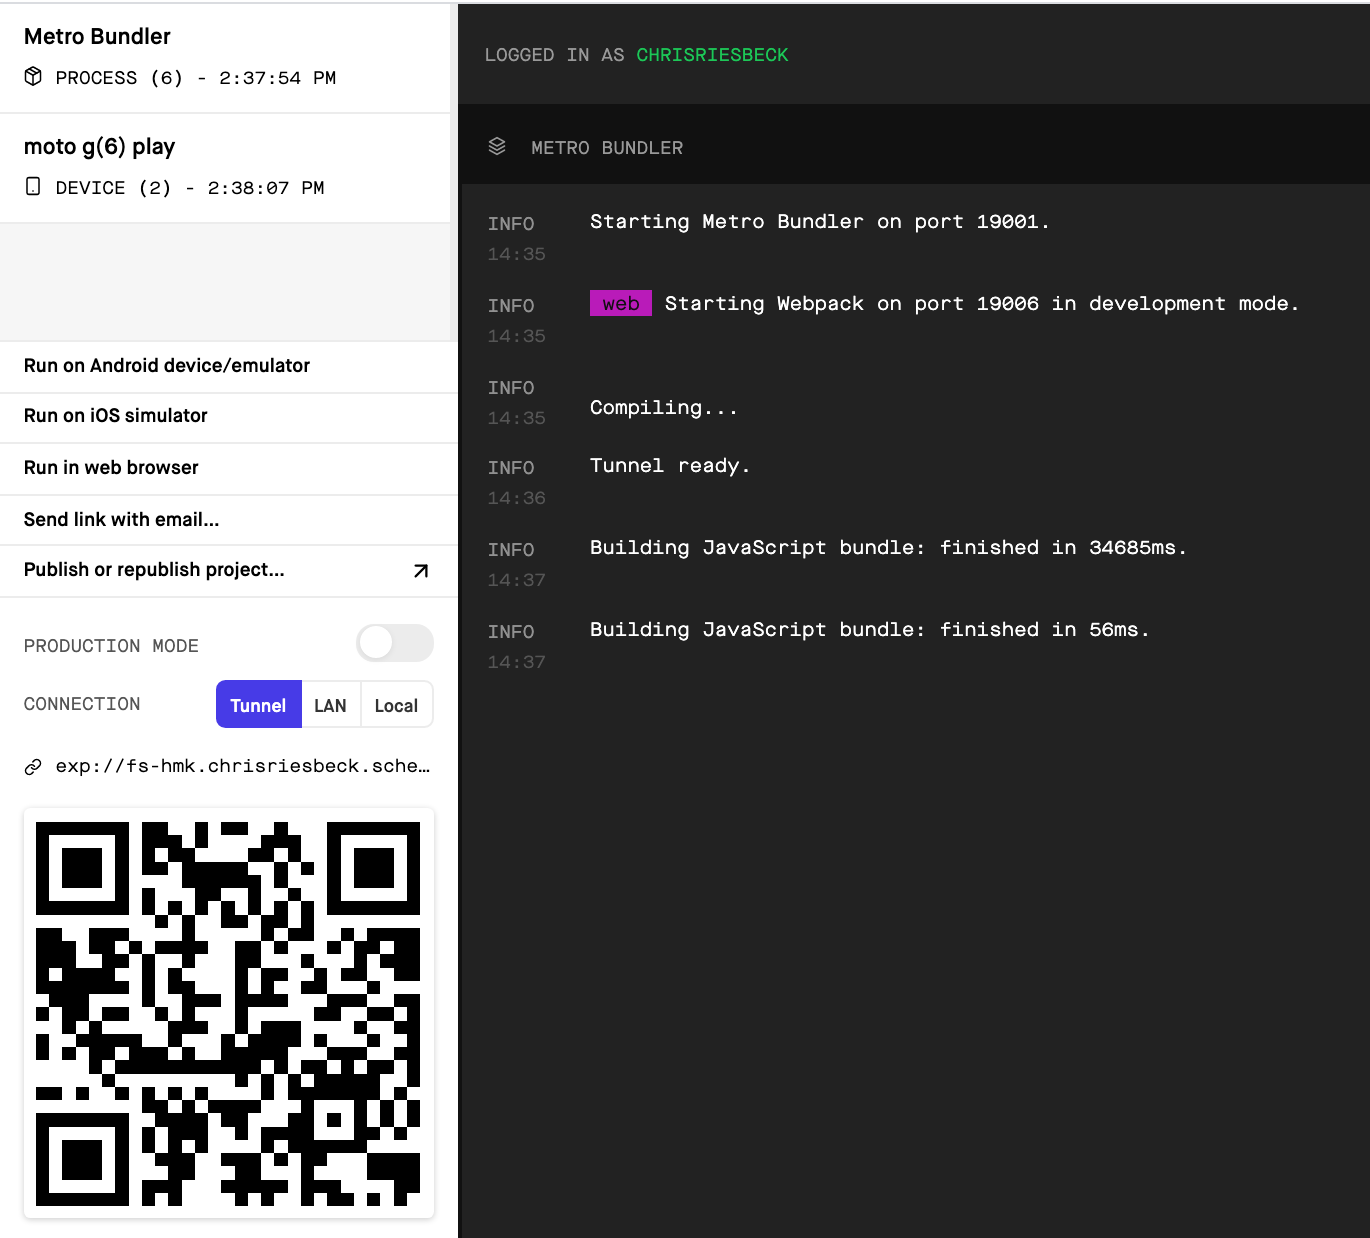
This starts a local web server that manages deployment of the app. Eventually, your default browser should open the Expo deployment web page showing the Metro Bundler. On this page, you can create and deploy your app to devices, simulators, or to a web page. Menu of options and a large QR code are on the left. Console messages from Expo are on the right.
Run the web version
One option on the left is Run in web browser. This tells the Metro Bundler to create your app as a web page. This is an actual web version of your app, not a simulation of a device running your app. This is one of the features of Expo: the ability to deploy to all three major platforms.
Click Run in web browser. After twenty seconds or so, a new browser window should appear with the text "Open up App.js to start working on your app!"
Deploy to a device
Now test deploying to a real Android or iOS phone or tablet. The device must be on the same local network as your development machine. Whichever method you use, you should end up seeing the same "Open up App.js to start working on your app!" text on your device.
By default, the deployment web page will use the local area network (LAN) to deploy. This is the fastest method but I find I usually have to switch to "Tunnel". Do this before doing the methods below, since it changes the link that needs to be used.
Scan QR code with Expo Client
On an Android device, you can open the Expo client, click Scan QR Code, and point the camera at the QR code on the Expo deployment page. Scroll the page if the entire QR code is not visible. When the code is recognized, your app will be downloaded.
Scan QR code with camera
Apple required the removal of this feature in Expo Client on iOS, but on both Android and iOS, you can scan the QR code with your normal Camera app. This will raise a notification with a link to Expo. Tap the link to open Expo and download the app.
Send link in email
Finally, you can select "Send link with email..." on the Expo deployment page. When the email arrives, open it on your device and click the link to open Expo and download the app.
Modify the app
Now do what the app says: open App.js in your code editor. Make the following changes to the code. The edits change the wording, make the background blue and the text white, and increase the font size to 32pt.
import React from 'react';
import { StyleSheet, Text, View } from 'react-native';

export default function App() {
  return (
    <View style={styles.container}>
    <Text style={styles.textStyle}>Welcome to my app!</Text>
    </View>
  );
}

const styles = StyleSheet.create({
  container: {
    flex: 1,
    backgroundColor: '#00f',
    alignItems: 'center',
    justifyContent: 'center',
  },
  textStyle: {
    color: '#fff',
    fontSize: 32,
  }
});
Despite appearances, there is no HTML or CSS here. View and Text are native user interface widgets.
React Native, and hence Expo, use CSS-like forms to style the native widgets. StyleSheet is a React Native class that lets you organize styles by names in a JavaScript object. When deployed, these pseudo-CSS styles get translated into the appropriate commands for iOS, Android, and the web. For simple styling, your CSS intuitions should work, but don't expect all the bells and whistles of real CSS.
Although you can specify styles with JSON in a component's style property, it's more common to centralize styles in a single StyleSheet.create() at the end of the component file, as shown in the example above.
More on React Native styling.
After saving these changes, you should see them in both the web page and on your device.
If the app does update automatically on your device, there are several ways to cause a reload:
- Swipe down to show a bar with the name of your app and a reload icon.
- Shake the phone. This should bring up a page with a reload option.
- Use the gesture for your device for switching applications to return to the Expo Client. Use the QR code option to reload your app.
Fix the web page title
You tell the Metro Bundler what title to use for the web version of your app by specifing a name in the configuration file app.json:
{
  "expo": {
    ...
    },
    "web": {
      "name": "CS Course Scheduler",
      "favicon": "./assets/favicon.png"
    }
  }
}
You may need to restart the local server and redeploy to get the updated title.
expo start
Create a Github repo
Now that your app is running, it's time to stop and create a repository for it. Stop Expo in the command shell with control-C.
Create a repository on Github for your app. Follow these instructions to create a repository for existing code. As noted there, do NOT create the default README or .gitignore files. They will be wrong. expo init already created the correct files.
This repository does NOT need to be in the course organization. It does need to be public.
Be sure the code has been pushed to Github. Make sure node_modules is NOT on Github.
Report: Github repo
Enter the Github repo link into the spreadsheet.
Deploy the web app to a public host
Set up a remote site to host the web version of your app. This will be handy for quickly showing users or clients changes to the user interface. It will be a working system, except for the functions that require an actual smartphone. I will describe Firebase for hosting, because you will need it anyway, but you can use AWS, Heroku, Github pages, or whatever you are familiar with. The app is just a web site. It doesn't require Node to run.
Go to the Firebase console. If this is your first visit, you will be asked to create an account.
Northwestern u.northwestern.edu accounts can not be used for Firebase access. Use your personal Google account if you have one, or create one.
Use the Firebase console to create a new project . You can call it what you want. This project will provide several services for your app. Later you will create a database on this project and set up authentication, but for now, just click on Hosting on the left.
Click the Get started button. Firebase will give you instructions on what you need to run on your local machine to install Firebase in your Expo project. However, instead of npm install firebase, use
expo install firebase
In general, use expo install rather than npm install. expo install will only install versions of libraries that are compatible with Expo.
When you get to the step where you run firebase init:
- select the project you just created to attach your web app to
- say web-build when the Firebase CLI asks where the web code is
- say Yes when it asks if this is a single-page app.
See the brief Expo documentation on hosting on Firebase.
Now follow Expo's instructions in publishing the web app to build an optimized web site in the directory web-build.
If the build is successful, run firebase deploy to deploy the web app to Firebase.
Test the URL Firebase gives you for the deployed app. If it's working, you're done with this task. You have your foundation for the rest of the tutorial.
Report: Public URL
Enter your Firebase web app URL in the report spreadsheet.
Slice 1: Your first React Native code
Now it's time to make a more realistic app, with buttons, logic, a database, and authentication.
The file src/App.js is the heart of your application. It's the code that gets run when your app starts. Much of your editing will begin in that file.
You are going to write a simple React app for quickly finding classes that don't conflict in meeting time. You'll do this in tiny slices that make something new happen on-screen in every step.
You need some data. Just to get things started for testing, you hard-wire that data in your JavaScript code, starting with an object with a title, and write just enough code to print the title.
Replace the entire contents of the src/App.js file that create-react-app made with the following text.
import React from 'react';
import { StyleSheet, Text, View } from 'react-native';

const schedule = {
  title: "CS Courses for 2018-2019"
};

const App = () => {
  return (
    <View style={styles.container}>
      <Text style={styles.bannerStyle}>{schedule.title}</Text>
    </View>
  );
}

const styles = StyleSheet.create({
  container: {
    flex: 1,
    alignItems: 'center',
    justifyContent: 'center',
  },
  bannerStyle: {
    color: '#888',
    fontSize: 32,
  }
});

export default App;
Study this code. Do you understand this method of defining functions in JavaScript? Do you understand what import and export are doing? If not sure, see my React notes. The only part that's specific to React Native here is the use of Text, View, and StyleSheet, rather than regular HTML and CSS.
For rapid prototyping, just deploy to the web version for now. Startup will be a little slow, but after that most changes will show up as soon as you save them.
expo start --web
This will bring up the Expo deployment page, and automatically create a web version and serve it. Eventually, another web page should appear showing "CS Courses for 2018-2019" in large centered dark gray text.
App.js is the default entry point for Expo apps.
The code in src/App.js defines a variable schedule to hold your data. Then it defines App to be a component, i.e., a function that when called returns a piece of the user interface. In this case, the interface is a View component, which is a React cross-platform component for holding UI elements, and a Text component to hold a bit of text to display. You can think of View and Text as analogs of div and span in HTML.
App is defined using JavaScript's modern arrow function expresssion syntax.
The function uses React's JSX feature. JSX lets us write component elements directly, inserting JavaScript values as needed inside curly braces.
<View style={styles.container}>
  <Text style={styles.bannerStyle}>{schedule.title}</Text>
</View>
Scripts installed by expo init translate the JSX into code to build the actual UI widgets needed for iOS, Android, or a web page.
You've finished your first slice. Build and deploy the web version to your hosting site. Test and if working, push your code to Github.
Report: Title slice
In the progress spreadsheet, enter the last commit for this task.
Snack for Slice 1
Snack is a website that hosts example React Native code. It's similar to CodePen and CodeSandbox for web apps. Not only can you preview the sample code on Snack, you can view it on your own devices device, using the Expo client app.
Snack is handy for testing code without needing to create an Expo project. It's also useful embedding live demos on web pages.
If you don't see both code and preview in the Snack below, trying increasing your browser window size or zooming out.
Slice 2: Showing a list of courses
Of course, what you really want to display are the courses. That will need a loop. You could write it in the App function, but it would better to refactor App into two new components, passing each one just the data it needs:
- A banner with the title
- A list with the courses
Components are things you can define as you need them to organize your React code.
The following code for App.js defines a data object with a few courses, and redefines the App component to generate HTML with two new components: a banner and a component list. You'll see the code for those shortly.
import React from 'react';

const schedule = {
  "title": "CS Courses for 2018-2019",
  "courses": [
    {
      "id": "F101",
      "title": "Computer Science: Concepts, Philosophy, and Connections",
      "meets": "MWF 11:00-11:50"
    },
    {
      "id": "F110",
      "title": "Intro Programming for non-majors",
      "meets": "MWF 10:00-10:50"
    },
    {
      "id": "F111",
      "title": "Fundamentals of Computer Programming I",
      "meets": "MWF 13:00-13:50"
    },
    {
      "id": "F211",
      "title": "Fundamentals of Computer Programming II",
      "meets": "TuTh 12:30-13:50"
    }
  ]
};

const App = () => {
  return (
    <View style={styles.container}>
      <Banner title={schedule.title} />
      <CourseList courses={schedule.courses} />
    </View>
  );
}

export default App;
The App creates two components: Banner and CourseList. It passes the title to the banner and the list of courses to the course list, using HTML attributes.
<Banner ... />
is JSX shorthand for
<Banner ...>...</Banner>. All
JSX components must be closed one way or the other.
Component names must be capitalized.
Component are just functions you define to return JSX. When React sees a component in JSX, it calls the function with the same name. Whatever the function returns replaces the component in the JSX that called it.
More on functional components.
React collects any attributes attached to a component into a props object, and passes that object to the function. The keys of the object are the attributes in the component call, and the values are the attribute values. So
<Banner title={schedule.title} />
means the function Banner will
be passed the props object { "title": "CS Courses for 2018-2019" }.
Do not use the attribute children. children is a reserved property in React.
You could define Banner like this:
const Banner = props => (
  <Text style={styles.bannerStyle}>{props.title}</Text>
)
But modern JavaScript lets you use destructuring syntax to get the values you want from an object. This makes the parameter list explicit about what the function expects to receive.
const Banner = ({title}) => (
  <Text style={styles.bannerStyle}>{title}</Text>
);
If you forget the curly braces in the parameter list and write
const Banner = (title) =>  (
  <Text style={styles.bannerStyle}>{title}</Text>
);
you will get an error during compilation.
The CourseList component is a little more complex. It needs to loop over the list of courses, producing a widget for each one. In modern JavaScript, looping is best done using mapping functions, such as map and filter.
To keep CourseList clean and clear, define it to just make a list of Course components. A JSX expression can return either null, one component, or a list of components. Anything else will cause a React compilation error.
const CourseList = ({courses}) => (
  <View style={styles.courseList}>
    {courses.map(course => <Course course={course} />)}
  </View>
);

const styles = StyleSheet.create({
  ...
  courseList: {
    flex: 1,
    flexDirection: 'row',
    flexWrap: 'wrap',
    alignItems: 'center',
    justifyContent: 'space-between',
  },
});
Since the buttons are small and there will eventually be many of them, it would best to lay them out horizontally, wrapping, just likes words in a paragraph.
React Native uses the CSS Flexbox model, with some differences, to define layout. The above styles will lay out the course objects horizontally, left to right, wrapping if necessary, centered vertically on the screen.
I am still a novice when it comes to layout with React Native's Flexbox. I spent more time on that when doing these examples than anything else. Authentication came in a distant second. For an introduction to Flexbox, see In-depth styling with React Native and Flexbox.
Courses will be buttons with the course number and meeting time. Eventually a user will be able to select and de-select courses.
You can implement a button using the React Native component TouchableOpacity. This wraps a touchable area around another object. You wrap this around a React Native Text object to create a button with label.
A better component, called Pressable, is available in the latest React Native but not yet in Expo.
You can get the course number from the course ID, e.g. "F110" is the course 110 when it meets in Fall.
Finally you should make the course buttons blue with white text and rounded corners. Putting all that together gives this code. Ellipses ("...") are used for parts of code that haven't changed.
const getCourseNumber = course => (
  course.id.slice(1)
);

const Course = ({course}) => (
  <TouchableOpacity style={styles.courseButton}>
    <Text style={styles.courseText}>
      {`CS ${getCourseNumber(course)}\n${course.meets}`}
    </Text>
  </TouchableOpacity>
);

const styles = StyleSheet.create({
  ...
  courseButton: {
    flex: 1,
    borderRadius: 5,
    justifyContent: 'center',
    alignItems: 'center',
    margin: 10,
    height: 60,
    padding: 10,
    minWidth: 90,
    maxWidth: 90,
    backgroundColor: '#66b0ff',
  },
  courseText:{
    color: '#fff',
    fontSize: 12,
    textAlign: 'center',
  },
...
Note the use of a JavaScript template string to construct the title.
The above will render the heading and a list of the sample courses, but you will see a React warning in the browser and terminal consoles about elements in a list without keys. The reason is a bit technical but the fix is to add a key attribute to the component you are making a list of. The value needs to be a unique, unchanging ID. That's easy in this case.
const CourseList = ({courses}) => (
  <View style={styles.courseList}>
    {courses.map(course => <Course key={course.id} course={course} />) }
  </View>
);
Mobile-first styling
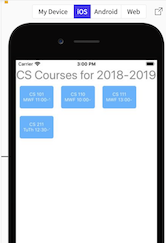
The web version of your app is very useful for quickly prototyping a new feature, but it is not a good predictor of what you will see on a mobile device. For example, here's what your code produces on the Expo Snack sandbox simulators:
| iOS | Android | Web |
|---|---|---|
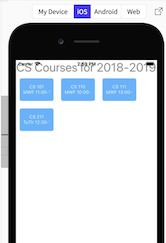 |
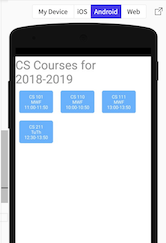 |
 |
Modern best practice for applications that might be deployed to mobile devices is to design for mobile first. Do that when the code is still small and simple. Test again after every new piece of functionality is added. Typically, if it looks good in mobile, it will be OK on web.
React Native has two special view components to help out: SafeAreaView and ScrollView.
SafeAreaView adds padding to content to avoid that content from being covered up by navigation elements, toolbars, sensor notches, and so on. It only does this for iOS devices, but is safe to use in Android and web apps. You will want to add a little padding at the top to avoid overlap on Android.
Replace your top-level View with SafeAreaView like this
const App = () => {
    return (
      <SafeAreaView style={styles.container}>
        <Banner title={schedule.title} />
        <CourseList courses={schedule.courses} />
      </SafeAreaView>
    );
  }

  const styles = StyleSheet.create({
    container: {
      flex: 1,
      alignItems: 'center',
      justifyContent: 'center',
      paddingTop: 20,
    },
    ...
Put ScrollView around content that may be more than what fits on the screen. Wrap it around the View you already have.
const CourseList = ({courses}) => (
    <ScrollView>
      <View style={styles.courseList}>
        { courses.map(course => <Course key={course.id} course={course} />) }
      </View>
    </ScrollView>
  );
Don't forget to import these!
import { SafeAreaView, ScrollView, StyleSheet, Text, TouchableOpacity, View } from 'react-native';
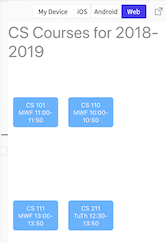
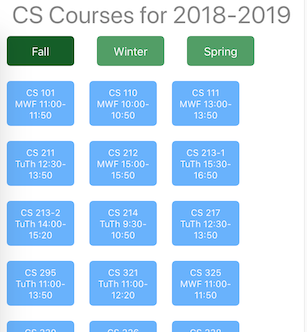
Now deploy to your device and the web. You should see a much more consistent interface across devices and the web. This is what you should see in Snack.
| iOS | Android | Web |
|---|---|---|
 |
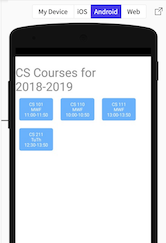 |
 |
You have finished your second slice! You have a working app that displays data about a list of courses, that runs on three different platforms. Push to your host. Test. When working, push code to Github.
Report: Course list slice
Enter the last commit for this task in the report sheet.
Snack for Slice 2
If you don't see both code and preview in the Snack below, trying increasing your browser window size or zooming out.
Slice 3: Fetching data
Creating trackable state
Most applications get their data from a server, not a local text file. In this slice, you are going to fetch the schedule data from a URL. Later, you'll see how to get it from a Firebase realtime database.
But first, you need to have a place to store that data on the client, so you don't have to keep fetching it. In React, runtime data is called state. State data includes data from a user or any external source.
A common challenge in modern user interfaces is making sure what is shown in the user interface is always consistent with the state, especially when data might be updated asynchronously by external messages, like a chat, or events, like a sensor.
React solves this problem by letting you declare state variables. When you change those variables with a state variable update function, React will automatically re-render all and only those parts of the user interface that are affected by the new data. You don't write code to update your interface. You write code to display the state data in the user interace, and code to update the state variables when appropriate. React does the interface updating, efficiently and robustly.
Never forget that React state is temporary user interface state. React state is persistent over re-rendering, but disappears if you reload a web page or reset a native app.
React makes it possible to store state locally in components, without expicit global variables. This is another way React makes dynamic user interfaces easier to develop and maintain.
In React Native 0.59 and up, you create component state with useState(). To use useState, you need to import it at the top of your App.js file like this:
import React, { useState } from 'react';
useState() is called a Hook, because it hooks into the internals of the React system. How it works is complicated, but using it is not.
You call useState(value) inside a component to create a local state variable for that component. useState(value) takes a value, and returns a two-element array. Here's an example of how useState() is typically used:
const Scoreboard = () => {
  const [score, setScore] = useState(0);
  ...
The first time useState(0) is called, it will set the internal state to 0. It then returns an array with 0 and a function to call to change the state. When useState(0) is called again, it will ignore the 0 argument, and return an array with the current value of the state and the state changing function.
The code above uses array destructuring to assign the array values to the variables score and setScore respectively. To change the score state, call setScore(new-value). Whenever that happens, React will re-render any components that depend on score.
The initial value should be something that works with your component code. Zero or null or an empty string is fine if your component JSX can handle that.
In your application, your components want a course schedule object, so make your initial value an object with an empty title and empty list of courses. Because App now has some actions before returning JSX, you need to replace the simple parenthesized expression with a statement block, i.e., curly braces. The last statement of the block needs to return the JSX.
const App = () => {
  const [schedule, setSchedule] = useState({ title: '', courses: [] });
  ...
  return (
    ...
  );
};
To show the user that there is no data yet, modify your banner component slightly, to show "[loading...]" until the data has been received.
const Banner = ({title}) => (
  <Text style={styles.bannerStyle}>{title || '[loading...]'}</Text>
);
Getting data for components
Now that you have a schedule state variable, you need to fetch some data to put into it. This is your data. The URL to get it is
'https://courses.cs.northwestern.edu/394/data/cs-courses.php'
This URL can be fetched from any server, including your local test server, without getting a CORS exception.
To fetch JSON data, use the React Native function fetch(url) to get a response object. The response object can be checked to see if it has data. If it does, call response.json() to parse that data.
Both fetch(url) and response.json() are asynchronous functions. That means that they need to be called using async and await. That will let your code use the data when it eventually returned, without making the client application freeze and wait.
Here's code using async and await to get the schedule JSON data, and store it using the setSchedule() function created by useState().
const fetchSchedule = async () => {
    const response = await fetch(url);
    if (!response.ok) throw response;
    const json = await response.json();
    setSchedule(json);
  };
The trick is to integrate this asynchronous event processing into the React rendering cycle. React re-renders very frequently. Any change to state will cause React to re-run the component functions to calculate what needs to be displayed. It does this very quickly, but you need to be careful not to run code like network calls every time this happens.
In React, you manage code with side-effects by putting that code in a function that you pass to the React hook useEffect(function). useEffect() needs to be imported at the top of any code that uses it, e.g., App.js file.
import React, { useState, useEffect } from 'react';
You need an asynchronous function to fetch data. You can't pass an asynchronous function directly to useEffect(), but you can pass a function that defines and calls an asynchronous function. So you can pass useEffect() a function that defines and calls the asynchronous function fetchSchedule(), which calls fetch() and waits for results, like this:
useEffect(() => {
  const fetchSchedule = async () => {
    const response = await fetch(url);
    if (!response.ok) throw response;
    const json = await response.json();
    setSchedule(json);
  }
  fetchSchedule();
})
This works but has a serious flaw. By default, the function passed to useEffect() is called whenever the component is rendered. React apps re-render components very frequently, sometimes on every keystroke. You don't want to do a fetch everytime the component is updated. That would cause a lot of network traffic, and, if you are calling some service, might get your app kicked off for violating service limits!
Most side-effect code only needs to be run if some state variable has changed. You pass an array of those variables as the second argument to useEffect(). Then the function will be run only when the values of any of those variables has changed since the last run. If an empty list is given, React runs the function only when the component is first displayed. If no argument is given, React runs the function on all updates.
useEffect(() => {
  const fetchSchedule = async () => {
    const response = await fetch(url);
    if (!response.ok) throw response;
    const json = await response.json();
    setSchedule(json);
  }
  fetchSchedule();
}, [])
Putting this all together leads to this code to load the course schedule into your App.
const App = () => {
  const [schedule, setSchedule] = useState({ title: '', courses: [] });

  const url = 'https://courses.cs.northwestern.edu/394/data/cs-courses.php';

  useEffect(() => {
    const fetchSchedule =  async () => {
      const response = await fetch(url);
      if (!response.ok) throw response;
      const json = await response.json();
      setSchedule(json);
    }
    fetchSchedule();
  }, []);

  return (
    <SafeAreaView style={styles.container}>
      <Banner title={schedule.title} />
      <CourseList courses={schedule.courses} />
    </SafeAreaView>
  );
};
The code for fetching data from the Firebase Realtime Database is slightly different. See the section on using Firebase with Hooks.
More on useEffect().
That's it. You can delete the code that downloads and displays a sample schedule. You have finished your third slice! Test that your code works on your device and public site. Push to Github.
Report: Data fetch slice
Enter the commit for this task on the progress spreadsheet.
Snack for Slice 3
If you don't see both code and preview in the Snack below, trying increasing your browser window size or zooming out.
Slice 4: Interactive filtering
Time to implement the interactive part of your course scheduling tool.
Filtering by term
Students usually schedule courses one term at a time. It would be nice to let users select a term, i.e., fall, winter, or spring, and only see the courses for that term.
To implement filtering by term, you need some buttons to let users select what term they're picking courses for. Only one term should be selected at a time. Only courses for the selected term should be visible. Initially the fall term should be selected.
You need a state variable for the currently selected term. It should be initialized to the fall term. You will need that state to filter the list of courses, so the state belongs in CourseList.
Localize state as much as possible. In this case, it makes sense to put the code for terms in the CourseList component.
const CourseList = ({courses}) => {
  const [selectedTerm, setSelectedTerm] = useState('Fall');
  ...
Once you have a selected term, you need a way to tell what term a course is in. The sample database has courses in three terms -- fall, winter, and spring The first letter of the course ID -- F, W, or S -- says which term the course is in. This suggests using an object to map letters to terms. From that object, you can also create a list of term names to use to make buttons with.
const termMap = { F: 'Fall', W: 'Winter', S: 'Spring'};
const terms = Object.values(termMap);

const getCourseTerm = course => (
  termMap[course.id.charAt(0)]
);
Now you can use the array filter() method to construct a list of the courses in the selected term.
const CourseList = ({courses}) => {
  const [selectedTerm, setSelectedTerm] = useState('Fall');
  const termCourses = courses.filter(course => selectedTerm === getCourseTerm(course));
  ...
};
Now you need an interface to select the term. This can be done with a row of buttons, one for each term. This is very similar to the list of course buttons. To make these buttons distinct, color them light green.
const TermButton = ({term}) => (
  <TouchableOpacity style={styles.termButton}>
    <Text style={styles.termText}>{term}</Text>
  </TouchableOpacity>
);

const TermSelector = () => (
  <View style={styles.termSelector}>
    {
      terms.map(term => (
        <TermButton key={term} term={term} />
      ))
    }
  </View>
);

const styles = StyleSheet.create({
  ...
  termSelector: {
    flexDirection: 'row',
    justifyContent: 'space-between',
    width: 350,
  },
  termButton: {
    flex: 1,
    borderRadius: 5,
    justifyContent: 'center',
    alignItems: 'center',
    margin: 10,
    height: 40,
    padding: 10,
    minWidth: 90,
    maxWidth: 90,
    backgroundColor: '#4f9f64',
  },
  termText: {
    color: '#fff',
    fontSize: 15,
  },
});
Now you can define CourseList to render the term selector and show only those courses in the current term. Nothing will be interactive yet.
const CourseList = ({courses}) => {
  const [selectedTerm, setSelectedTerm] = useState('Fall');
  const termCourses = courses.filter(course => selectedTerm === getCourseTerm(course));
  return (
    <View>
      <TermSelector />
      <ScrollView style={styles.courseList}>
        { termCourses.map(course => <Course key={course.id} course={course} />) }
      </ScrollView>
    </View>
  );
};
If you run this, you should see only fall courses. Edit the code to make the initial value of the term state 'Winter' or 'Spring'. Verify that you see only those courses.
One problem with this interface is that there's no feedback to let the user know which term is currently selected. To highlight the current selected term in the term selector, pass the selected term as a property to the term selector.
const CourseList = ({courses}) => {
  const [selectedTerm, setSelectedTerm] = useState('Fall');

  const termCourses = courses.filter(course => selectedTerm === getCourseTerm(course));

  return (
    <ScrollView>
      <TermSelector selectedTerm={selectedTerm} />
      { termCourses.map(course => <Course key={course.id} course={course} />) }
    </ScrollView>
  );
};
Change the term selector so that when it generates the term buttons, it passes a flag indicating if the term is selected or not.
const TermSelector = ({selectedTerm}) => (
  <View style={styles.termSelector}>
    {
      terms.map(term => (
        <TermButton key={term} term={term}
          isActive={term === selectedTerm}
        />
      ))
    }
  </View>
);
Finally, change the term button to choose a different style when it is selected. In this case, use a darker shade of green.
const TermButton = ({term, isActive}) => (
  <TouchableOpacity style={styles[isActive ? 'termButtonActive' : 'termButton']}}>
    <Text style={styles.termText}>{term}</Text>
  </TouchableOpacity>
);

const styles = StyleSheet.create({
  ...
  termButtonActive: {
    flex: 1,
    borderRadius: 5,
    justifyContent: 'center',
    alignItems: 'center',
    margin: 10,
    height: 40,
    padding: 10,
    minWidth: 90,
    maxWidth: 90,
    backgroundColor: '#105f25',
  },
  ...
});
You can avoid duplicating style information using normal JavaScript object construction with the spread operator. For example, if you defined a JavaScript constant termButtonBase with the properties that don't change, then you could create the term button and active term button styles with
const termButtonBase = {
  flex: 1,
  borderRadius: 5,
  justifyContent: 'center',
  alignItems: 'center',
  margin: 10,
  height: 40,
  padding: 10,
  minWidth: 90,
  maxWidth: 90,
};

const styles = StyleSheet.create({
  ...
  termButton: {
    ...termButtonBase,
    backgroundColor: '#4f9f64'
  }
  termButtonActive: {
    ...termButtonBase,
    backgroundColor: '#105f25',
  },
  ...
});
With this code in place, nothing is clickable yet, but if you change the initial term value in the call to useState() that term button should be darker than the other term buttons. Verify that.
Now implement changing the selected term by clicking on a term button.
In order for clicking a term button to change the term, you need to pass setSelectedTerm() to the term selector as a prop. The term selector can then pass this function to each term button. On each term button, add an onPress property that calls setSelectedTerm() with the term for that button. onPress() is called when you tap a TouchableOpacity component.
Your updated term selector components look like this:
const TermButton = ({term, setSelectedTerm, isActive}) => (
  <TouchableOpacity style={styles[isActive ? 'termButtonActive' : 'termButton']}
      onPress={() => setSelectedTerm(term)}>
    <Text style={styles.termText}>{term}</Text>
  </TouchableOpacity>
);

const TermSelector = ({selectedTerm, setSelectedTerm}) => (
  <View style={styles.termSelector}>
    {
      terms.map(term => (
        <TermButton key={term} term={term} setSelectedTerm={setSelectedTerm}
        isActive={term === selectedTerm}
        />
      ))
    }
  </View>
);
You have finished term filtering! Clicking a term button should now instantly make that button highlight and all course buttons not for that term disappear. Check that this works on both the web app and a mobile device.
Filtering by course conflicts
The other functionality you need to add is the ability to select courses that have no meeting time conflict. First, you'll need to make your course buttons selectable, similar to the term selector, but allowing for zero or many courses to be selected.
You will need a state variable for the list of currently selected courses. Initially, the state should be an empty list.
const [selected, setSelected] = useState([]);
You will want to highlight courses that have been selected. As with the term selector, you can do that by using a darker color for courses that are in the list of selected courses.
To better localize this state and keep the course list component clean and small, refactor the list of courses out of CourseList into a new component, CourseSelector. After refactoring, put the selected courses state in CourseSelector.
const CourseSelector = ({courses}) => {
  const [selected, setSelected] = useState([]);

  return (
    <View style={styles.courseList}>
      {
        courses.map(course => (
          <Course key={course.id} course={course}
            isActive={selected.includes(course)}
          />
        ))
      }
    </View>
  );
};

const CourseList = ({courses}) => {
  const [selectedTerm, setSelectedTerm] = useState('Fall');

  const termCourses = courses.filter(course => selectedTerm === getCourseTerm(course));

  return (
    <ScrollView>
      <TermSelector selectedTerm={selectedTerm} setSelectedTerm={setSelectedTerm} />
      <CourseSelector courses={termCourses} />
    </ScrollView>
  );
};
Pressing the button for a course should add that course to the list of selected courses if it's not already there. It should remove the course from the list it is there. Be careful! Do NOT mutate the list directly, e.g., by calling delete(). Never mutate state. Instead you need to construct a fresh list of selected items.
To construct a new list with a course added, you can use the array concat() method, but more popular in React programming is to use the spread operator, like this
[...selected, course]
To construct a list with a course removed, use the array filter() method like this
selected.filter(x => x !== course)
These can be used in a function toggle() that adds or removes a course from the selected state:
const toggle = course => setSelected(selected => (
  selected.includes(course) ? selected.filter(x => x !== course) : [...selected, course]
));
Here's the course selector code:
const Course = ({course, isActive, select}) => (
  <TouchableOpacity style={styles[isActive ? 'courseButtonActive' : 'courseButton']}
      onPress={() => { select(course);}}>
    <Text style={styles.courseText}>
      {`CS ${getCourseNumber(course)}\n${course.meets}`}
    </Text>
  </TouchableOpacity>
);

const CourseSelector = ({courses}) => {
  const [selected, setSelected] = useState([]);

  const toggle = course => setSelected(selected => (
    selected.includes(course) ? selected.filter(x => x !== course) : [...selected, course]
  ));

  return (
    <View style={styles.courseList}>
      {
        courses.map(course => (
          <Course key={course.id} course={course}
            select={toggle}
            isActive={selected.includes(course)}
          />
        ))
      }
    </View>
  );
};

const courseButtonBase = {
  flex: 1,
  borderRadius: 5,
  justifyContent: 'center',
  alignItems: 'center',
  margin: 10,
  height: 60,
  padding: 10,
  minWidth: 90,
  maxWidth: 90,
};

const styles = StyleSheet.create({
  ...
  courseButton: {
    ...courseButtonBase,
    backgroundColor: '#66b0ff',
  },
  courseButtonActive: {
    ...courseButtonBase,
    backgroundColor: '#004a99',
  },
  courseButtonDisabled: {
    ...courseButtonBase,
    backgroundColor: '#d3d3d3',
  },
  ...
});
Clicking on a course button should now select it, if it wasn't selected, and unselect it if it was. Verify that the right courses are highlighted when you can click on one or more of them.
Now for the hardest part. When a user selects or unselects a course, you want to disable the buttons for any courses that conflict with any of the selected courses.
To do that, you need a function that can tell us when
a course conflicts with another course, e.g.,
"MTuWF 10:00-11:00" has a conflict with
"TuTh 9:00-10:30.
There are many possible approaches, but all of it is pure JavaScript calculation, unrelated to React. Here's code for one solution, briefly commented. Put this in courseUtils.js. It includes code already defined for getting the term and number for a course, plus the new function hasConflict() that takes a course and list of selected courses, and returns true if the course conflicts with any of the selected courses.
// getCourseTerm(course) => string
//   given a course, returns the term the course is in
//
// getCourseNumber(course) => string
//   given a course, returns its course number
//
// terms -- a variable set to the list of academic terms
const termMap = { F: 'Fall', W: 'Winter', S: 'Spring'};
const terms = Object.values(termMap);


const getCourseTerm = course => (
  termMap[course.id.charAt(0)]
);

const getCourseNumber = course => (
  course.id.slice(1)
)

// addTimes(course) => void
//   given a course with a meeting time, e.g., "MTuWF 9:00-10:30"
//   adds a days value, e.g., ["M", "Tu", "W", "F"]
//     and an hours value, e.g., { start: 540, end: 630 },
//     with start and end in minutes past midnight

const daysPat = /M|Tu|W|Th|F/g;
const timesPat = /(\d\d?):(\d\d) *[ -] *(\d\d?):(\d\d)/;

const addTimes = (course) => {
  course.days = (!course.meets) ? [] : (
    Array.from(course.meets.matchAll(daysPat)).map(m => m[0])
  );

  const [match, hh1, mm1, hh2, mm2] = timesPat.exec(course.meets);
  if (match) {
    course.hours = {
      start: hh1 * 60 + mm1 * 1,
      end: hh2 * 60 + mm2 * 1
    }
  };
}

// hasConflict(course, selected) => boolean
//   given a course and list of courses
//   returns true if course conflicts with any item in selected
//
// courseConflict(course1, course1) => boolean
//   given two courses
//   returns if they are not the same course, occur in the
//     same quarter, have at least one day in common, and
//     the start/end times overlap

const daysOverlap = (days1, days2) => (
  days1 && days2 && days2.some(day => days1.includes(day))
);

const hoursOverlap = (hours1, hours2) => (
  hours1 && hours2 && Math.max(hours1.start, hours2.start) < Math.min(hours1.end, hours2.end)
);

const timeConflict = (course1, course2) => (
  daysOverlap(course1.days, course2.days) && hoursOverlap(course1.hours, course2.hours)
);

const courseConflict = (course1, course2) => (
  course1 !== course2
  && getCourseTerm(course1) === getCourseTerm(course2)
  && timeConflict(course1, course2)
);

// SIDE EFFECT: the first time a course is compared to other courses,
// its meeting times are parsed and added, so that this work
// doesn't need to be done again. Clear the days field if
// changing meeting times.
const hasConflict = (course, selected) => {
  if (!course.days) addTimes(course);
  return selected.some(selection => courseConflict(course, selection))
};

export { getCourseNumber, getCourseTerm, hasConflict, terms }
You just need to make a few changes to App.js>. Import the functions from courseUtils.js and delete the definitions that were moved there. Passed a disabled property to course buttons. Disabled should be true when a course has a conflict.
import React, { useEffect, useState } from 'react';
import { Button, StyleSheet, Text, View } from 'react-native';
import { getCourseNumber, getCourseTerm, hasConflict, terms } from './courseUtils';
...
const Course = ({course, disabled, isActive, select}) => (
  <TouchableOpacity style={styles[disabled ? 'courseButtonDisabled' : isActive ? 'courseButtonActive' : 'courseButton']}
      onPress={() => { if (!disabled) select(course); }}>
    <Text style={styles.courseText}>
      {`CS ${getCourseNumber(course)}\n${course.meets}`}
    </Text>
  </TouchableOpacity>
);

const CourseSelector = ({courses}) => {
  const [selected, setSelected] = useState([]);

  const toggle = course => setSelected(selected => (
    selected.includes(course) ? selected.filter(x => x !== course) : [...selected, course]
  ));

  return (
    <View style={styles.courseList}>
      {
        courses.map(course => (
          <Course key={course.id} course={course}
            select={toggle}
            disabled={hasConflict(course, selected)}
            color={selected.includes(course) ? '#004a99' : '#66b0ff'}
          />
        ))
      }
    </View>
  );
};
Now, when you click on a course, any course that conflicts with it will be disabled. React Native displays disabled button as grayed out. Verify that this works when you select and unselect various courses in any quarter.
You've finished your slice! A user can now select a set of non-conflicting courses for a term. There was a fair bit of code at the end, but most of it was for calculating time conflicts, not React.
Report: Filter slice
Enter the commit for this task on the progress spreadsheet.
Snack for Slice 4
If you don't see both code and preview in the Snack below, trying increasing your browser window size or zooming out.
Slice 5: Add a course detail page
Your goal in this slice is add to your app the ability to get the details of a course. Right now there's just the full title, but you could easily add a course description field, a link to a course home page, and so on.
But first you have to know how to switch pages in an app.
Navigation background
Navigating between pages is a core port of a standard web site. You click on a link and the browser replaces the current page with a new one. You click the back button and the browser returns to the previous page.
Single-page web apps (SPAs) are web pages that simulate this behavior, but don't actually go to different web pages. Instead, clicking on a link or button calls code that changes what you see without leaving the page. This means that JavaScript variables are not reset. Most React apps are single-page web apps.
SPAs use libraries called routers that manage the web browser history so that the browser back button continues to work as expected. They're called routers because they take a URL as input and select a component to display.
There are no URLs and no browser in a React Native app, but most apps do have multiple screens. Therefore, there are navigation libraries for React Native to provide functionality similar to React routers. The recommended navigation library for Expo is React Navigation.
Don't use React Native Navigation. That's a different library that is incompatible with Expo.
Install React Navigation
React Navigation requires a number of other libraries to handle gesture recognition, screen change animation, and such.
expo install react-native-gesture-handler react-native-reanimated react-native-screens react-native-safe-area-context @react-native-community/masked-view
There are two key libraries in React Navigation you need to install.
expo install @react-navigation/native @react-navigation/stack
@react-navigation/native is the core library. @react-navigation/stack provides an API for navigating between separate screens. It's called a stack navigator, because it keeps a history of screen in a stack, just like browser history.
Another useful library is @react-navigation/drawer. This provides an API for opening and closing a "drawer". A drawer is a screen that slides in and out of the main screen.
Refactor your app
Your app is now going to have two screens: the screen with terms and courses, and a new screen with details about a single course. Your current app is going to be one screen, so rename the file App.js to be SchedulerScreen.js. Inside the file, rename the App component to be ScheduleScreen and update the export statement.
Now replace the code in App.js with this:
import React from 'react';
import SchedulerScreen from './SchedulerScreen';

const App = () => {
  return (
    <SchedulerScreen />
  );
};

export default App;
Verify that the code runs just as it used to.
Add navigation to your app
Now generalize your App component so that it can have more than one screen. In React Navigation, you do this by creating an instance of a StackNavigator, and defining screens. It's easiest to understand with an example.
import 'react-native-gesture-handler';
import React from 'react';
import { NavigationContainer } from '@react-navigation/native';
import { createStackNavigator } from '@react-navigation/stack';
import SchedulerScreen from './SchedulerScreen';

const Stack = createStackNavigator();

const App = () => {
  return (
    <NavigationContainer>
      <Stack.Navigator>
        <Stack.Screen name="SchedulerScreen"
          component={SchedulerScreen}
          options={{ title: 'Schedule'}}
        />
      </Stack.Navigator>
    </NavigationContainer>
  );
};

export default App;
This creates a navigation container, with a stack navigator, with one screen -- the scheduler screen. The title will be displayed if needed, e.g., in the browser tab in the web version of the app. The name will be used for navigation.
Add a course details screen
Now make a screen showing the details of one course. This should be a simple vertical list of field labels and field values showing the ID, meeting times, and title of the course.
To simplify specifying fields with labels, define a Field component that takes a label and field and displays them in two Text objects. Put the fields inside a ScrollingView. Put the whole screen inside a SafeAreaView. Add some styles to the fields to make things look nice.
To test this screen, have it default to showing one of the courses. You'll soon see how to use React Navigation to pass data to a component.
Here is one possible solution, with styling.
import React from 'react';
import { SafeAreaView, ScrollView, StyleSheet, Text, View } from 'react-native';

const Field = ({label, value}) => {
  return (
    <View style={styles.fieldContainer}>
      <Text style={styles.label}>{label}</Text>
      <Text style={styles.field}>{value}</Text>
    </View>
  );
};

const CourseDetailScreen = () => {
  const course = {
    "id": "F101",
    "title": "Computer Science: Concepts, Philosophy, and Connections",
    "meets": "MWF 11:00-11:50"
  };

  return (
    <SafeAreaView style={styles.container}>
      <ScrollView>
        <Field label="ID" value={course.id} />
        <Field label="Meeting times" value={course.meets} />
        <Field label="Title" value={course.title} />
      </ScrollView>
    </SafeAreaView>
  );
};

const styles = StyleSheet.create({
  container: {
    flex: 1,
    alignItems: 'center',
    justifyContent: 'center',
    backgroundColor: '#ccccb3'
  },
  field: {
    height: 40,
    width: 300,
    padding: 5,
    backgroundColor: 'white',
  },
  fieldContainer: {
    marginBottom: 20,
    shadowColor: '#000',
    shadowOffset: {
      width: 0,
      height: 2,
    },
    shadowOpacity: 0.23,
    shadowRadius: 2.62,
    elevation: 4,
  },
  label: {
    fontWeight: 'bold',
  }
});

export default CourseDetailScreen;
To test, make the course details screen the first screen listed in App:
const App = () => {
  return (
    <NavigationContainer>
      <Stack.Navigator>
        <Stack.Screen name="CourseDetailScreen"
          component={CourseDetailScreen}
          options={{ title: 'Course detail'}}
        />
        <Stack.Screen name="ScheduleScreen"
          component={SchedulerScreen}
          options={{ title: 'Schedule'}}
        />
      </Stack.Navigator>
    </NavigationContainer>
  );
};
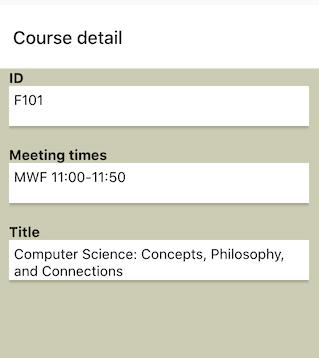
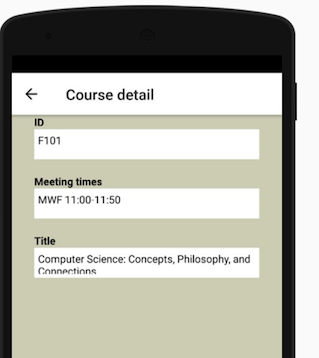
Your app should now look like this:
Now change the order of screens so that SchedulerScreen is the first, or home, screen. It's time to add code to allow using a course button to see the course detail screen.
Each screen component declared in a NavigationContainer is passed two extra properties: navigation and route. The navigation object is used primarily to navigate to other screens and pass data when doing so. The route object is used to get data passed to a component, if any.
First, use the navigation object to define a function in SchedulerScreen to view a particular course. Then you can pass that function to the course button.
The navigation object has a method navigate(name, params) that takes the name of a screen to switch to, and an optional object to pass data to that screen. So the following defines a function to switch to the course detail screen with specific course data:const view = (course) => {
navigation.navigate('CourseDetailScreen', { course });
};
Then you need to pass this function from SchedulerScreen to CourseList:
const SchedulerScreen = ({navigation}) => {
  const [schedule, setSchedule] = useState({ title: '', courses: [] });

  const view = (course) => {
    navigation.navigate('CourseDetailScreen', { course });
  };
  ...
  return (
    <SafeAreaView style={styles.container}>
      <Banner title={schedule.title} error={schedule.error} />
      <CourseList courses={schedule.courses} view={view} />
    </SafeAreaView>
  );
};
CourseList just takes this parameter and passes it to CourseSelector, and CourseSelector passes it to Course.
This pattern of passing a property down a chain of components is called property drilling.
Finally, Course uses this function to switch to the course detail screen when the user does a long press (press and hold) on the course button, rather than a tap.
const Course = ({course, disabled, isActive, select, view}) => (
    <TouchableOpacity style={styles[disabled ? 'courseButtonDisabled' : isActive ? 'courseButtonActive' : 'courseButton']}
        onPress={() => { if (!disabled) select(course); }}
        onLongPress={() => view(course)}>
      <Text style={styles.courseText}>
        {`CS ${getCourseNumber(course)}\n${course.meets}`}
      </Text>
    </TouchableOpacity>
  );
Try it! If you tap a course button, it should select and unselect as usual. But if you press the button for a second or so, the course detail screen should appear, like this (on Android)
Notice the left arrow at the top. That is the back button that React Navigation has added for you automatically.
Unfortunately, no matter which course button you press, you always see the same course. To fix that, you need to get the course date from the route parameter passed to CourseDetailScreen. The changes are few:
const CourseDetailScreen = ({route}) => {
  const course = route.params.course;
...
};
You've finished your slice! A user can now navigate between the main schedue page and seeing details of a particular course.
Report: Details slice
Enter the commit for this task on the progress spreadsheet.
Snack for Slice 5
If you don't see both code and preview in the Snack below, trying increasing your browser window size or zooming out.
Slice 6: Add course editing
Your next big task is to add course editing. Only administrative users should be able to do this, so you need to add code to track the current user. For prototyping, the user will be hard-wired into the code first. Authentication will come later.
Adding users
You clearly need a user state variable. Since this is global data, it makes sense to define it in your top level app.
const App = () => {
  const [user, setUser] = useState();
Since user data might be needed anywhere in the application, it's common to store it in a React context, rather than using prop drilling to pass it down to every component.
You define a React context in a file so that it can be imported in any component that needs it. Only a few lines are needed to define a context. Here's code to define a UserContext.
import { createContext } from 'react';

const UserContext = createContext();

export default UserContext;
There are two ways UserContext is used. First, in the code that creates the data to be stored, you import UserContext. Then you wrap the component UserContext.Provider around the components that might need the data, like this:
...
import UserContext from './UserContext';
...
const App = () => {
  const [user, setUser] = useState();
  ...
  return (
    <UserContext.Provider value={user}>
      <NavigationContainer>
        ...
      </NavigationContainer>
    </UserContext.Provider>
  );
};
Any component that is rendered inside UserContext.Provider can access the data in the value prop.
In particular, SchedulerScreen will need the user to determine who can edit a course and who can just see the details. SchedulerScreen can get the data stored in the context with the following additional code:
import React, { useContext, useEffect, useState } from 'react';
...
import UserContext from './UserContext';
...
const SchedulerScreen = ({navigation}) => {
  const user = useContext(UserContext);
  ...
This sets user to the data specifed in the value prop of UserContext.Provider in the App component. Hence, whenever the user state variable changes, UserContext.Provider will be re-rendered with the new user value, and the code above will get that value.
You will define user roles later. Only administrative users should be able to edit course data. Change SchedulerScreen to decide which screen to navigate to when the user does a long press on a course button, based on the user's role.
This is enough with users for now. Time for you to create a course editor.
Add a course edit screen
Save a copy of CourseDetailScreen.js as CourseEditScreen.js, and rename the component accordingly.
...
const CourseEditScreen = ({ navigation, route }) => {
  ...
}

export default CourseEditScreen;
Add CourseEditScreen to your app's navigation stack.
const App = () => {
  ...
  return (
    <UserContext.Provider value={user}>
      <NavigationContainer>
        <Stack.Navigator>
          ...
          <Stack.Screen name="CourseEditScreen"
            component={CourseEditScreen}
            options={{ title: 'Course Editor'}}
          />
          ...
        </Stack.Navigator>
      </NavigationContainer>
    </UserContext.Provider>
  );
};
Change SchedulerScreen to import CourseEditScreen. Change the view() method to open the editor instead of the detail screen if the user is an admin.
import CourseEditScreen from './components/CourseEditScreen';
  ...
  const SchedulerScreen = ({navigation}) => {
  const user = useContext(UserContext);
  const canEdit = user && user.role === 'admin';
  ...
  const view = (course) => {
    navigation.navigate(canEdit ? 'CourseEditScreen' : 'CourseDetailScreen', { course });
  };
  ...
};
Test! If you long-press a course button, the details screen should open as before. Now change App to initialize the user as someone with the admin role:
const App = () => {
  const [user, setUser] = useState();
...
Now if you long-press, you should see the same screen, but it should be titled "Course Editor".
Create a course editing form
A popular library for forms in React and React Native is Formik. It supports React HTML forms and React Native widgets. With Formik, you define a form with input fields. Formik will maintain an internal object with values for each field. When the user presses the "submit" button, Formik validates the data with rules you give it. If validation fails, Formik gives you the error messages to display. If validation succeesds Formik calls a function you gave it with the form data object.
To make using Formik simpler, I've created some starter code. Follow the instructions there to add this to your app source code, and install the libraries it needs.
To create a form in CourseEditScreen, you need to import Form. Form is both a functional component, and an object that contains components for form elements, such as Form.Button and Form.Field.
Form.Field is used to get user text input. Internally it expands into a View with a Text label and a TextInput. In addition, there are a number of properties to customize the field in this particular form library:
- name is a label for the data, that will be used in creating a values object that can be validated and sent to backend server.
- leftIcon to insert a helpful icon at the start of the field. Expo provides a large number of named icons.
- rightIcon to insert an icon at the end of the field. A common use of this for password fields where you can reveal or hide the password.
- Any property available to TextInput, such as autoCapitalize, autoFocus, and placeHolder.
So, here's a possible form for editing course data:
const CourseEditScreen = ({ navigation, route }) => {
  ...
  return (
    <SafeAreaView style={styles.container}>
      <ScrollView>
        <Form>
          <Form.Field
            name="id"
            leftIcon="identifier"
            placeholder="F110"
            autoCapitalize="none"
            autoFocus={true}
          />
          <Form.Field
            name="meets"
            leftIcon="calendar-range"
            placeholder="MThu 12:00-13:50"
            autoCapitalize="none"
          />
          <Form.Field
            name="title"
            leftIcon="format-title"
            placeholder="Introduction to programming"
          />
        </Form>
      </ScrollView>
    </SafeAreaView>
  );
}
To edit a course, you need to populate the form with the current course data. You should pass the course being edited as a parameter when navigating, just as you did with CourseDetailScreen, so that you can get the course from the route parameter. You then populate a Formik form using the initialValues prop:
const CourseEditScreen = ({ navigation, route }) => {
  const course = route.params.course;

  return (
    <SafeAreaView style={styles.container}>
      <ScrollView>
        <Form
          initialValues={{
            id: course.id,
            meets: course.meets,
            title: course.title,
          }}
        >
        ...
        </Form>
      </ScrollView>
    </SafeAreaView>
  );
}
When a Form.Field value changes, the form code calls the Formik function setFieldValue(name, value to update the values object.
The simplest way to validate form data with Formik is to use the Yup library. Yup lets you create a schema validation object, with rules for each field in your form data.
Validation can not prevent incorrect data, but it should at least prevent storing data that would break other parts of your code. For course, you would want to at least make sure that
- The course ID is a valid term letter, i.e., F, W, or S, followed by a number, e.g., "F110"
- The title is a non-empty string
- The meeting times is a string that has one or more weekdays, i.e., M, Tu, W, Th, F, Sa, Su, followed by a start time and an end time, e.g., "MWF 9:00 - 10:30"
Using Yup, you first create a Yup schema object. The syntax is a bit odd, but designed to make it easy to write rules like the ones above. For rules involving patterns, you can write user-friendly error messages to return if the rule fails.
import * as Yup from 'yup';
...
const validationSchema = Yup.object().shape({
  id: Yup.string()
    .required()
    .matches(/(F|W|S)\d{3,}/, 'Must be a term and 3-digit number')
    .label('ID'),
  meets: Yup.string()
    .required()
    .matches(/(M|Tu|W|Th|F)+ +\d\d?:\d\d-\d\d?:\d\d/, 'Must be weekdays followed by start and end time')
    .label('Meeting times'),
  title: Yup.string()
    .required()
    .label('Title'),
});
Formik has a property for attaching a Yup validation schema:
const CourseEditScreen = ({ navigation, route }) => {
...
return (
Test! At this point, you should be able to change -- but not save -- the course information in the form. If the change is not valid, an error message should appear. Make sure this works in both the web version on the public host and on your device. Push to Github.
Report: Edit form
Enter the commit for this task on the progress spreadsheet.
Snack for Slice 6
If you don't see both code and preview in the Snack below, trying increasing your browser window size or zooming out.
Note: try opening CS 330. It's an example of how the rules can find an error in the existing data. It's a minor problem that doesn't break the code. It's a good example of how validation can find problems in existing data that should be fixed.
Slice 7: Reading data from Firebase
You can't have editable data without a database to save the changes. It's time for you to replace the code that loads data from a static source with code that loads data from a database you can modify.
I like Firebase because it provides three services for free that are commonly needed: a real-time database, authentication, and web hosting. The real-time database automatically notifies your app when data changes.
If you used another service to host the web version of your app, first follow the instructions for creating a Firebase project for your app.
Add the Realtime Database to the project
Go to the Firebase dashboard for the project you created to host your web app. Click on Database on the left. Firebase will suggest Firestore on the right, but scroll down and select Realtime Database. It's simpler to get started with.
When creating the database, select Test Mode when Firebase asks if you want the database to be in locked mode or test mode. Locked mode means only authenticated users can access and change the database. You don't want that yet.
After the database is created, use the import button to upload this data into the database. This is not the same database as before. It has been restructured to follow Firebase guidelines. Courses are stored in an object, under course ID, instead of in an array. This will make it possible to update an individual course later on. You will modify your application code slightly to accept data in this new form.
Register your app with the project
Click on Project Overview on the left. Click on + Add app on the right. Select the web platform, not Android or iOS. Enter a name.
Add Firebase initialization code
Firebase needs a fairly small amount of boilerplate to set things up. Although there are some identification keys, they are not secret. It's fine to have them in files that are checked into Github.
Create a firebase.js file in your project. In it, put the following code:
 as firebase from 'firebase';

import "firebase/database";

const firebaseConfig = {
  get the config object from the Firebase console
};

firebase.initializeApp(firebaseConfig);

export { firebase };
To get the Firebase configuration object, go to the Firebase project dashboard, and click on the gear icon on the top left for the project's settings. Scroll down to where your app is listed on the right and click on its name. Then click on the config radio button. Copy the Firebase config object that is shown. Paste it into the firebase.js code shown above.
Get data from Firebase
You should be all set up now to write code to fetch data from Firebase! The code will replace the code in SchedulerScreen that fetches data from a URL.
At the top of SchedulerScreen.js, import the firebase variable your firebase.js file.
Now add code to subscribe to changes in the database. This is what makes Firebase real time. Your code doesn't fetch data as you do with URLs or queries to an SQL database. Instead, you give Firebase a function to call whenever the database changes. Your function then updates the local state to match what's in the database.
In Firebase, you subscribe to a database db by first getting an object that points to the database.
const db = firebase.database().ref();
This code will point to the root of the entire database. If your database is an object with subparts, e.g.,
{
  members: ...,
  posts: {
    current: ...,
    archived: ...
  },
  events: ...
}
and your code just needs to work with one part, say archived posts, you could do this
const db = firebase.database().ref('posts/archived');
If db is a database reference, then you subscribe to changes in the data by calling db.on(dataHandler, errorHandler) with two functional arguments. Firebase will call dataHandler whenever the database changes. It will pass dataHandler a snapshot object. Snapshots have a val() method that returns the JSON data from the database, if any. Firebase will call errorHandler with an error object if anything goes wrong. The error object has a message property that contains a string with the error message.
In this case you want to set the schedule using the state setSchedule() update function. To avoid changing the code that maps over a list of courses, define a fixCourses() function to replace the Firebase courses object with the list of the courses that the rest of the code expects.
With React, you put code with side effects inside a function that you pass to useEffect(). Subscribing is a side effect so that's where you should put the code to subscribe.
const fixCourses = json => ({
  ...json,
  courses: Object.values(json.courses)
});
...
const SchedulerScreen = () => {
  const [schedule, setSchedule] = useState({ title: '', courses: [] });
  ...
  useEffect(() => {
    const db = firebase.database().ref();
    db.on('value', snap => {
      if (snap.val()) setSchedule(fixCourses(snap.val()))    ;
    }, error => console.log(error));
  }, []);
  ...
};
This code works but is inefficient. Subscribing with on() causes the browser to periodically check the database for changes every few seconds. You don't want to do that if the component using the data is not in the current user interface.
You stop listening by calling db.off(dataHandler) with the same data handler you passed to on().
But how can you tell when a component is no longer being used? It turns out that if you define useEffect() to return a no-argument function, then React will call that function when the component with the useEffect() call is unmounted, i.e., removed from the interface.
This leads to this definition of SchedulerScreen.
const SchedulerScreen = () => {<
  const [schedule, setSchedule] = useState({ title: '', courses: [] });
  ...
  useEffect(() => {
    const db = firebase.database().ref();
    const handleData = snap => {
      if (snap.val()) setSchedule(fixCourses(snap.val()));
    }
    db.on('value', handleData, error => alert(error));
    return () => { db.off('value', handleData); };
  }, []);
  ...
};
This code does what the previous fetch code did, and more. Now, if the course data is changed by any user, handleData() will be called, updating the local state, and re-rendering the interface, with no additional code needed.
Verify that your app still shows the same courses as before.
Notice that there was no need for async or await in the useEffect().
Report: Google login
Enter the commit for this task on the progress spreadsheet.
Slice 8: Authentication with Firebase
Your app can now get data from Firebase, and a user can change that data, but a user can't save the changes. There's not even a save button. For obvious reason, you will want to allow only certain users to change course data.
Authentication has been deliberately left for last. A common mistake that people do when developing a new app is to start with sign up/log. That's misplaced effort. Logging in is not an interesting thing to user test. Start with the part of your app that is new and different.
But now that you have made it possible for someone to edit courses, you need to make sure that only logged in users can do this. Login is called authentication and determining what a user is allowed to do is called authorization.
A popular method is to let users login with Facebook or Google. This approach is user-friendly, but a bit tricky to code. You need to have a developer account with each service you use, register your application with that service, and configure several URLs to enable back and forth communication. Expo has example code for many authentication providers.
To keep things simple for now, use email-based authentication. Firebase provides support for this and the application code is mostly sending form data.
Enable email authentication on Firebase
Go to the Firebase dashboard for your project. Click on Authentication on the left. Click on Sign-in method on the right top. Cick on Email/Password. Don't click "passwordless sign-in". Click Enable. Click Save.
Create a login screen
You need to add some way for users to log in. Some apps have a login screen a user needs to go through before they can even start, but the scheduler only requires log in if the user wants to edit course data.
So add a login button to the scheduler screen. It should appear only if there is no currentUser. Put it in the banner to the right. One way to style that is to make the banner view stretch to the full width of the screen, then make the two subviews (the title and the login button) self-position at the start and end of the banner, respectively.
...
const LoginButton = () => (
  <TouchableOpacity style={styles.loginButton} >
    <Text style={styles.loginText}>Login</Text>
  </TouchableOpacity>
);

const Banner = ({title, user}) => (
  <View style={styles.bannerStyle}>
    <Text style={styles.bannerTextStyle}>{title || '[loading...]'}</Text>
    { !user <LoginButton /> }
  </View>
);
...
const SchedulerScreen = ({navigation}) => {
  ...
  return (
    <SafeAreaView style={styles.container}>
      <Banner title={schedule.title} user={currentUser} />
      ...
    </SafeAreaView>
  );
};
...
const styles = StyleSheet.create({
  ...
  bannerStyle: {
    ...
    alignSelf: 'stretch',
  },
  bannerTextStyle: {
    alignSelf: 'flex-start',
    ...
  },
  ...
  loginButton: {
    alignSelf: 'flex-end',
    borderRadius: 5,
    justifyContent: 'center',
    alignItems: 'center',
    margin: 10,
    height: 20,
    padding: 10,
    minWidth: 90,
    maxWidth: 90,
    backgroundColor: '#63b5cf',
  },
  loginText: {
    alignSelf: 'center',
    color: '#fff',
    fontSize: 10,
  },
  ...
Add Firebase authentication code
Add the following import to firebase.js:
...
  import 'firebase/auth';
This extends firebase to include the firebase.auth submodule. No additional exports are needed.
You listen for Firebase authentication events, by passing a function to firebase.auth().onAuthStateChanged(). That function will be called with a user object, whenever a user is authenticated or signed out. So, add code in App.js to update the state variable currentUser appropriately:
const App = () => {
  const [currentUser, setCurrentUser] = useState();

  useEffect(() => {
    firebase.auth().onAuthStateChanged((user) => {
      setCurrentUser(user);
    });
  }, []);
  ...
Adding authorization
Authentication determines who the user is. It's up to the app to determine what that user is authorized to do. Typically this is done using role-based authorization. You associate users with roles, and then the roles determine what the user can do. For the course scheduler app, you could have some users are departmental administrators, and allow only adminstrators to edit course data.
If currentUser is a Firebase user object, then currentUser.uid is a unique user ID maintained by Firebase. You can use this ID in your database to add additional information about users, including any role they might have, into your database, using the Firebase console.
{
  "title": "CS Courses for 2018-2019",
  "users": {
    "firebase-user-uid": {
      "role": "admin",
      ...
    }
    ...
  }
  ...
Data like this should definitely be used on the back end when writing Firebase security rules to guarantee data can be changed only by authenticated users with a given role.
On the front-end, you could add role data to the user object with a useEffect() function to query Firebase with the user ID, once it's known. E.g.,
const App = () => {
  const [currentUser, setCurrentUser] = useState(null);
  const addUserData = (data) => {
    setCurrentUser(currentUser => ({
      ...currentUser,
      ...data
    }))
  };
  ...
  useEffect(() => {
    if (user && user.uid) {
      const db = firebase.database().ref('users').child(user.uid);
      const handleData = snap => {
        addUserData(snap.val());
      }
      db.on('value', handleData, error => alert(error));
      return () => { db.off('value', handleData); };
    }
  }, [user]);
  ...
Then you could use the user role to determine whether a user sees the course edit screen.
Add email-based login
The Expo documentation provides on how to authenticate with various services. This is mostly boilerplate code, with a few bits of data that you get from either Firebase or the authentication service.
One really nice feature of React is the ability to refactor code like this into a reusable custom hook that is independent of any specific user interface design. I have created a hook useGoogleSignIn() to sign into Firebase with Google. To use the hook with your login button takes just a few lines of additional code.
...
import useGoogleSignIn from './useGoogleSignIn';
...
const [request, response, signin] = useGoogleSignIn(your web client id>);
 ...
const LoginButton = () => {
 return (
    <TouchableOpacity style={styles[request ? 'loginButton' : 'loginButtonDisabled']} >
      <Text style={styles.loginText} onPress={signin}>Login</Text>
    </TouchableOpacity>
  );
};
You pass useGoogleSignIn() your project's web client ID. You'll see where to get this ID shortly. A good place to store this ID is in a variable that you export from your firebase.js:
const webClientId = 'your web client id';
export { firebase, webClientId };
useGoogleSignIn() returns a list of three items:
- An AuthRequest object: This is a dynamic state variable. You can't log in until it becomes non-null, so test for that in your user interface.
- AuthSessionResult object: This contains information about the result of calling the request. It can be handy when errors occur.
- The function to call to try signing into Firebase using Google. If this function succeeds, the Firebase authentication state will change, and your authentication listener will be called.
Here is my custom hook code. It is based on two sources: the Expo Google for Firebase code, and Evan Bacon's code. They use slightly different protocols. I've had more luck with Bacon's version.
First, you need to install two packages:
expo install expo-auth-session expo-web-browser
Then create the file useGoogleSignIn.js with this code.
import { useEffect } from 'react';
import { Platform } from 'react-native';
import * as WebBrowser from 'expo-web-browser';
import { makeRedirectUri, ResponseType, useAuthRequest, useAutoDiscovery } from "expo-auth-session";
import firebase from "firebase/app";

WebBrowser.maybeCompleteAuthSession();
const useProxy = Platform.select({ web: false, default: true });
const discovery = useAutoDiscovery("https://accounts.google.com");

const useGoogleSignIn = (clientId) => {
  const googleId = clientId.split('.')[0];
  const [request, response, promptAsync] = useAuthRequest(
    {
      responseType: ResponseType.Token,
      clientId,
      redirectUri: makeRedirectUri({
        // For usage in bare and standalone
        native: `com.googleusercontent.apps.${googleId}:/oauthredirect`,
        useProxy,
      }),
      scopes: ["openid", "profile"],
      usePKCE: false,
    },
    discovery
  );

  useEffect(() => {
    if (response && response.type === "success") {
      const { access_token } = response.params;
      const credential = new firebase.auth.GoogleAuthProvider.credential(null, access_token);
      firebase.auth().signInWithCredential(credential);
    }
  }, [response]);

  const signin = () => { promptAsync({ useProxy }); };

  return [request, response, signin];
};

export default useGoogleSignIn;
This is complicated code, with many low-level details. A few points are worth noting:
- It uses an embedded web browser object to let the user sign into the service without letting the app see or steal password information. This is why you use Firebase and Google's web client API for interacting with the service, not the native Android or iOS APIs.
- The function promptAsync(), returned by the useAuthRequest hook, opens the web browser. It, and hence signin which calls it, can only be called in response to user input, e.g., a button press. This is a security measure to avoid an app surreptitiously logging a user in to some web site.
- When the response state variable changes, the useEffect() will be called. If the response was successful, it uses the access token returned by Google to sign into Firebase.
Configure Firebase
The code above won't work until you configure Firebase and Google on the back end. Third-party authentication is a multi-step exchange of information between your app, the user, and the authentication service. To use any service, you have to have a developer account, register your app with the service, and specify several URLs -- called redirect URLs, that the service will use to communicate with your app. Similar steps have to be done for every authentication service.
Fortunately, you and your app are already known to Firebase. You just have to tell it that you want to support authentication using Google.
- Go to your project page on Firebase
- Select Authentication on the left
- Select Sign-in method on the top
- Select Google from the list of sign-in providers
- Click Enable
- Enter a valid email address
- Click Save
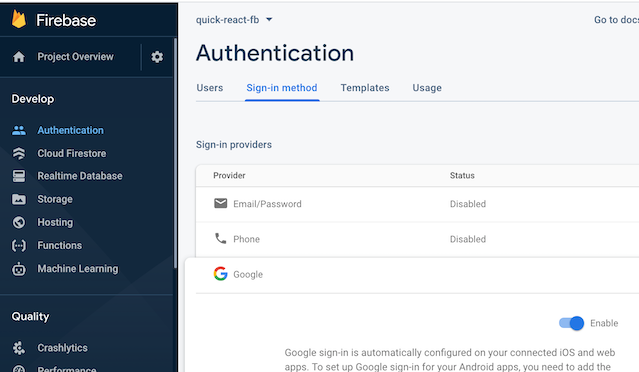
Get your web client ID
This is a good time to set your web client ID variable.
- Select the Google sign-in provider again.
- Click on Web SDK Configuration to open up a sub-panel.
- Copy the web client ID and store it as a string whereever you are defining your web client ID variable.
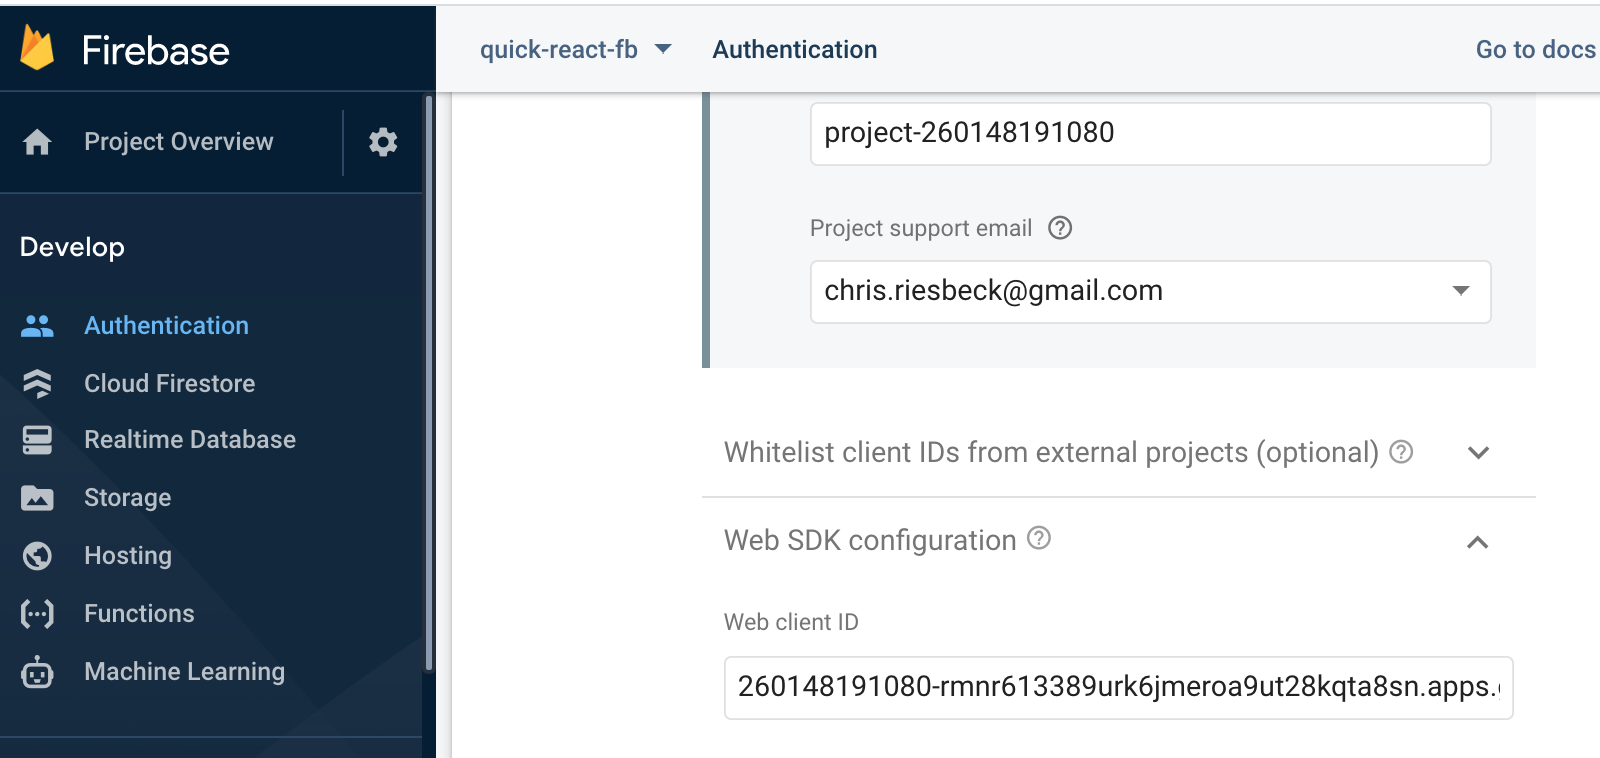
Configure Google
The steps above tell Firebase to accept Google credentials for your app. Now you have to configure Google to communicate with your app to get those credentials.
- Go to the Google API console https://console.developers.google.com/. Log in if necessary.
- Select your Firebase project from the dropdown menu at the top.
- Click Credentials on the left.
- Scroll down to OAuth 2.0 Client Ids.
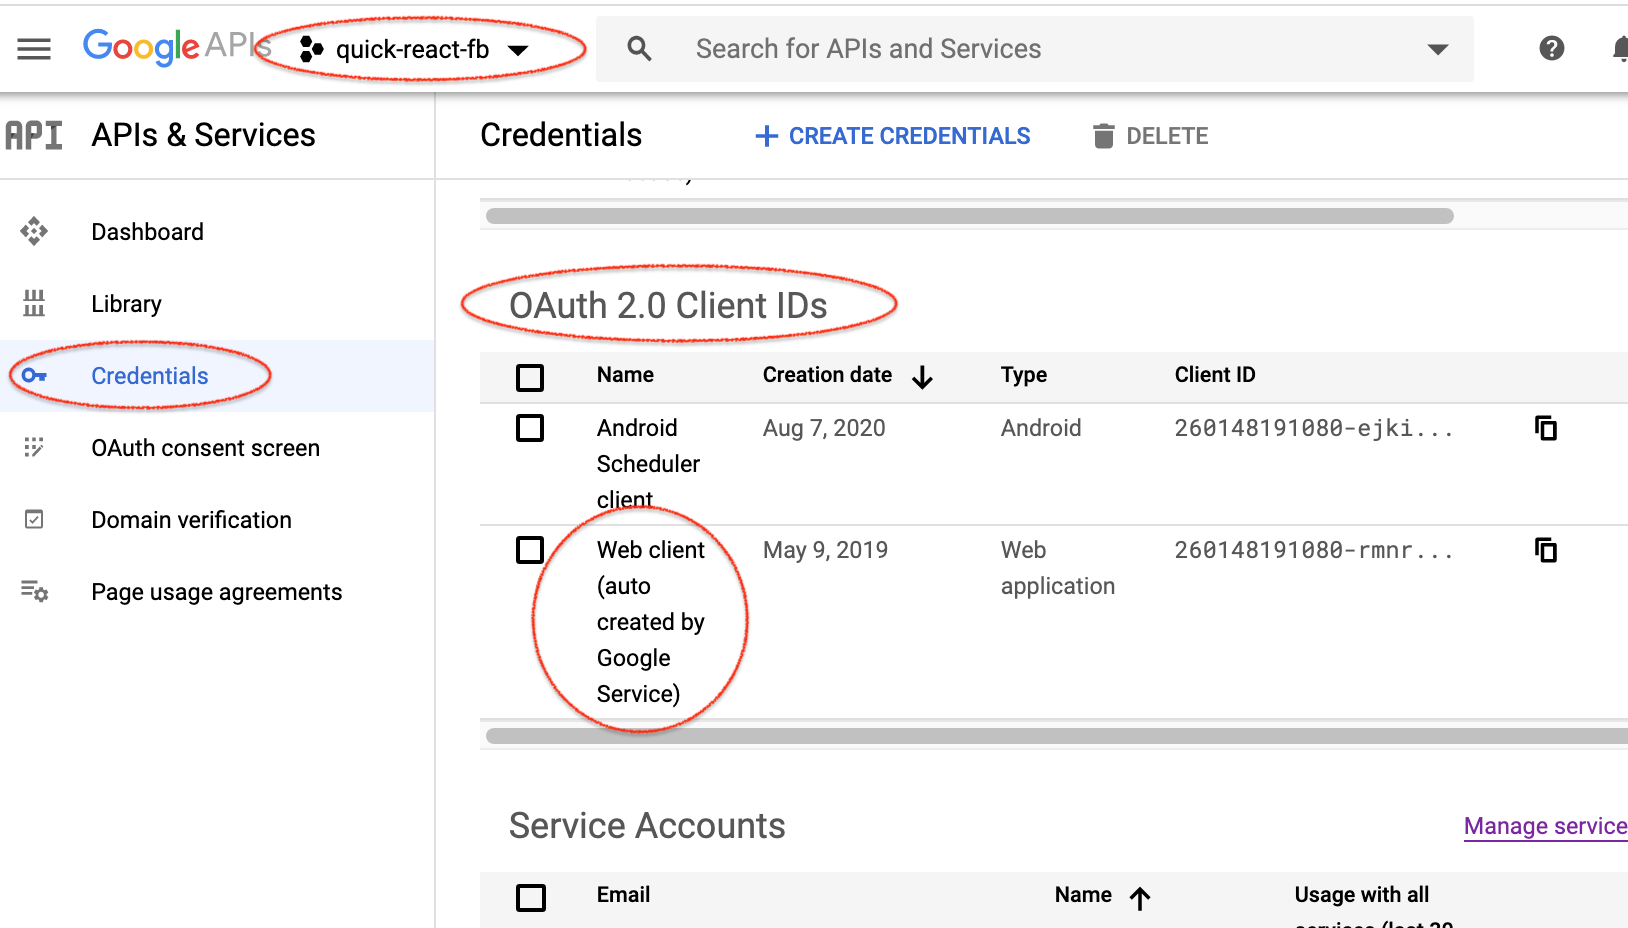
Click on "Web client" to open the URL configuration page.
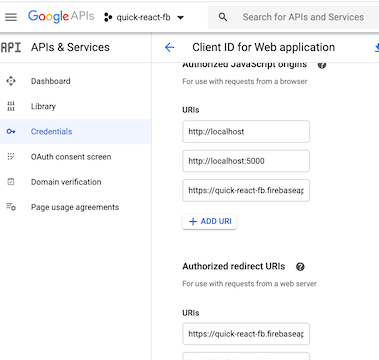
Add two URLs under URIs:
- https://localhost:19006
- https://auth.expo.io
Add two URLs under Authorized redirect URIs:
- https://localhost:19006
- https://auth.expo.io/@yourname/your-app -- where yourname is your Expo account name, e.g., mine is "chrisriesbeck", and your-app is your app name, e.g., "Scheduler".
Be careful. If any of these URLs are incorrect, authentication will fail with a message about bad redirect URLs.
Report: Login slice
Enter the commit for this task on the progress spreadsheet.
Slice 9: Storing data on Firebase
Implement saving changes
Saving the data requires adding a button to your form to save the data, and code to actually store the data on Firebase.
Typically in React Native, to make a button do something, you add an onPress property to it, with a function to call. Formik uses a different convention. You add a function to the form to call when the form is submitted. That function is passed a key-value data object with the values from the form. For example, to print the values object on the console:
const CourseEditScreen = ({ navigation, route }) => {
  ...
  return (
    <SafeAreaView style={styles.container}>
      <ScrollView>
        <Form
          ...
          onSubmit={values => console.log(values)}
        >
You can add a Form.Button to the form. This just takes a title property, for the text to show in the button. When pressed, the button calls the submit function you attached to the form, if there are no validation errors.
const CourseEditScreen = ({ navigation, route }) => {
  ...
  return (
    <SafeAreaView style={styles.container}>
      <ScrollView>
        <Form
          ...
        >
          ...
          <Form.Button title={'Update'} />
        </Form>
      </ScrollView>
    </SafeAreaView>
    );
  };
Storing data on Firebase
It's finally time to save the data. Firebase has the four ways to save data. Of those, set() makes the most sense here, because you are just storing update course data for a course ID.
You need to import your Firebase object, get the reference to the courses part of your database, and set the child with the course ID to the course data. If the child ID does not already exist, Firebase will add it.
In addition, you should always let the user know if Firebase sent an error message. To do that, you need to create a state for a submission error, and display it in a Form.ErrorMessage at the bottom of the form.
import { firebase } from '../utils/firebase';
...
const CourseEditScreen = ({ navigation, route }) => {
  const course = route.params.course;
  const [submitError, setSubmitError] = useState('');

  async function handleSubmit(values) {
    const { id, meets, title } = values;
    const course = { id, meets, title };
    firebase.database().ref('courses').child(id).set(course).catch(error => {
      setSubmitError(error.message);
    });
  }

  return (
    <SafeAreaView style={styles.container}>
      <ScrollView>
        <Form
          initialValues={{
            id: course.id,
            meets: course.meets,
            title: course.title,
          }}
          validationSchema={validationSchema}
          onSubmit={values => handleSubmit(values)}
        >
          ...
          <Form.Button title={'Update'} />
          {<Form.ErrorMessage error={submitError} visible={true} />}
        </Form>
      </ScrollView>
    </SafeAreaView>
  );
  };
Saving data to Firebase will send the changed data back to all appropriate listeners. That will cause the listeners to update the local state, which will triggering re-rendering affected components. There is no need to write explicit code to update the interface.
Your slice is done! You now have a working database and Google-based authentication. While there was a fair amount of code, almost all of it was for the user interface or business logic, not for managing changes in the database or user status.
Report: Data update slice
Enter the commit for this task on the progress spreadsheet.
Slice 10: Modularization
To keep things simple, you've put all your code in App.js. At this point, it's about 200 lines of code. It's overdue for refactoring into independent files. Refactoring dramatically simplifies code editing. There's less to look at when changing a file. There's less chance a team mate will be editing the same file, causing a merge conflict. There's more code that can be re-used in other projects.
Refactoring code into modules has two steps:
- Moving the code from the current file(s) into a new file
- Adding the necessary export and import declarations so that the code still works
Note: it's best to stop and restart your local server when you change the directory strucure of your app.
Refactor Firebase setup
Firebase is used in several components, to authenticate, and to manage persistent data. Access to Firebase is encapsulated in your code in a single variable firebase. It's common to put utility code into a separate directory, e.g., src/shared or src/utilities. So let's refactor the code to set up Firebase into shared/firebase.json.
The code you want to move out of App.js is this:
import firebase from 'firebase/app';
import 'firebase/auth';
import 'firebase/database';

const firebaseConfig = {
  apiKey: "...",
  authDomain: "...",
  databaseURL: "...",
  projectId: "...",
  storageBucket: "....",
  messagingSenderId: "...",
  appId: "..."
};

firebase.initializeApp(firebaseConfig);
You move this code into src/shared/firebase.js. This breaks all the code in
App.js that refers to the firebase variable, i.e., every
occurrence of firebase.database().ref() and firebase.auth().
Since you just need to export one variable, you can fix this by adding
export default firebase;
to the end of src/shared/firebase.js, and
import firebase from './shared/firebase'
to the start of src/App.js.
If you put firebase.js in the same directory as App.js be sure to write
import firebase from './firebase';not
import firebase from 'firebase';The latter will import from the Firebase module, not your file.
Refactor CourseList
Because it is so big, the component CourseList is a good candidate to pull out of App.js. It's standard convention to put components into the directory src/components.
In this case, you want to move into the file src/components/CourseList.js:
- the component function CourseList
- all the functions that CourseList calls, including any components it renders, like Course, and
- all the imports this code needs
Export CourseList at the end:
export default CourseList;
In App.js, remove everything not needed, including imports of functions not in App.js anymore, and add
import CourseList from './components/CourseList';
at the top.
Save your changes and verify that your code still works. The new App.js should be much simpler now.
Refactor Course
The next biggest component to refactor is the course component in CourseList.js. Repeat the above process to create a src/components/Course.js file, with all the code and imports that the Course function needs. Add the export and import needed to src/components/Course.js and src/components/CourseList.js. The file App.js should not need any changes.
Save and verify that everything still works.
Component subdirectories
To illustrate one more common component pattern, you'll move all the functions in Course.js that check for date and time conflicts into a separate times.js module. Since this code is only needed by the course component, a common approach is to make a component subdirectory rather than a file. Then you can store the time handling code in that subdirectory.
Remember to restart your local React server for this kind of change to take effect.
To do this:
- Create the subdirectory src/components/Course.
- Move Course.js into the new subdirectory.
- Refactor the JavaScript functions for meeting times into a new file src/components/Course/times.js.
You need several import and export declarations to connect everything together. At the end of src/components/Course/times.js, add
export { getCourseNumber, getCourseTerm, hasConflict };
At the start of src/components/Course/Course.js, add
import { getCourseNumber, getCourseTerm, hasConflict } from './times';
Finally, create a new file, src/components/Course/index.js, with just the following line of code:
export { default } from './Course';
The last step is a shorthand way to import Course into index.js and then export it. When the React build tool sees import ... from 'components/Course', it look for code in either src/components/Course.js or src/components/Course/index.js. This is why you should not add .js to your imports, i.e., don't do this:
import Course from 'components/Course;
Save and verify that your app still works. Now the course file is less than 20 lines long, and times.js is about 40.
You'll see applications that put component code directly into the index.js file. That works, but means that when you are editing multiple component files, all your tabs will say "index.js". Using files named for the component avoids that problem.
Further modularization would depend on your needs. A more actively edited file benefits from refactoring more than a file that's never touched.
Wrap Up
You've come to the end of this tour of modern React programming. You've seen functional components, styling, handling state, managing persistent data, and authentication. You've seen modern JavaScript techniques for defining functions, for destructuring and constructing objects. Both React and JavaScript emphasize small single-task components and functions, and minimal global state. The only global variables you used were for static constants.
Notice all the things you didn't need. Unlike a vanilla JavaScript or jQuery application, you didn't write any code to modify the page. You just updated state variables. Unlike previous versions of React, you didn't define any classes, you didn't define any lifecyle methods like componentDidMount or componentWillUpdate, and you never once worried about the this variable.
I've deliberately avoided many useful topics, such as higher order components, routing, and Redux. I've focused on the React and JavaScript concepts essential to begin writing clean manageable dynamic apps.
There's much more to learn, but it's time to explore on your own. For starting points, I recommend:
- Do the Learn React task, to work through a more substantial example, with Firebase data access and updating and authentication. It's a good way to test your understanding of basic React ideas.
- Take a look at React Old and New for discussion of how new React differs from old, since many resources online still use the old approach.
Happy Reacting!