
Welcome
This follow-along tutorial covers most of the features React web apps need, including a database and authentication. It uses functional components, JSX, Bootstrap, and Firebase for hosting, database, and authentication. It does not use JavaScript classes, lifecycle methods, a state manager like Redux, or higher-order components.
If you have not looked at React before, see this short list of basic concepts.
Prerequisites
It is assumed you know basic HTML, CSS, and JavaScript.
It is assumed you know how run commands in a terminal shell. For MacOS, use the Terminal application. For Windows, use Git Bash, which is installed when you install git. This Unix-like command shell is better than using the built-in cmd or PowerShell tools.
You need to have git installed and a Github account.
You need a Google account that provides access to Firebase. Some Google accounts, such as those provided for educational purposes, are not given Firebase access. You can test by visiting the Firebase home page. If your school Google account doesn't work, create a personal one.
You need an editor that supports React development. A good editor can save hours of time. An up to date list of good choices is here.
I recommend Visual Studio Code. VS Code runs identically on MacOS, Windows, and Linux. That makes it very nice for teams with different development machines.
Visual Studio Code is not the same as Visual Studio! The latter is more complex and designed more for Microsoft software development.
Set up
Install Node
Node is a scripting environment, like Python or Ruby, but based on the JavaScript language. You want to have the latest long-term release. That's version 18 at the moment.
Installing Node also installs npm for adding Node libraries to React applications, and npx, a tool for running tools, like degit, without permanently installing them.
Start a React app project
For this tutorial, we're making a course planning app that identifies and avoids for time conflicts when selecting classes. To create the initial directory for this application, do the following terminal commands in a directory you use for coding projects.
mkdir scheduler
cd scheduler
npx degit criesbeck/react-vitest
npm install
This command creates a new directory with the given app name. In that directory it puts an initial set of React files and scripts, and a .gitignore file that will keep git from storing literally thousands of Node libraries on github.
Test to make sure everything installed correctly and runs.
cd scheduler
npm start
This starts a local web server and launches your browser on an index.html page that vite created. After a few seconds, a web page should appear with the animated React logo. This verifies that your React installation is working.
Create a Github repo
Stop your app in the command shell with control-C.
Go to Github and create a repository for your app. Follow these instructions for creating a remote repository for existing code. Do NOT create the default README or .gitignore files. They will be wrong. The steps above already created the correct files.
Go public
You need to host your web page on a server for testing, showing to users, etc. It's good to do this as early as possible. You don't want to spend hours or days building something only to discover it doesn't work when deployed.
Firebase is used for hosting this tutoria. It's free, simple, and you'll need Firebase for other services later. Other options include Github Pages, AWS, and Heroku.
Follow these instructions to create a project on Firebase to host your web app. Some points to pay attention to:
- Use the global -g option to install firebase-tools.
- Specify build when firebase init asks what the public directory is.
- Say no when Firebase asks about adding Github Actions.
-
Don't forget to do
npm run buildbefore deploying.
Verify that you see your React app running at the URL that Firebase gives you.
Report progress
Congratulations! You have created and deployed a React application. Commit your code changes, push them to Github, and update your status report. Then move on to the next task.
Change the app title
Right now, the title of your app is "React App". That's what appears in the browser tab for your app and in a bookmark for this page. Let's change that to show a more helpful title.
Re-start your local server with
npm startLeave the local server running while you work. As you edit and save files, React will detect the changes and reload the app. If you make a mistake, you'll quickly see error messages in the terminal console, the browser, and/or the browser's developer console.
The title of a web page is in the index.html. For React apps, the source for that file is in the public directory. Unlike classic web apps, there is almost no code in index.html. You rarely need to edit it, other than to change the page title.
Open public/index.html in your editor and change the title to "CS Course Scheduler".
This new title should show up locally as soon as you save. Verify that that happened.
public/index.html is actually a template file.
That's why you see things like %PUBLIC_URL% in it.
When you do npm run build, this template file
is modified to contain the actual HTML for your application,
as generated by your React JavaScript code.
Report progress
Congratulations! You have edit and deployed changes to your React application. Commit your code changes, push them to Github, and update your status report. Then move on to the next task
Change page contents
We're going to write a simple React app to help pick computer science courses that don't conflict in meeting time. We'll do this in tiny slices that make something new happen on-screen in every step.
Unlike static HTML pages, React apps are typically driven by data. HTML is generated by JavaScript from the data. The most common format for that data is a JavaScript object, usually stored in JSON (JavaScript Object Notation) in a file or database.
To get things started, we'll make a data object with a title, and write just enough React code to print the title.
import React from 'react';

const schedule = {
  title: "CS Courses for 2018-2019"
};
By default, React is set up to run code in the file src/App.js to generate the HTML.
Open that file and you'll see the code that currently shows the React "atom". Replace the entire contents of src/App.js with this code instead:
import React from 'react';

const schedule = {
  title: "CS Courses for 2018-2019"
};

const App = () =>  (
  <div>
    <h1>{ schedule.title }</h1>
  </div>
);

export default App;
Verify that your app has changed to show the text "CS Courses for 2018-2019".
The first line of the code makes React available to our JavaScript. The last line makes the function App available to any script that imports this file, such as this line at the top of src/index.js.
import App from './App';
There is nothing special about the name App. It is just a common default.
The rest of our code in src/App.js defines a variable schedule with our data, and the function App that returns the HTML to display the title. App is defined using JavaScript's modern arrow function expresssion syntax.
The function App returns HTML using React's JSX feature. JSX lets us write HTML directly, and insert JavaScript values as needed inside curly braces. I.e., to create a div element containing an h1 element containing our schedule title:
<div>
  <h1>{ schedule.title }</h1>
</div>
Scripts installed with React translate the JSX into regular JavaScript code to build the actual HTML.
Build and deploy to Firease. Verify that you see your changes there.
Report progress
Congratulations! You have edit and deployed changes to your React application. Commit your code changes, push them to Github, and update your status report. Then move on to the next task
Show a list of courses
Of course, what we really want to display are the courses. That will need a loop. We could write it in App, but it would better to refactor App into two new components, passing each one just the data it needs:
- A banner component to show the title
- A course list component to show the courses
Components are just functions to create bits of HTML. We can invent as we need them to organize our React code and keep things clean.
The following code for App.js defines a data object with a few courses, and redefines the App component to generate HTML with two new components: a banner and a component list. We'll give the code for those shortly.
import React from 'react';

const schedule = {
  "title": "CS Courses for 2018-2019",
  "courses": {
    "F101" : {
      "id" : "F101",
      "meets" : "MWF 11:00-11:50",
      "title" : "Computer Science: Concepts, Philosophy, and Connections"
    },
    "F110" : {
      "id" : "F110",
      "meets" : "MWF 10:00-10:50",
      "title" : "Intro Programming for non-majors"
    },
    "S313" : {
      "id" : "S313",
      "meets" : "TuTh 15:30-16:50",
      "title" : "Tangible Interaction Design and Learning"
    },
    "S314" : {
      "id" : "S314",
      "meets" : "TuTh 9:30-10:50",
      "title" : "Tech & Human Interaction"
    }
  }
};

const App = () =>  (
  <div>
    <Banner title={ schedule.title } />
    <CourseList courses={ schedule.courses } />
  </div>
);

export default App;
Our new App creates two component: Banner and CourseList. It passes the title to the banner and the list of courses to the course list, using HTML attributes.
Component names must be capitalized, so React can tell them apart from normal HTML such as div and span.
<Banner... /> is HTML shorthand for <Banner ...></Banner>. All JSX elements must be explicitly closed, one way or the other.
Component are just functions you define to return JSX. When React sees a component in JSX, it calls the function with the same name. Whatever the function returns replaces the component in the JSX that called it.
More on functional components.
When React sees this JSX
<Banner title={ schedule.title } />
it collects the attributes into a props object, and passes that object to the function. So React will call the function Banner with the object
{ "title": "CS Courses for 2018-2019" }We could define Banner like this:
const Banner = props => (
  <h1>{props.title}</h1>
)
But modern JavaScript lets you use destructuring syntax to get the values you want from an object. This makes the parameter list explicit about what the function expects to receive.
const Banner = ({ title }) => (
    <h1>{ title }</h1>
  );
If you forget the curly braces in the parameter list and write
const Banner = (title) =>  (
  <h1>{ title }</h1>
);
you will get the error "Objects are not valid as a React child" when you load the page.
The CourseList component is passed an object with course IDs and course data. You can get an array of just the values with
Object.values(courses)
In modern JavaScript, the common way to loop over an array is with mapping methods, such as map and filter.
React lets a function return a list of components (JSX or HTML), so our code can look like this:
const CourseList = ({ courses }) => (
  <div>
  { Object.values(courses).map(course => <Course course={ course } />) }
  </div>
);
Now we need to decide how to render a Course component. A single course value looks like this:
{
  "id": "F101",
  "title": "Computer Science: Concepts, Philosophy, and Connections",
  "meets": "MWF 11:00-11:50"
}
For now, we can render this as a simple div. Instead of the cryptic "F101" It would be better to have the term "Fall" and the course number "101". Defining utility functions to get the term and number from the ID leads to this code for the Course component:
const terms = { F: 'Fall', W: 'Winter', S: 'Spring'};

const getCourseTerm = course => (
  terms[course.id.charAt(0)]
);

const getCourseNumber = course => (
  course.id.slice(1, 4)
);

const Course = ({ course }) => (
  <div>
    { getCourseTerm(course) } CS { getCourseNumber(course) }: { course.title }
  </div>
);
This produces a page that looks like this:

If you look in the browswer console, you will see a warning about elements in a list without keys. The reason is a bit technical but the fix is to add a key attribute to the component we are making a list of. The value needs to be a unique, unchanging ID. That's easy in this case.
const CourseList = ({ courses }) => (
  <div>
    { Object.values(courses).map(course => <Course key={course.id} course={ course } />) }
  </div>
);
Build and deploy. Verify that you see your React app running correctly on Firebase.
Report progress
Congratulations! You have a working app that takes data about a list of courses and displays them on a web page. Commit your code changes, push them to Github, and update your status report. Then move on to the next task.
Style the app
Our data is displaying, but the page is not very pretty. Time to add some simple but nice styling.
There are two common ways to style React apps.
- Use CSS classes from a CSS library like Bootstrap or MaterialUI
- Use a library that defines React components incorporating these styles
We'll use the first approach with Bootstrap 5. A popular alternative for styled components is React Bootstrap It's popular and well-documented. However it does add an extra layer of complexity to the rendered HTML.
There are two steps to adding Bootstrap. First, install the library:
npm install bootstrapSecond, in src/index.js, replace
import './index.css';which imports React's default CSS with Bootstrap's
import 'bootstrap/dist/css/bootstrap.min.css';Importing CSS is an extension of import provided by the tools React installs. More on importing CSS and images.
If you do this, you should already see a slight change in the app, as the default fonts change. But what would be really nice, since the courses are going to be items you can click on later, is to have the courses appear as a grid of boxes.
To get boxes, make each course a Bootstrap card. Cards have title and body text, which is all we need for now.
const Course = ({ course }) => (
  <div className="card">
    <div className="card-body">
      <div className="card-title">{ getCourseTerm(course) } CS { getCourseNumber(course) }</div>
      <div className="card-text">{ course.title }</div>
    </div>
  </div>
);
You have to write className instead of class in JSX because class is reserved for another purpose in JavaScript.
Now we want to lay the cards out left to right, in a way that is responsive to the width of the screen. Bootstrap, using CSS flex, lets you specify relative card sizes for different screen sizes, but this is a bit tedious. A simpler alternative is to define a CSS class using a CSS grid layout.
Define the following in src/App.css:
.course-list {
  display: grid;
  grid-template-columns: repeat(auto-fill, minmax(12rem, 17rem));
}
This creates equal-height rows with as many columns as naturally fits on the current screen size. Cards will be shrink to 12 letters wide or expand to 17, whichever fits bets.
You can delete all the other CSS that was initially put into App.css.
Import the CSS at the top of src/App.js if it is not already being imported.
import './App.css';Add the class to CourseList.
const CourseList = ({ courses }) => (
  <div className="course-list">
  { Object.values(courses).map(course => <Course key={course.id} course={ course } />) }
  </div>
);
To get nice page margins, put the entire app inside a container.
const App = () =>  (
    <div className="container">
      <Banner title={ schedule.title } />
      <CourseList courses={ schedule.courses } />
    </div>
  );
Try this. You should see the cards appear left to right, top to bottom. Try making your browser window bigger and smaller, or open the browser developer console and switch to "responsive" view. You should see the number of cards per row change to fit the available space.
The layout is a little tight. There is no margin between the cards, and no padding around the text inside the cards. Bootstrap provides utility CSS classes for margin, e.g., m-1 and m-2, and padding, e.g., p-1 and p-2. These are imported with the Bootstrap CSS file in App.js. Here's one possible combination.
const Course = ({ course }) => (
  <div className="card m-1 p-2">
    <div className="card-body">
      <div className="card-title">{ getCourseTerm(course) } CS { getCourseNumber(course) }</div>
      <div className="card-text">{ course.title }</div>
    </div>
  </div>
);
At this point, your interface should look like this:

Experiment with other values. When you're happy with the look, you are done with this slice!
When you're happy with the layout, build and deploy. Verify that everything looks correct on Firebase.
Report progress
Congratulations! You have styled your React app with Bootstrap. Commit your code changes, push them to Github, and update your status report. Then move on to the next task.
Fetch data
Getting data for components
Now that we have a schedule state variable, we need to fetch some data to put into it. I have put our data at the URL
'https://courses.cs.northwestern.edu/394/guide/data/cs-courses.php'
This URL can be fetched from any server, including your local test server, without getting a CORS exception.
Fetching JSON data can be done by calling the built-in function fetch(url) to get a response object. The response object can be checked to see if it has data. If it does, we call response.json() to parse that data.
Both fetch(url) and response.json() are asynchronous functions. That means that they need to be called using async and await, to take allow our code to use the data returned when it eventually arrives, without making the browser stop and wait.
Here's code using async and await to get the schedule JSON data.
const fetchSchedule = async () => {
  const url = 'https://courses.cs.northwestern.edu/394/guide/data/cs-courses.php';
  const response = await fetch(url);
  if (!response.ok) throw response;
  return await response.json();
};
It's important to understand that this function does not return JSON data. It returns a promise to return JSON data. If you did something like
console.log(fetchSchedule())
you would not see a JSON object printed. You would see a Promise object. To get the JSON value, fetchSchedule() itself has to be called inside an await.
The next problem is how to call fetchSchedule(). You do not want to do this:
const App = () => {
  const schedule = fetchSchedule();
  return (
    <div className="container">
      <Banner title={ schedule.title } />
      <CourseList courses={ schedule.courses } />
    </div>
  );
};
This is broken in two ways. First, fetchSchedule() returns a promise, not a schedule. The app needs to wait for the data using await, which means App would need to be async, and we'd need to set schedule to some temporary initial value.
On top of that, fetchSchedule() would be called every time the component is re-rendered. Almost any change will cause React to run all the component functions to calculate what needs to be displayed. It does this very quickly, but we need to be careful not to run code like network calls to fetch data every time this happens.
In short, we need a way to initialize the schedule to some default empty value, update the schedule asynchronously when the data eventually arrives over the network, make sure the component is re-rendered when that happens so the data appears, but make sure to not fetch data every time the component is re-rendered.
This programming situation occurs frequently in React apps. To address it, React provides the functions useState() and useEffect(). These functions are called hooks because they hook into internal data structures managed by React. These hooks are described later in the section on state. But we don't have to use them directly. The react-query library uses those tools to meet the above requirements and more. It
- caches data locally to avoid unnecessary reloads
- signals when data is still being loaded
- signals when there was an error loading data
npm install react-queryIn App.js, import the following components
import { QueryClient, QueryClientProvider, useQuery } from "react-query";/pre>
To use React Query, you create a QueryClient to manage your data, then provide it to your app comonents by wrapping them inside a QueryClientProvider component. To keep the app content clearly separated from boilerplate like this, it pays to move our app content into a separate component, e.g., Main. Then we can wrap it inside a QueryClientProvider like this:
const Main = () =>  (
  <div className="container">
    <Banner title={ schedule.title } />
    <CourseList courses={ schedule.courses } />}
  </div>
);

const queryClient = new QueryClient();

const App = () => (
  <QueryClientProvider client={queryClient}>
    <Main />
  </QueryClientProvider>
);
Our Main component needs to get the course data. fetchSchedule() will get that data, but it is asynchronous. We need give React some default HTML to start with. Furthermore, we should show an error message if a problem occurs during fetching,
React Query provides a custom hook useQuery() that we can use to call fetchSchedule() and handle all of these outcomes. It takes two arguments: some unique key to label the data, and a function to call to get the data. useQuery() returns an object with various fields describing the state of the data fetch process. We just need three fields:
- data: the data fetched; null if no data available yet
- isLoading: true is the data is still loading, false if loading is complete
- error: an error object if someething went wrong; null if there is no error
Modify Main to use object destructuring to get these three pieces of data with useQuery(). The data field is stored in the variable schedule to match our previous code.
const Main = () =>  {
  const { schedule: data, isLoading, error } = useQuery({
    queryKey: ['schedule'],
    queryFn: fetchSchedule
  });

  return (
    <div className="container">
      <Banner title={ schedule.title } />
      <CourseList courses={ schedule.courses } />}
    </div>
  );
};
This code is not complete. It needs two extra lines to test if the data is being loaded or if there was a probem.
const Main = () =>  {
  const { schedule: data, isLoading, error } = useQuery({
    queryKey: ['schedule'],
    queryFn: fetchSchedule
  });

  if (error) return <h1>{error}</h1>;
  if (isLoading) return <h1>Loading the schedule...</h1>

  return (
    <div className="container">
      <Banner title={ schedule.title } />
      <CourseList courses={ schedule.courses } />}
    </div>
  );
};
The code for fetching data from the Firebase Realtime Database is slightly different. See the section on using Firebase with Hooks.
This code should work now. Test! Verify that the full schedule is loaded and displayed.
When everything is working locally, build, deploy, and verify that everything still works on Firebase.
Report progress
Congratulations! You have added asynchronous data fetching to your React app. Commit your code changes, push them to Github, and update your status report. Then move on to the next task.
Filter by term
Time to implement the interactive part of our course scheduling tool. First, implement filtering by term. A user should be able to click buttons for Fall, Winter, or Spring, to show just the courses for that term. Exactly one term should be selected and displayed at a time. Initially the fall term should be selected.
First, add a component to the interface for selecting the term. We could add it to the App or to the CourseList component. Since the app includes the title and maybe many other things, the course list seems like a better place.
const CourseList = ({ courses }) => (
  <>
    <TermSelector />
    <div className="course-list">
    { Object.values(courses).map(course => <Course key={course.id} course={ course } />) }
    </div>
    </>
);
JSX syntax only allows one component to be returned. The empty element syntax <> is a way to return several components as one, without creating an unnecessary HTML element, such as a div.
Our term selector can just be a group of buttons, one for each term. We can get the term names using JavaScript's Object.values() function on our global terms data object.
Object.values(terms) // returns ["Fall", "Winter", "Spring"]
The term selector is a row of buttons. In Bootstrap, the CSS class btn-group can be used to make a row of butons.
const TermSelector = () => (
  <div className="btn-group">
  {
    Object.values(terms)
      .map(value => <TermButton key={value} term={value} />)
  }
  </div>
);
We could implement a TermButton as a button, but using the more accurate radio button would lead to clearer guidance by screenreaders. The HTML for Bootstrap radio buttons is messy but can be copied and adapted easily. Note the use of m-1 p-2 to add some spacing.
const TermButton = ({term}) => (
  <>
    <input type="radio" id={term} className="btn-check" autoComplete="off" />
    <label class="btn btn-success m-1 p-2" htmlFor={term}>
    { term }
    </label>
  </>
);
In JSX, you have to use htmlFor in a label instead of for because for is a reserved word in JavaScript.
Create a term state variable
The next thing we need to do is add code so that when the user selects a term, only the courses for that term are displayed. In early JavaScript programming, this kind of things was usually done having a button click call a function to modify the HTML showing on the page. This is why such pages were called dynamic -- the HTML on them changed based on user actions.
Unfortunately as pages become more complex and support more user actions,
such web page manipulation code becomes very hard to maintain and extend.
React was designed to support developing complex dynamic web pages.
In React, you don't write code to modify HTML directly. Instead, you write
code to store values in state variables, e.g., to store
'Winter' in the state variable term.
Every time any state variable changes, the React system "reacts" and updates
the web page, changing just what needs to change and nothing more.
Don't confuse React state with persistent data. React state is temporary user interface state. React state is persistent over re-rendering, but disappears if you reload the page.
In React, you create a state variable with the function useState(). You need to import it at the top of your App.js file.
import React, { useState } from 'react';
useState() is called a hook, because it hooks into the internals of the React system. How it works is complicated, but using it is not.
You call useState(value) inside a component to create a local state variable for that component, with value as its initial value. useState(value) returns an array with two element: the current value of the state variable, and a function to call to change that value.
Let's create a state variable for the term, inside CourseList,
with the initial
value Fall.
const CourseList = ({ courses }) => {
  const [term, setTerm] = useState('Fall');
...
This code uses
array destructuring to assign the array items returned
by useState() to
the variables term and setTerm respectively.
term will have the string value Fall.
setTerm will have a function to call
to set the state variable to a new value.
For now, let's use term to filter courses for the selected term.
We can filter the courses by term using JavaScript's array filter() method:
const CourseList = ({ courses }) => {
  const [term, setTerm] = useState('Fall');
  const termCourses = Object.values(courses).filter(course => term === getCourseTerm(course));

  return (
    <>
      <TermSelector />
      <div className="course-list">
      { termCourses.map(course => <Course key={course.id} course={ course } />) }
      </div>
    </>
  );
};
If you run this, you should see only fall courses. If you change the initial value to 'Winter' or 'Spring', you should see only those courses. Make sure that's true.
Now we'd like to highlight the current term. We need to pass the term as a property to the term selector.
const CourseList = ({ courses }) => {
  const [term, setTerm] = useState('Fall');
  const termCourses = Object.values(courses).filter(course => term === getCourseTerm(course));

  return (
    <>
      <TermSelector term={term} />
      <div className="course-list">
      { termCourses.map(course => <Course key={course.id} course={ course } />) }
      </div>
    </>
  );
};
We want the term selector to highlight the button for the selected term. The HTML attribute checked indicates if a button is checked. Bootstrap highlights checked radio buttons and React lets you specify checked with a boolean value. So we can update our term selector code as follows:
const TermButton = ({term, checked}) => (
  <>
    <input type="radio" id={term} className="btn-check" autoComplete="off"
      checked={checked} />
    <label class="btn btn-success m-1 p-2" htmlFor={term}>
    { term }
    </label>
  </>
);

const TermSelector = ({term}) => (
  <div className="btn-group">
  {
    Object.values(terms).map(value => (
      <TermButton key={value} term={value} checked={value === term} />
    ))
  }
  </div>
);
Verify that the button for whatever term is currently the default is a different color than the other terms.
Now implement selecting a term. To do that, we need to pass setTerm to the term selector.
const CourseList = ({ courses }) => {
  const [term, setTerm] = useState('Fall');
  const termCourses = Object.values(courses).filter(course => term === getCourseTerm(course));

  return (
    <>
      <TermSelector term={term} setTerm={setTerm} />
      <div className="course-list">
      { termCourses.map(course => <Course key={course.id} course={ course } />) }
      </div>
   </>
  );
};
Change the term selector code so that clicking a term button sets the term to the appropriate value.
const TermButton = ({term, setTerm, checked}) => (
  <>
    <input type="radio" id={term} className="btn-check" checked={checked} autoComplete="off"
      onChange={() => setTerm(term)} />
    <label class="btn btn-success m-1 p-2" htmlFor={term}>
    { term }
    </label>
  </>
);

const TermSelector = ({term, setTerm}) => (
  <div className="btn-group">
  {
    Object.values(terms).map(value => (
      <TermButton key={value} term={value} setTerm={setTerm} checked={value === term} />
    ))
  }
  </div>
);
In HTML, the attribute is onchange. In JSX, attributes are camel-cased, so onChange is used. More on event handlers.
This finishes the slice. Clicking a term button should now instantly make that button highlight and all courses not for that term disappear.
When everything is working locally, build, deploy, and verify that everything still works on Firebase.
Report progress
Congratulations! You have added interactive filtering to your React app. Commit your code changes, push them to Github, and update your status report. Then move on to the next task.
Filter by time conflicts
The other thing we want to do is make it impossible for a user to select courses that conflict, i.e., overlap in time. We'll do that by disabling all course buttons that conflict with courses selected so far.
To do that, we need a trackable state variable for the list of currently selected courses. That's easy.
const CourseList = ({ courses }) => {
  const [term, setTerm] = useState('Fall');
  const [selected, setSelected] = useState([]);
  const termCourses = Object.values(courses).filter(course => term === getCourseTerm(course));

  return (
    <>
      <TermSelector term={term} setTerm={setTerm} />
      <div className="course-list">
      {
        termCourses.map(course =>
          <Course key={ course.id } course={ course }
            selected={selected} setSelected={ setSelected }
          />)
      }
      </div>
    </>
  );
};
Two things have to change in Course. Selected courses should be highlighted, and clicking a course should select or unselect it.
We have to be careful when selecting and unselecting. State values should be immutable. That is, code should never destructively modify a state value. A new state should be constructed instead.
To select a course, we should create a new list of selected courses that includes the course. To unselect a course, we should create a new list of selected courses that omits the course. Define a function to create these new lists using the spread operator and the array method filter.
const toggle = (x, lst) => (
  lst.includes(x) ? lst.filter(y => y !== x) : [x, ...lst]
);
To implement selecting a course by clicking on it, we add an onClick handler:
const Course = ({ course, selected, setSelected }) => {
  const isSelected = selected.includes(course);
  return (
    <div className="card m-1 p-2"
      onClick={() => setSelected(toggle(course, selected))}>
      <div className="card-body">
        <div className="card-title">{ getCourseTerm(course) } CS { getCourseNumber(course) }</div>
        <div className="card-text">{ course.title }</div>
      </div>
    </div>
  );
};
Determining if a course is selected and should be highlighted is easy.
selected.includes(course)Highlighting can be done by computing a a style object whose keys and values specify CSS properties. For hyphenated CSS properties, like background-color, use camelcase keys, like backgroundColor. The values should be strings.
So, to set the background color of a Course to light green if it is selected and white if it is not.
const isSelected = selected.includes(course);
const style = { isSelected ? '#B0E5A4' : 'white' };
Putting the above into the Course component gives this code:
const Course = ({ course, selected, setSelected }) => {
  const isSelected = selected.includes(course);
  const style = {
    backgroundColor: isSelected ? 'lightgreen' : 'white'
  };
  return (
    <div className="card m-1 p-2"
      style={style}
      onClick={() => setSelected(toggle(course, selected))}>
      <div className="card-body">
        <div className="card-title">{ getCourseTerm(course) } CS { getCourseNumber(course) }</div>
        <div className="card-text">{ course.title }</div>
      </div>
    </div>
  );
};
Now you should see courses highlight and unhighlight as you select them.

Now for the tricky part. When we select a course, we want to disable any courses that conflict with the course just selected. Since the meeting time is now going to be important, add code to display meeting time for each course.
const Course = ({ course, selected, setSelected }) => {
  const isSelected = selected.includes(course);
  const style = {
    backgroundColor: isSelected ? 'lightgreen' : 'white'
  };
  return (
    <div className="card m-1 p-2"
      style={style}
      onClick={() => setSelected(toggle(course, selected))}>
      <div className="card-body">
        <div className="card-title">{ getCourseTerm(course) } CS { getCourseNumber(course) }</div>
        <div className="card-text">{ course.title }</div>
        <div className="card-text">{ course.meets }</div>
      </div>
    </div>
  );
};
Now we need to define a function hasConflict(course, selected) that can tell us when a course conflicts with a set of selected courses.
const hasConflict = (course, selected) => (
  selected.some(selection => courseConflict(course, selection))
);
The function courseConflict(course1, course2) should return true if the courses are in the same term and overlap on some day and time. To calculate that efficiently over and over, we need a better data structure than a string like "TuTh 10:00-11:20". We will parse meeting strings for each course into a more structured form. For example, we will parse "TuTh 10:00-11:20" into
{ days: "TuTh" hours: { start: 600, end: 680 } }
The days have been separated out, and the start and end times have been converted into minutes from midnight. The following function does this, using a regular expression for the hard part:
const meetsPat = /^ *((?:M|Tu|W|Th|F)+) +(\d\d?):(\d\d) *[ -] *(\d\d?):(\d\d) *$/;

const timeParts = meets => {
  const [match, days, hh1, mm1, hh2, mm2] = meetsPat.exec(meets) || [];
  return !match ? {} : {
    days,
    hours: {
      start: hh1 * 60 + mm1 * 1,
      end: hh2 * 60 + mm2 * 1
    }
  };
};
To avoid constantly re-parsing the meeting strings, we'll add the new fields to each course when the courses are first fetched, using Object.fromEntries to create a new object from an old one, and the spread operator to add new key-value pairs to each object.
const mapValues = (fn, obj) => (
  Object.fromEntries(Object.entries(obj).map(([key, value]) => [key, fn(value)]))
);

const addCourseTimes = course => ({
  ...course,
  ...timeParts(course.meets)
});

const addScheduleTimes = schedule => ({
  title: schedule.title,
  courses: mapValues(addCourseTimes, schedule.courses)
});
We can call addScheduleTimes() in fetchSchedule().
const fetchSchedule = async () => {
  const url = 'https://courses.cs.northwestern.edu/394/guide/data/cs-courses.php';
  const response = await fetch(url);
  if (!response.ok) throw response;
  return addScheduleTimes(await response.json());
};
Now we can define our courseConflict() functions:
const days = ['M', 'Tu', 'W', 'Th', 'F'];

const daysOverlap = (days1, days2) => (
  days.some(day => days1.includes(day) && days2.includes(day))
);

const hoursOverlap = (hours1, hours2) => (
  Math.max(hours1.start, hours2.start) < Math.min(hours1.end, hours2.end)
);

const timeConflict = (course1, course2) => (
  daysOverlap(course1.days, course2.days) && hoursOverlap(course1.hours, course2.hours)
);

const courseConflict = (course1, course2) => (
  getCourseTerm(course1) === getCourseTerm(course2)
  && timeConflict(course1, course2)
);
With hasConflict defined, a Course is disabled if it is not selected but conflicts with the currently selected courses. A disabled course should
- display in some way that shows it is disabled
- not be selected if clicked on
To appear disabled, make the card gray. To prevent selecting a disabled course, test for being disabled before adding the onClick handler.
const Course = ({ course, selected, setSelected }) => {
  const isSelected = selected.includes(course);
  const isDisabled = !isSelected && hasConflict(course, selected);
  const style = {
    backgroundColor: isDisabled? 'lightgrey' : isSelected ? 'lightgreen' : 'white'
  };
  return (
    <div className="card m-1 p-2"
      style={style}
      onClick={isDisabled ? null : () =>  setSelected(toggle(course, selected))}>
      <div className="card-body">
        <div className="card-title">{ getCourseTerm(course) } CS { getCourseNumber(course) }</div>
        <div className="card-text">{ course.title }</div>
        <div className="card-text">{ course.meets }</div>
      </div>
    </div>
  );
};
When selection and conflict catching is working, build, deploy, and verify that everything is working on Firebase.
Report progress
Congratulations! You have implemented some complex business logic. Commit your code changes, push them to Github, and update your status report. Then move on to the next task.
Modularize the code
To keep things simple, we've put all our code in App.js. At this point, it's about 150 lines of code. It's overdue for refactoring into independent files. Refactoring dramatically simplifies code editing. There's less to look at when modifying a component. There's less chance a team mate will be editing the same file, causing a merge conflict. It's easier to reuse components in other projects.
Refactoring code into modules has two basic steps:
- Move the code from the current file(s) into a new file
- Add the necessary export and import declarations so that the code still works
There are many ways to organize React source code files. There are numerous web pages describing different approaches. For this small app, we'll do something simple, and create two subdirectories in src:
- a components directory where files that define individual components go
- a utilities directory where JavaScript code goes that defines utility functions not specific to React components
Note: it's best to stop and restart your local server when you change the directory strucure of your app.
Refactor the time utility code
A fair amount of the code in App.js is the code to parse the information about courses, such as meeting times, and calculate meeting conflicts. Let's refactor this code into a times.js file in the utilities subdirectory.
First, create the file src/utilities/times.js. Then move hasConflict and everything it needs out of App.js and into times.js. Include data constants like terms and days.
This will break App.js because now several functions are undefined. Make a note of what those are. Export them from times.js, by adding export to their declarations, e.g.,
export const hasConflict = ...
Then import them into App.js, using a relative pathname that leads from App.js to times.js.
import { hasConflict, ... } from './utilities/times.js';
More on different ways to export names from a file.
Restart your app and verify that it still works.
Refactor CourseList
Because it is the biggest component, the component CourseList is a good candidate to pull out of App.js. It's standard convention to put all components into a subdirectory called components. So create the file src/components/CourseList.js and in it put
- the component function CourseList
- all the functions that CourseList calls, including any components it renders, like Course, and
- all the imports any of this code needs
By convention, components are normally the default export for a component file. That means you export them this way, at the end of the file:
export default CourseList;
and import it into App.js like this in,
import CourseList from './components/CourseList';
Note that there are no curly braces around CourseList.
Remove from App.js any imports that are no longer needed. React and VS Code will tell you about unused imports.
Save your changes and verify that your code still works.
Refactor Course
The next biggest component to refactor is the Course component in CourseList.js. Repeat the above process to create a src/components/Course.js file, with all the code and imports that the Course function needs.
Make Course the default export from Course.js and import it into CourseList:
import Course from './Course.js';
Notice that since Course is in the same directory as CourseList, the relative path does not specify the components directory.
The file App.js should not need any changes. The refactoring of CourseList has no effect on App.js.
Save and verify that everything still works.
This slice is done! Further modularization would depend on your needs. In general, you should refactor into separate files large components and a large amounts of utility code.
Build, deploy, and verify that everything still works without error on Fireabase.
Report progress
Congratulations! You have modularized your React app. Commit your code changes, push them to Github, and update your status report. Then move on to the next task.
Read from a database
The code so far is fine for apps that just need to retrieve data from some source, like Yelp or IMDB, but many apps need to maintain their own database. In this step, we add a backend cloud database to our app. Cloud databases make sense, especially when prototyping, because they are easy to use and free for modest amounts of data and network traffic.
We'll use Firebase since our app already has a Firebase project for hosting.
Add a database to your backend Firebase project
Go to the Firebase web console. Click on the card for your project. On the left side, click on Database. On the right side, where it offers several options, scroll until you see Realtime Database. Select that.
When Firebase asks about security, put the database in Test Mode. This lets anyone read and write to your data. Firebase only allows this mode for a relatively short period of time. To see your security rules, click on the Rules tab. You should see this.
{
  "rules": {
    ".read": true,
    ".write": true
  }
}
You will change these rules later in the authentication task.
The Realtime Database is simple -- the database is just one big JSON object -- and supports real-time notifications of changes to the data. Initially it is empty. You can use the console to import a file with some initial JSON data.
Download the JSON test data to a local file.
On the Firebase web console. click on Realtime Database on the left. Click on the Data tab. Click on the vertical three-dot menu and select Import JSON. Follow the instructions.
Verify that the data successfully imported and you can browse it on the web console.
Add the Firebase package
You have already installed the Firebase CLI, i.e., firebase-tools. To use the database functions in your code, you need to install the Firebase library. To make using Firebase easier in React, also install react-firebase-hooks.
npm install firebase react-firebase-hooksThe API for Firebase version 9 is quite different than Firebase version 8. The same concepts and code are there, but the way you call the code is different. The reasons and differences ar summarized here. Until version 9 is in commonly use, we show code for both versions below.
Add code to initialize Firebase
To keep the code modular, Firebase initialization should go into a separate file, like src/utilities/firebase.js. The boilerplate for importing Firebase, including the database library, looks like this:
import { initializeApp } from 'firebase/app';
import { getDatabase, onValue, ref, set } from 'firebase/database';

const firebaseConfig = {
  apiKey: "...",
  authDomain: "...",
  databaseURL: "...",
  projectId: "...",
  storageBucket: "....",
  messagingSenderId: "...",
  appId: "..."
};

const firebase = initializeApp(firebaseConfig);
const database = getDatabase(firebase);
You get firebaseConfig from the Firebase web console.
- Click on your project.
- Click on the "gear" icon in the upper left and select Project settings.
- Click on the General tab.
-
Scroll down to the Your apps
section, and click on the web app you registered for this
project.
- If you haven't registered a web app, do so now by clicking Add app.
- On the right, click the config radio button under SDK setup and configuration.
- Copy the JavaScript code you see there into firebase.js as shown above.
Fetching data from Firebase
Fetching data from Firebase can be done similarly to how data was fetched using fetch. There are several important differences.
- You access the data with a database reference not a URL.
- With the Realtime Database, you don't just get the data. Instead, you subscribe to the data, by giving Firebase a function to call when the data changes.
A database reference is like a URL, but refers to some part of the JSON data stored in your realtime database. A reference (but no actual data) is created with
ref(database, path)where database is the variable holding your Firebase database object, and path refers to some part of your JSON object. For example, in the following references
| Reference | What data is referenced |
|---|---|
| ref(database) | The entire database |
| ref(database, '/') | The entire database |
| ref(database, '/schedule') | The data under the key schedule |
| ref(database, '/schedule/title') | The title of the schedule |
| ref(database, '/schedule/courses') | The courses in the schedule |
More about Firebase database references.
In Firebase, you normally subscribe to a database. That means you pass Firebase a function to be called every time the data at the end of some path changes. This is an incredibly useful feature. It lets you write applications where multiple users can be updating shared data and every user's interface will up to date, with very little coding on your part.
The React Query library contains an extension to make getting data from Firebase very similar to fetching data from a URL.
npm install @react-query-firebase/databaseImport a hook named useDatabaseValue from React Query.
import { useDatabaseValue } from "@react-query-firebase/database";This function is passed three argument:
- a key to label the data, just as with useQuery()
- a Firebase database reference
- an options object
Like useQuery(), useDatabaseValue returns an object with the data and other information. For our purposes, we'll use the same values as we used with useQuery():
- data: the JSON retrieved from Firebase, when available
- isLoading: true the data is being loaded
- error: an error object, if an error occurred
To keep the Firebase-specific code in one place, define a useData() function in the file firebase.js to get the data stored at a given Firebase path. It should take two arguments: the path to retrieve and an optional function to apply to the data when it is retrieved. That's so we can apply addScheduleTimes() to the data fetched.
useData() should subscribe to the database, i.e., it should re-run whenever the data on Firebase changes.
export const useData = (path, transform) => {
  const { data, isLoading, error } = useDatabaseValue([path], ref(database, path), { subscribe: true });
  const value = (!isLoading && !error && transform) ? transform(data) : data;

  return [ value, isLoading, error ];
};
Some notes about this code:
- Because it calls a hook function, it too must be a hook, so its name must begin with use, as per the rules of hooks.
- It uses the database path itselfs as the key to label the data returned.
- Because it is subscribing to the database, it specifies subscribe: true in the options object passed to useDatabaseValue.
- It sets value to transform(data) if the data has been loaded and transform is defined, otherwise it sets value to data.
- Because it returns just three values all of which will be needed by any code that calls useData(), it returns the values in array for easier renaming.
In App.js, import useData
import { useData } from './utilities/firebase.js';In Main, replace the call to useQuery() with a call to useData(). Because an array of values is returned, it's easier to name the variables as we want them.
const Main = () => {
  const [schedule, loading, error] = useData('/schedule', addScheduleTimes);
  ...
};
This code does what the previous fetch code did, and more. Now, if the course data is changed on Firebase by anyone, including ourselves, schedule will be updated and React will automatically re-render the page, with no additional work on our part.
Report progress
Build, deploy, and verify that the app still works without error on Fireabase.
Congratulations! You have added a live database to your React app. Commit your code changes, push them to Github, and update your status report. Then move on to the next task.
Add an edit page
Let's add the ability to edit course information. To this we need to add a new page to our app to hold a form for editing course data. In a classic web site, this would mean adding a new HTML file. But we don't want to do that with a React app. Loading a new file would reload all JavaScript code and re-initialize all JavaScript data, include all React state.
For this reason, React apps are normally single-page web apps, with just one file. A single-page web app simulates changing pages by using JavaScript to hide and show content. In a React app, we would build a component for each page, and hide or show the entire component.
This is works but has a problem: the URL is not updated to indicate what page the user is viewing. That means that browser actions like going backward and forward don't work, and reloading the app will send the user back to the default page.
Add routes
Routing libraries are designed to make it easier to make single-page web apps behave like classic web sites. A React routing library lets you define URLs for React components that render different pages or screens. Here's an example in React Router v6 of a small business accouting app with a dashboard summary screen, an expenses screen, and an invoices screen:
<App>
  <BrowserRouter>
    <Routes>
      <Route path="/" element={<Dashboard />} />
      <Route path="/expenses" element={<Expenses />} />
      <Route path="/invoices" element={<Invoices />} />
    </Routes>
  </BrowserRouter>
</App>
There are three components involved in routing.
-
Route defines a route, i.e., a mapping
between a URL path and a component. The above maps the
URL
/expensesto the componentExpenses. The first route, with the empty path/, is used when no path is given. - Router selects which component to render, based on the current URL. It picks the component of the route whose path best matches the current URL. Roughly that means the route with the longest path that matches.
-
BrowserRouter manages the browser's window information,
i.e., what's stored in
window.locationandwindow.history.
We want two routes for our web app:
-
The default route,
/, to show our course list. -
An
/editroute to show the edit form.
First, create a placeholder page for the edit form.
const EditForm = () => {
  return (
    <h1>Course Edit Form</h1>
  );
};

export default EditForm;
Now install React Router.
npm install react-router-dom@6Import the routing components and our edit form in App.js:
import { BrowserRouter, Routes, Route } from "react-router-dom";
import EditForm from './EditForm';
Change the code in Main so that the course list
is shown by default and our edit form is shown when the URL
is /edit.
const Main = () => {
  ...
  return (
    <div className="container">
      <Banner title={ schedule.title } />
      <BrowserRouter>
        <Routes>
          <Route path="/" element={<CourseList courses={ schedule.courses } />} />
          <Route path="/edit" element={ <EditForm /> } />
        </Routes>
      </BrowserRouter>
    </div>
  );
};
Test! Start the app. It should run and display the course list. Now
add /edit to the URL in the browser's address field. You
should see the placeholder edit form.
Add navigation
Now let's add the ability to edit a specific course by double-clicking on the appropriate course card in the course list. HTML supports an onDoubleClick attribute. You can test it with this change to the Course component:
const Course = ({ course, selected, setSelected }) => {
  ...
  return (
    <div className="card m-1 p-2"
        style={style}
        onClick={isDisabled ? null : () =>  setSelected(toggle(course, selected))}
        onDoubleClick={() => alert('double click')}>
      ...
    </div>
  );
};
Note that if you double-click an element with both onClick and onDoubleClick handlers, first the onClick handler will be called, which selects the course, then the onDoubleClick handler is called. If you want the double click to override the single click ,see use-double-click.
To do programmatic navigation in React Router, you use the hook useNavigate(). This hook returns a function. You pass that function a route URL. Change the double-click handler to navigate to the edit form placeholder.
import { BrowserRouter, Routes, Route, useNavigate } from "react-router-dom";
...
const Course = ({ course, selected, setSelected }) => {
  const navigate = useNavigate();
  ...
  return (
    <div className="card m-1 p-2"
        style={style}
        onClick={isDisabled ? null : () =>  setSelected(toggle(course, selected))}
        onDoubleClick={() => navigate('/edit')}>
      ...
    </div>
  );
};
Test! Double-click a course card. The edit placeholder should appear. Click the browser back button. The course list should re-appear.
Define an edit form
Now we can define an edit form in EditForm.js. The code below uses Bootstrap's form styles for a simple but clean layout.
const EditForm = () => {
  return (
    <form>
      <div className="mb-3">
        <label htmlFor="title" className="form-label">Course title</label>
        <input className="form-control" id="title" />
      </div>
      <div className="mb-3">
        <label htmlFor="meets" className="form-label">Meeting time</label>
        <input className="form-control" id="meets" />
      </div>
      <button type="submit" className="btn btn-primary">Submit</button>
    </form>
  )
};

export default EditForm;
Test! Double-click a course page. You should now see a blank course form.
Now populate the form with data from the course that was double-clicked. To do that, we need to change
- Our navigation code in Course to pass the selected course to the edit form
- Our form code in EditForm to get and use the course data
To pass data to a component in React Router, you give navigate() a second argument. This optional argument is an object with two keys: replace which we'll ignore, and state. The state key can be used to pass any data we want to a component we are navigating to.
Change the double-click handler in Course to pass the selected course to the edit form:
const Course = ({ course, selected, setSelected }) => {
  const navigate = useNavigate();
  ...
  return (
    <div className="card m-1 p-2"
        style={style}
        onClick={isDisabled ? null : () =>  setSelected(toggle(course, selected))}
        onDoubleClick={() => navigate('/edit', { state: course })}>
      ...
    </div>
  );
};
To get this data in EditForm, we import and use the useLocation() hook. Change EditForm to import useLocation, use it to get the course, and use the course data to give default values for the form fields. We add the course ID as a hidden field so that it will be available when the form is submitted, but not editable by the user.
import { useLocation } from "react-router-dom";
...
const EditForm = () => {
  const { state: course } = useLocation();
  return (
    <form>
      <input type="hidden" name="id" value={course.id} />
      <div className="mb-3">
        <label htmlFor="title" className="form-label">Course title</label>
        <input className="form-control" id="title" defaultValue={course.title} />
      </div>
      <div className="mb-3">
        <label htmlFor="meets" className="form-label">Meeting time</label>
        <input className="form-control" id="meets" defaultValue={course.meets} />
      </div>
      <button type="submit" className="btn btn-primary">Submit</button>
    </form>
  )
};

export default EditForm;
Test. Double-clicking a course card should open the edit form with data for the course that was double-clicked.
Add validation
A user can now change the data in the form fields. Before we let them save this data to Firebase, we should add some code to validate the new data. We can't ensure that it's correct, but we should at least ensure that the data can be parsed and used.
The best way to do form validation is with a library like react-hook-form. Such libraries provide nice visual feedback on errors. This tutorial will implement a basic useForm hook to illustrate validation and styling for valid and invalid fields. useForm is called like this:
const [ errors, handleSubmit ] = useForm(validate, submit);
useForm returns two values. errors is an object with field names and their validation results. An empty string means the field value is OK. A non-empty string is a user-friendly error message that should be displayed. handleSubmit is a function that should be called when the form is submitted. It will call the submit function only if the validate function returns no errors.
useForm is passed two functions that the developer defines. validate will be called to validate each form field. It should return the error message if there is a problem or an empty string if there is not. submit will be called only if there are no form errors. It will be passed an object with the form data.
Define useForm in the file useForm.js.
import { useState } from 'react';

export const useForm = (validate, submit) => {
  const [errors, setErrors] = useState(null);

  const handleSubmit = (evt) => {
    evt.preventDefault();
    const form = evt.target;
    const entries = Array.from(new FormData(form).entries());
    const errors = entries.map(([key, val]) => [key, validate(key, val)]);
    errors.forEach(([key, val]) => { form[key].setCustomValidity(val) });

    if (errors.some(([key, val]) => val !== '')) {
      setErrors(Object.fromEntries(errors));
    } else {
      setErrors(null);
      submit(Object.fromEntries(entries));
    }
  }

  return [errors, handleSubmit];
}
As is common for this kind of code, the first thing useForm does is call Event.preventDefault so that the form is not submitted automatically when the function finishes. Then useForm creates a list of key-value pairs for the form data, using the JavaScript class FormData. Only fields with name attributes are collected. Then it creates a list of validation results for each key-value pair. The validity for each form field is set with setCustomValidity. This is for HTML styling. If any result is not the empty string, then errors is set to an object with all the validation results. If all fields validate, then errors is set to null and submit() is called with an object containing the form data.
To use this in EditForm, we need to import and call useForm with the appropriate validate and submit functions, and change our form to show any errors. For now, define the submit function to just display the form data that would be submitted.
const submit = (values) => alert(JSON.stringify(values));
Define validateCourseData(key, value) function to validate the fields title and meets. Non-empty messages should be returned when a field fails to validate. Require a title to haveat least two characters. Require meets to be either an empty string, for courses not yet scheduled, or a string that timeParts() can parse into day and time data.
const isValidMeets = (meets) => {
  const parts = timeParts(meets);
  return (meets === '' || (parts.days && !isNaN(parts.hours?.start) && !isNaN(parts.hours?.end)));
};

const validateCourseData = (key, val) => {
  switch (key) {
    case 'title': return /(^$|\w\w)/.test(val) ? '' : 'must be least two characters';
    case 'meets': return isValidMeets(val) ? '' : 'must be days hh:mm-hh:mm';
    default: return '';
  }
};
Change EditForm.js to import and use useForm to validate a form when submitted. Change the HTML for the form to call handleSubmit on form submission, and display the error messages for each field, if any. The most obscure part of this code is getting Bootstrap form error styles to work. The form needs the noValidate attribute to indicate that validation is being handled by JavaScript and the Bootstrap CSS class was-validated when there are errors. Error messages should have the Bootstrap CSS class invalid-feedback.
import { useLocation } from "react-router-dom";
import { useForm } from './useForm';
import { timeParts } from "./times";

const isValidMeets = (meets) => {
  const parts = timeParts(meets);
  return (meets === '' || (parts.days && !isNaN(parts.hours?.start) && !isNaN(parts.hours?.end)));
};

const validateCourseData = (key, val) => {
  switch (key) {
    case 'title': return /(^$|\w\w)/.test(val) ? '' : 'must be least two characters';
    case 'meets': return isValidMeets(val) ? '' : 'must be days hh:mm-hh:mm';
    default: return '';
  }
};

const submit = (values) => alert(JSON.stringify(values));

const EditForm = () => {
  const { state: course } = useLocation();
  const [ errors, handleSubmit ] = useForm(validateCourseData, submit);
  return (
    <form onSubmit={handleSubmit} noValidate className={errors ? 'was-validated' : null}>
        <input type="hidden" name="id" value={course.id} />
        <div className="mb-3">
        <label htmlFor="title" className="form-label">Course title</label>
        <input className="form-control" id="title" name="title" defaultValue={course.title} />
        <div className="invalid-feedback">{errors?.title}</div>
      </div>
      <div className="mb-3">
        <label htmlFor="meets" className="form-label">Meeting time</label>
        <input className="form-control" id="meets" name="meets" defaultValue={course.meets} />
        <div className="invalid-feedback">{errors?.meets}</div>
      </div>
      <button type="submit" className="btn btn-primary">Submit</button>
    </form>
  )
};

export default EditForm;
Test! Double-click a course to open the editor. Try entering invalid field values and click Submit. You should see a visual indication of valid and invalid field, and messages describing what wrong, like this
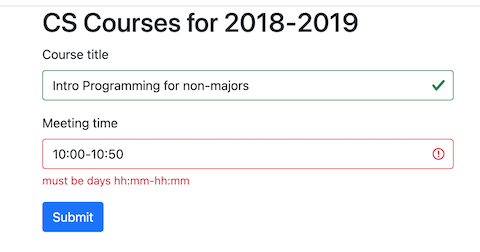
Then change the fields to valid values and click submit. You should see an alert with the correct form data.
Congratulations! You have added the ability to navigate to another screen and form entry to your React app. Commit your code changes, push them to Github, and update your status report. Then move on to the next task.
Store data
Now that we have a form to edit course data, the last step is to save the edited data to Firebase when the user clicks submit and there are no form errors. There are four ways to save data in Firebase. The set() method of the database reference object is the simplest. It just stores a value where the database reference points.
In firebase.js define and export the function setData(path, value) to save a value at point in the database referenced by the path.
export const setData = (path, value) => (
  set(ref(database, path), value)
);
In the submit(values) function in EditForm.js, we can store the form data in Firebase under the course ID with
setData(`schedule/courses/${values.id}/`, values)
Our code to store data is fairly simple, because our form data object is structured like our database entries. But we need a bit more code than this:
- Because this action is permanent, we should ask the user to confirm.
- Because database and network errors are common, we should use a try-catch block to catch and report any problem.
- Because set and hence setData are asynchronous, the try-catch will need an await so submit needs to be async as well.
const submit = async (values) => {
  if (window.confirm(`Change ${values.id} to ${values.title}: ${values.meets}`)) {
    try {
      await setData(`schedule/courses/${values.id}/`, values);
    } catch (error) {
      alert(error);
    }
  }
};
If you do the above, changes are saved but something odd happens if you change the database when there are selected courses: all courses that conflict with the selected courses become disabled. You can neither select them nor unselect them. Why? Because after the change, Firebase sends a new list of course objects. The app stores them in the variable courses, but the selected state variable still holds the old course objects. The old courses in selected will disable all courses in courses that overlap, but there's no way to de-select those old courses.
The simplest fix is to check to see if selected contains items different than what's in courses. If so, clear selected.
const CourseList = ({ courses }) => {
  const [term, setTerm] = useState('Fall');
  const [selected, setSelected] = useState([]);

  if (selected.some(course => course !== courses[course.id])) {
    setSelected([])
  };

  const termCourses = Object.values(courses).filter(course => term === getCourseTerm(course));

  return (
    <>
      <TermSelector term={term} setTerm={setTerm} />
      <div className="course-list">
      {
        termCourses.map(course =>
          <Course key={ course.id } course={ course }
            selected={selected} setSelected={ setSelected }
          />)
      }
      </div>
    </>
  );
};
Test! Verify that cancelling and entering invalid meeting data cause no change. Verify that adding a valid new meeting string causes the data to be updated on Firebase -- use the Firebase console to check -- the new data to appear on the page, without any need to reload. The page update should happen automatically because useObjectVal set up a listener for changes to schedule.
Report progress
Congratulations! You have added the ability to update data on your database. Commit your code changes, push them to Github, and update your status report. Then move on to the next task.
Add authentication
Authentication has been held off until now. It is a common mistake when developing a new app is to start with sign up or log in. That's misplaced effort. Signing up is not an interesting thing to user test. Start with the part of your app that is new and different.
But now that users can change the course schedule, it makes sense to only let logged-in users make changes. This is called authentication. Authentication enables authorization -- what is a specific user allowed to do. This is typically based on user roles. We only need authentication here. Any logged-in user can edit a course. With hooks, Firebase, and a helper UI library, authentication is not too much code.
Require authentication to change data
A series of small steps is needed to require authentication for writing to the database.
- Go to the Firebase console.
- Click on your project.
- Click the Rules tab.
- Click the button Edit rules.
Your rules should currently look like this:
{
  "rules": {
    ".read": true,
    ".write": true
  }
}
Select the true value to the right of ".write".
Replace it with the string "auth.uid != null", so that your
rules now look like this:
{
  "rules": {
    ".read": true,
    ".write": "auth.uid != null"
  }
}
Click Publish to save the rules.
The new rule is a JavaScript string that Firebase will evaluate when an attempt is made to write data to any part of the database. The variable auth will be set to a user object, and auth.uid will only have a value if the user has logged in.
Test! Reload your web app page. You should still see the courses. Now try to change a course's meeting time. You should get a permission denied error. If so, you have now protected your database from guest users.
Enable authentication support on Firebase
Authentication means asking a user to identify themselves, usually with a name or email address and a password. Developers used to write code to do this for every app, but a popular alternative now is to let a third-party service, like Google or Facebook, do the work. Those services manage the database of user information, check passwords, provide "forgot password" emails, and so on. Developers like doing less work. Users like having one less password to remember.
Here's how to enable authentication with Google, i.e., that users can click on a button and sign in with Google.
- Go to Firebase console.
- Go to your project page.
- Click Authentication on the left.
- Click the Sign-in method tab along the top.
- Click the Google line.
- In the panel that opens up, click Enable and enter any required information.
- Click Save.
That last step is easy to miss on the Firebase web site!
There are many other options you can enable. Click on them to see what they do. To use a third-party like Facebook or Twitter, you will need to set up a developer account with that service and get an ID for your app.
Add authentication code to the app
Now that Google authentication is enabled on the backend, we need to add code on the frontend to let users click a button and log in. The Firebase auth object provides a class GoogleAuthProvider to do this, as well as a signOut method to log out.
In src/utilities/firebase.js add this import
import { getAuth, GoogleAuthProvider, onIdTokenChanged, signInWithPopup, signOut } from 'firebase/auth';Define and export this function
export const signInWithGoogle = () => {
  signInWithPopup(getAuth(firebase), new GoogleAuthProvider());
};
Calling signInWithGoogle pops up a dialog box to let the user sign in with Google.
Where should we put the buttons to call these functions? Users will look for this at the top. The term selector seems like a good place. The new button should go to the right, to avoid being accidentally clicked when changing terms.
Bootstrap has many options for laying out a row of buttons. It's alway best to explore the examples in the documentation and adapt one that looks like what you want. The code below adapts an example from the section on button toolbars, using a temporary dummy "sign in" button.
const TermSelector = ({term, setTerm}) => (
  <div className="btn-toolbar justify-content-between">
    <div className="btn-group">
    {
      Object.values(terms).map(
        value => <TermButton key={value} term={value} setTerm={setTerm} checked={value === term} />
      )
    }
    </div>
    <button className="btn btn-secondary btn-sm">Sign In</button>
  </div>
);
When the UI looks like what we want, replace the dummy button with a working sign-in button.
const SignInButton = () => (
  <button className="btn btn-secondary btn-sm"
      onClick={() => signInWithGoogle()}>
    Sign In
  </button>
);

const TermSelector = ({term, setTerm}) => (
  <div className="btn-toolbar justify-content-between">
    <div className="btn-group">
    {
      Object.values(terms).map(
        value => <TermButton key={value} term={value} setTerm={setTerm} checked={value === term} />
      )
    }
    </div>
    <SignInButton  />
  </div>
);
Test! Believe it or not, you should now have working authentication. Try changing a course meeting time without signing in. Verify that you get the permission denied error. Now click Sign In. A dialog box should appear instructing you to sign in with Google. After signing in, trying change a course time again. Now it should work!
Add signing out
It's always good to include a sign out option, so that if someone is using your web app on a public terminal, they can log out.
firebase.auth provides a simple function for signing out. Define and export this function in src/utilities/firebase.js
const firebaseSignOut = () => signOut(getAuth(firebase));

export { firebaseSignOut as signOut };
Calling signOut just logs the user out of Google. No dialog box appears.
Import signOut and define a SignOutButton to go with your SignInButton.
const SignOutButton = () => (
  <button className="btn btn-secondary btn-sm"
      onClick={() => signOut()}>
    Sign Out
  </button>
);
Signing out is something that can only happen after you have signed in. So it makes sense to show a sign in button only when there is no user signed in, and a sign out button only when there is a user signed in.
Authentication changes are asynchronous, like database changes. You have to listen for a change in user status. react-firebase-hooks defines a custom hook, useAuthState(), that returns an array of three state variables: the user, a loading flag to indicate authentication is processed, and an error object if something goes wrong in authentication. In src/utilities/firebase.js define and export a very simple hook to list for changes in user state.
export const useUserState = () => useAuthState(firebase.auth());
Import useUserState in the file where TermSelector is defined. Change TermSelector to use it to determine whether there is a user signed in or not.
const TermSelector = ({term, setTerm}) => {
  const [user] = useUserState();
  return (
    <div className="btn-toolbar justify-content-between">
      <div className="btn-group">
      {
        Object.values(terms).map(
          value => <TermButton key={value} term={value} setTerm={setTerm} checked={value === term} />
        )
      }
      </div>
      { user ? <SignOutButton /> : <SignInButton /> }
    </div>
  );
};
Finally, fix Course so that double-clicking a course to change the meeting time only happens if you are logged in.
const Course = ({ course, selected, setSelected }) => {
  const isSelected = selected.includes(course);
  const isDisabled = !isSelected && hasConflict(course, selected);
  const [user] = useUserState();
  const style = {
    backgroundColor: isDisabled? 'lightgrey' : isSelected ? 'lightgreen' : 'white'
  };

  return (
    <div className="card m-1 p-2"
        style={style}
        onClick={(isDisabled) ? null : () => setSelected(toggle(course, selected))}
        onDoubleClick={!user ? null : () => reschedule(course, getMeetingData(course))}>
      <div className="card-body">
        <div className="card-title">{ getCourseTerm(course) } CS { getCourseNumber(course) }</div>
        <div className="card-text">{ course.title }</div>
        <div className="card-text">{ course.meets }</div>
      </div>
    </div>
  );
};
Test! Verify that you can sign in and sign out. Verify that the appropriate button is displayed. Verify that you can only edit meeting times when you are signed in.
Report progress
Congratulations! You have added the ability to update data on your database. Commit your code changes, push them to Github, and update your status report. Then move on to the wrap up.
Wrap Up
We've come to the end of this tour of modern React programming with Firebase. We've seen functional components, styling, handling state, managing persistent data, and authentication. We've seen modern JavaScript techniques for defining functions, for destructuring and constructing objects. Both React and JavaScript emphasize small single-task components and functions, and minimal global state. The only global variables we used were for static constants.
Notice all the things we didn't need. Unlike a vanilla JavaScript or jQuery application, we didn't write any code to modify the page. We just defined HTML in JSX and managed state variables. Unlike previous versions of React, we didn't define any classes, and we didn't need to worry about lifecyle methods like componentDidMount or componentWillUpdate. We never once had to bind this.
This tutorial has focused on the React and JavaScript concepts essential to begin writing clean manageable dynamic apps. There's much more to learn -- React navigation and context for example -- but it's time to explore on your own. For starting points, I recommend:
- Do the Learn React task, to work through a more substantial example, with Firebase data access and updating and authentication. It's a good way to test your understanding of basic React ideas.
- Take a look at React Old and New for discussion of how new React differs from old, since many resources online still use the old approach.
Happy Reacting!