
Welcome
This project is a set of challenges, building a React app using functionalities commonly needed in React web apps need, including functional components, JSX, styling, routing, forms, hosting, database, and authentication. Additional tools used include Bootstrap, React Query, and Firebase. It does not use class-based components, lifecycle methods, or a state manager like Redux.
Prerequisites
You should know basic HTML, CSS, and modern JavaScript.
- For an introduction to modern JavaScript, see Hello, JavaScript.
You do not need to know React, but you should read the subsection React starting points to get an idea of how React programming differs from regular HTML or JavaScript.
You need to have git installed and a Github account.
You should know how to open a terminal shell and run Unix-style commands.
- MacOS: use the Terminal application.
-
Windows: use the Git Bash application installed with git.
- Git Bash is more Unix-like than Windows' cmd and PowerShell and simpler to set up than Windows Subsystem for Linux (WSL).
-
Git installs
two Bash shells.
Both work for most things, but only the one in
C:\Program Files\Git\bin\bash.exesupports an interactive mode needed for steps where Firebase is initialized.
You need a Google account that provides access to Firebase. Some Google accounts, such as those provided for educational purposes, may not have Firebase access. You can test by visiting the Firebase home page. If your school Google account doesn't work, create a personal one.
You need an editor that supports React development.
-
Recommended:
Visual Studio Code.
- VS Code runs identically on MacOS, Windows, and Linux. That makes it very nice for teams with different development machines.
- Windows: For instructions on how to make Git Bash available as a terminal inside VS Code, see How to integrate Git Bash with Visual Studio Code.
- Visual Studio Code is not the same as Visual Studio. Do not confuse the two.
- For other choices, see 8 Best React IDE and React editors.
How this tutorial works
In this tutorial, you create and deploy a class scheduling app using React and Firebase. The app displays a list of classes as cards on a screen. The app lets a user select classes that have no time conflicts. Data about the classes is initially retrieved from a static source, but later stored on a cloud database, so that users with "admin" privileges can edit class information.
Development is broken down into a series of tasks. In each task, you develop and deploy a working slice of the app. If you are doing this tutorial in one of my classes, you push each slice to a Github repo and record your progress on a spreadsheet as you complete each step.
A task is complete only when the specified functionality is working on the deployed site and the code is committed to Github.
Do not write code from scratch. Adapt the samples shown the React Example library. Each example has notes on the concepts and technical issues behind the code, with links to further documentation.
If an example doesn't make sense, or you think it is wrong, or you wonder why it is different from code you see elsewhere, ask about it on the class discussion forum. Includes snippets of the code you're discussing, with links to where it appears.
Set up
Get a working template React app running on a public web site. This task is done when you have
- a current version of Node installed
- a template React app running on a public web site
- a Github repository for the app
Resources
See the following examples and notes:
- Installing node
- Initializing a React app
- Creating a Github repo for existing code
- Hosting an app on a public server
Report progress
When this is working on the public web site and the code has been pushed to Github, enter the URLs for the repo and web site on your status report, then move on to the next task
Change the app title and icon
Right now, the title of your app is "React App" and the favicon is the React atom logo. That's what you see in the browser tab for your app and in the browser history.
Change the title to "CS Course Scheduler". Change the icon to something you think is distinctive and appropriate.
Resources
See the following examples and notes:
Report progress
When this is working on the public web site and the code has been pushed to Github, update your status report and move on to the next task
Make an initial schedule page
Begin changing the app to display content relevant to a class scheduling app. For now, replace the template code in the file src/App.jsx with code to display an an h1 header element whose content is taken from the variable schedule:
const schedule = {
  title: "CS Courses for 2018-2019"
};

const App = () => (
  ...
);

export default App;
Verify that your app has changed to show the text "CS Courses for 2018-2019".
Resources
See the following examples and notes:
Report progress
When this is working on the public web site and the code has been pushed to Github, update your status report and move on to the next task
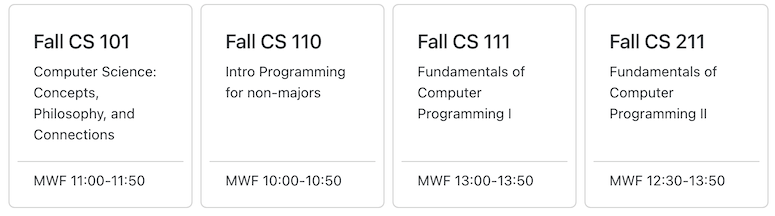
Show a list of courses
Two big things to do here: add some data to display, and refactor App component into subcomponents.
The desired page output is this:

Use this JSON data. Note that the courses are in a key-value object, not an array.
const schedule = {
  "title": "CS Courses for 2018-2019",
  "courses": {
    "F101" : {
      "term": "Fall",
      "number": "101",
      "meets" : "MWF 11:00-11:50",
      "title" : "Computer Science: Concepts, Philosophy, and Connections"
    },
    "F110" : {
      "term": "Fall",
      "number": "110",
      "meets" : "MWF 10:00-10:50",
      "title" : "Intro Programming for non-majors"
    },
    "S313" : {
      "term": "Spring",
      "number": "313",
      "meets" : "TuTh 15:30-16:50",
      "title" : "Tangible Interaction Design and Learning"
    },
    "S314" : {
      "term": "Spring",
      "number": "314",
      "meets" : "TuTh 9:30-10:50",
      "title" : "Tech & Human Interaction"
    }
  }
};

const App = () => (
  ...
);

export default App;
Define App to use two components: Banner and CourseList. It should pass the schedule title to Banner and the courses object to CourseList. Neither component should need to access schedule.
Put each component in its own file in src/components and import into App.jsx.
This task is done when the app deployed to the public site shows the list of courses. No errors or warnings should be appearing in the browser console.
Resources
See the following examples and notes:
- Defining a basic component
- Displaying a list of components
- Importing code, data, and assets
- Objects and arrays
Report progress
When this is working on the public web site and the code has been pushed to Github, update your status report and move on to the next task
Style the app
Add CSS styling so that the list of courses looks more like this:
Depending on screen width, course cards may need more than one row. Each row should fill the available screen width. Cards on the same row should appear uniform in height and internal spacing.
Resources
Bootstrap has many CSS classes to help here, especially the Card class. However, for a simple grid of cards, the grid in modern CSS is simpler than what Bootstrap provides. See the following examples and notes:
Report progress
When this is working on the public web site and the code has been pushed to Github, update your status report and move on to the next task
Fetch data
Change App to fetch a more complete list of courses from
https://courses.cs.northwestern.edu/394/guides/data/cs-courses.php
This URL can be accessed from any server, including a local test server, without getting a CORS exception.
Use React Query, as described in the notes, to manage the fetching. You should define a React hook to load JSON in a JavaScript file. Put this file in src/utilities/.
Don't forget to delete the dummy schedule at the start of App.jsx.
This task is done when the app is displaying all the CS classes for fall, winter, and spring.
Resources
There are quite a few concepts to learn here, from asynchronous functions to managing queries with the React Query library. See the following examples and notes:
Report progress
When this is working on the public web site and the code has been pushed to Github, update your status report and move on to the next task
Implement a term filter
Implement an interactive user interface element to let users choose whether to see classes for fall, winter, or spring. Key steps in this task:
- A term selector component that holds three button, for Fall, Winter, and Spring respectively.
- A term page component that holds the term selector and course list.
- A selected term state variable that is initially set to Fall.
- Code in the course list component to only show classes that are in the selected term.
- Code in the term selector to change the selected term state when a term button is clicked.
This task is done when clicking on the Fall, Winter, or Spring buttons immediately updates the set of classes is displayed.
Resources
A key part of this task is learning how -- and where -- to define state variables.
See the following examples and notes:
Report progress
When this is working on the public web site and the code has been pushed to Github, update your status report and move on to the next task
Implement selecting courses
Change the user interface so that clicking on a course card adds it to a list of selected classes. Clicking a course already selected unselects it. Selected classes should highlight in some clear way, e.g., change in background color, text, or added icon, such as a checkmark.
This task requires defining a new state variable to hold the list of selected classes, code to add or remove a class from that list, and code to display a course different depending on whether it is selected.
The task is done a user can select and unselect any number of classes on the deployed app.
Resources
See the following examples and notes:
Report progress
When this is working on the public web site and the code has been pushed to Github, update your status report and move on to the next task
Implement a schedule pop-up
Change the app so a user can click a "course plan" button to see a pop-up listing the classes they've selected so far -- numbers, titles, and meeting times. If no courses are selected, the pop-up should have text that says that, along with brief instructions on how to select courses. The pop-up should have a button to close it. Clicking outside the pop-up should also close it, but clicking anywhere inside the pop-up should not.
A reasonable place for the course button button on the same line as the term selector but on the right side of the screen.
Resources
See the following examples and notes:
- Defining modal dialogs
- Using a modal dialog
- Implementing signing in and out for an example of how to make a button float to the right.
Report progress
When this is working on the public web site and the code has been pushed to Github, update your status report and move on to the next task
Catch time conflicts
Make it impossible for a user to select a class that has a time conflict with classes they've already selected. A course card should be selectable only if it does not have a time conflict with any currently selected class. Unselectable courses should be marked in some way, e.g., fainter color or a small "x" somewhere. The visual display should update immediately when classes are selected and unselected.
Two classes have a time conflict if they meet in the same term,
have at least one day in common, and their timespans overlap.
A class meeting time is either the empty string
or a meeting string like MWF 9:00-9:50 or
TuTh 14:00-15:20. Any non-empty subset of days
is possible. No day appears twice. The start time is always
strictly less than the ending time. Times run from 0:00
to 23:59. Classes with an empty meeting string never
have a time conflict.
The code for calculating conflicts should be clean and maintainable, broken down into short well-named functions, and placed in a JavaScript utility file that exports only the functions needed by the React component(s) that check for time conflicts.
This task is done when the deployed app only allows users to select classes with no time conflicts. Make sure unselecting still works!
Resources
Most of the code for detecting time conflicts can be done with very short functions, for specific subtasks such as detecting day overlap and time overlap. See the following examples and notes:
- Defining JavaScript code modules
- Array methods
- String properties and methods
- Working with mixed types
Report progress
When this is working on the public web site and the code has been pushed to Github, update your status report and move on to the next task
Add a course form
Add a form that contains text input fields for the title and meeting times for a course. Then add a link or button on each course card to open the edit form, populated with the data
For now, just create the form with the fields and a Cancel button, but no Submit button. The form should have an onSubmit() method that does nothing. Clicking the Cancel button should return the user to the main course list.
Resources
This task introduces forms with React controlled components and routing with link-like components.
See the following examples and notes:
- Defining screens
- Implementing links with parameters
- Bootstrap icons -- useful for the "edit" button
- Defining a form data hook
- An example data editor with validation
Report progress
When this is working on the public web site and the code has been pushed to Github, update your status report and move on to the next task
Add form validation
Add code to the course form to give user feedback when form fields contain bad data. Specifically,
- the course title must be at least two characters, e.g., "AI" would be accepted but not "X"
- the meeting time must be either the empty string or a legal meeting time with one or more days and a non-empty timespan.
Helpful messages should appear next to form fields with invalid data, such "must contain days and start-end, e.g., MWF 12:00-13:20".
Resources
See the following examples and notes:
Report progress
When this is working on the public web site and the code has been pushed to Github, update your status report and move on to the next task
Add a Firebase database
Copy the course data into a Firebase Realtime Database, so that, in the next task, you can save modified course data there.
Data sources
Import into your database the JSON you've been testing with:
cs-courses.php
The task is done when the version is deployed to the public site gets its class data from Firebase. There should be no visual difference in how the app behaves.
Resources
See the following examples and notes:
- Adding a Firebase Realtime Database
- Organizing Firebase Realtime data
- Defining a database hook
- Using a database hook
Report progress
When this is working on the public web site and the code has been pushed to Github, update your status report and move on to the next task
Add form submission
Add the ability to save changed course data to the Firebase Realtime database when the user clicks a Submit button. Nothing should be submitted if there are any form field errors or no changes to any value.
Resources
See the following examples and notes:
Report progress
When this is working on the public web site and the code has been pushed to Github, update your status report and move on to the next task
Add authentication
Change the app so that only users who are authenticated, i.e., signed in, can edit class information. This involves the following changes on the back-end Firebase side:
- Enabling authentication services for the project on the Firebase web console
- Add security rules to the database to allow write-access only for authenticated users
The following changes need to be made on the front-end React web app side:
- Adding code to the app to track the current authenticated user, if any
- Adding code to the app to let a user sign in and out
- Adding code to show a course edit button on each course card only to authenticated users
The best place for a button for signing in or out would be a banner component that appears on all screens.
Resources
See the following examples and notes:
- Enabling Google authentication
- Defining an authentication hook
- Implementing signing in and out
- Authentication-enabled access in Database security rules
Report progress
When this is working on the public web site and the code has been pushed to Github, update your status report and move on to the next task
Add role-based authorization
Change the app so that only authenticated users who are administrators can edit class information. This requires adding two things to the Realtime database:
- information about which users are administrators
- security rules to the database to allow write access only for authenticated users who are administrators
To get UIDs for users who log into your app, go to your project's Firebase console and look under Build | Authentication | Users.
In the React app, you need to add code to
- get database data for the authenticated user, if any
- show a course edit button on each course card only to authenticated users who are administrators
Resources
See the following examples and notes:
- Implementing user profiles
- Implementing role-based authorization
- Role-based access in Database security rules
Report progress
When this is working on the public web site and the code has been pushed to Github, update your status report and move on to the next task
Wrap Up
You've reached the end of this challenge! You've developed functional components, styled them, added React state, created modal dialogs, incorporated React routing, created a cloud database, and implemented authentication and role-based authorization. You've applied modern JavaScript techniques for defining functions, for destructuring and constructing objects.
This challenge has include most of the React and JavaScript concepts essential to begin writing clean manageable dynamic apps. There's much more to learn, but it's time to explore on your own. For starting points, I recommend:
- Do the Learn React task, to work through a more substantial example, with Firebase data access and updating and authentication. It's a good way to test your understanding of basic React ideas.
- Take a look at React Old and New for discussion of how new React differs from old, since many resources online still use the old approach.
Happy Reacting!