
Overview
These are examples to study and adapt when doing tutorials and projects in React. These samples assume familiarity with modern JavaScript and a basic knowledge of the structure of a React application.
For more on modern JavaScript programming, see this introduction and these notes. For basic React concepts, see this short list of basic concepts.
For quick reference, the steps or code to do come first, followed by notes explaining how the steps or code work, alternatives, warnings, and so on.
There are several reasons why these examples may differ from other code you find online:
- React and JavaScript continues to evolve. Example code here tries to be as current as possible, using hooks and functional components, not classes.
The example code assumes the following React setup:
- Node 24
- React 19, with the compiler enabled
- TypeScript 5
- Tailwind CSS 4
If you see online references that significantly contradict these examples, ASK!
Installing Node
Test for the presence of Node. Open a terminal window. On MacOS use the Terminal. On Windows, run Git Bash which is included with Git for Windows. Then do
node --versionnvm --versionSee the Vite documentation for the current minimum Node version required.
If you have no Node, jump to the steps for installing nvm (Node Version Manager). If you have an older Node and no nvm, uninstall Node manually and then install nvm. If you have an older Node and nvm, jump to the steps for installing a current LTS (long-term support) version of Node.
Uninstall older Node manually
To uninstall an older Node without nvm:
- MacOS or Linux: How to uninstall Node on a Mac.
- Windows: How to completely remove Node from Windows
Install nvm
Install nvm if not present.
- MacOS and Linux: See the nvm Github page.
- Windows: See Install NodeJS on Windows.
Install a current version of Node
With nvm you install one or more versions of Node, then separately tell nvm which Node to use.
nvm install nodenvm use nodeOn Windows, to run nvm use, you must either enable Developer mode (Windows 10), or run Git Bash in Adminstrator mode (Windows 8).
Verify the installation
Open a new terminal window and run:
node --versionVerify you see the version of Node you installed.
Notes
Node (also known as NodeJS) is a scripting environment, like Python or Ruby, but based on the JavaScript language. It is used by React to build a web app from source code and run a local server for testing.
Installing Node also installs npm and npx. npm is the Node Package Manager. It is used to install Node libraries in applications. It downloads them into the directory node_modules in your application code. It keeps track of the libraries your application needs in the file package.json.
npx stands for Node Package Execute. It downloads and runs Node scripts, such as degit.
nvm is the Node Version Manager. It lets you install multiple versions of Node and switch between them. nvm avoids permission issues that often occur with installing Node manually. With nvm you should never need to use sudo to install libraries on MacOS or Linux.
Initializing a React app
Vite is an application for creating new React apps. Vite is much faster and uses much less disk space than the older create-react-app. No one should use that any more.
Start a React project with Vite and Vitest
If you are creating a React manually, follow these instructions to create a React project using react-ts-vitest, a template for React apps that includes TypeScript, Vitest, and the react-testing-library.
If you are using agentic AI to create your React app, give it an instruction file like the one described here so that it uses Vite and includes Vitest and whatever CSS library the team wants.
Some notes about React applications built with Vite:
-
Component files in TypeScript that include JSX, as most do, must have the
file extension
.tsx, not.ts. Don't use.jsxor.jswith TypeScript apps. -
The entry point for the application,
index.html, is in the root directory. You rarely touch this file. - The command npm run build puts the assembled application in the subdirectory dist.
- The testing framework is Vitest, a clone of Jest, built to work with Vite.
Creating a Github repo for existing code
Once you have created a React app, you should create a Github repository for it.
Stop your app in the command shell with control-C, if necessary.
Go to Github and follow these instructions for creating a remote repository to hold existing code. Do not create any default files such as README or .gitignore. Those have already been created.
Hosting an app on a public server
Use Firebase to host your web page on a public server for testing and demoing.
Create a Firebase project to host your React app
Follow these instructions to create a project to host your React app.
Northwestern Google accounts do not support Firebase. To create a Firebase project, you need to use a personal Google account, or create one if necessary.
Note that some steps are done are on the Firebase web console, and others are done on your local machine. When setting things up on your local machine,
- Use npm -g to install firebase-tools globally.
-
When Firebase asks for the public directory, do not accept the default.
- Specify dist for a Vite project.
- Say no when Firebase asks about adding Github Actions.
Building and deploying to Firebase
To deploy your app:
npm run build
firebase deploy
The build step creates a "production" version of your app. This is very different than the version created when you do npm run start. Code is optimized, compacted, and placed into a few files.
Notes
Firebase can be used to host simple web pages, including React apps. Using Firebase to host makes even more sense if you are or will be using other Firebase services, such as the database or authentication service. Other hosting options include Github Pages, AWS, and Heroku.
You create a project on the Firebase site to organize access to one or more Firebase services, including hosting, data storage, and authentication. Multiple apps -- both web-based and native -- can access the same project if they share the same backend data.
Changing an app title or favicon
To change the title or favicon for a web app that appear in a browser tab and history, edit the lines marked below in the index.html of your app.
<!doctype html>
<html lang="en">
  <head>
    <meta charset="UTF-8" />
    <link rel="icon" type="image/svg+xml" href="/vite.svg" />
    <meta name="viewport" content="width=device-width, initial-scale=1.0" />
    <title>Vite + React + TS</title>
  </head>
  <body>
    <div id="root"></div>
    <script type="module" src="/src/main.tsx"></script>
  </body>
</html>
Notes
You can use an online tool to create a favicon. Put the icon in the public directory of your project. Free Favicon Maker is nice because you can make a favicon from an emoji without uploading an image. It can create SVG icons which are smaller than PNG files. If you create a PNG file instead, you should adjust the type attribute of the link .
This is the only task where you will edit an HTML file. Normally, you will be editing JavaScript code that creates HTML. The title and/or favicon are different because they are specified in the HTML head rather than HTML body.
Defining App
To define an app, replace the default JavaScript code created by Vite in /src/App.tsx with code that defines the App functional component. For example, the following defines an app that shows the current date.
index.html loads /src/main.tsx, which then loads /src/App.tsx. You usually only edit /src/main.tsx if you are building an app with routing.
const App = () => {
  const today = new Date();
  const day = today.toLocaleString([], {weekday: 'long'});
  const date = today.toLocaleDateString([], {dateStyle: 'long'})

  return (
    <>
      <h1>Sample React code</h1>

      <p>This page was last loaded on {day}, {date}.</p>
    </>
  );
};

export default App;
Notes
With React, you don't edit HTML. You define JavaScript functions, called components, that React calls to generate HTML. By default, React calls the component App, defined in in src/App.tsx, to create an app.
To make writing HTML in JavaScript simple, HTML-like code called JSX can be embedded directly into JavaScript. The JSX is translated into a function calls that construct the desired HTML object. This only happens if the file extension is .tsx for TypeScript or .jsx for JavaScript.
See React starting points for an introduction to key concepts such as component functions, JSX, and React state.
JSX is limited to one top-level element. Typically this is done with a div element, but if there is no need for a div in the output HTML, the JSX fragment syntax, <>...</> can be used to group items.
This example code violates one of the Rules of React. A component should be a pure function. A pure function returns the same result when called with the same arguments. This component returns a different result every time because it gets the current the time. React assumes it can freely call -- or not call -- component functions at any time, any number of times. Hence code that violates the Rules of React will run but may have unexpected results.
Defining a basic component
Here is a React component that displays the name, email, and phone number of a user.
import { type User } from '../utilities/firebase';

interface UserCardProps {
  user: User;
}

const UserCard = ({user}: UserCardProps) => (
  <table>
    <tbody>
      <tr><th>Name</th><td>{user.displayName}</td></tr>
      <tr><th>Email</th><td>{user.email}</td></tr>
      <tr><th>Phone</th><td>{user.phoneNumber}</td></tr>
    </tbody>
  </table>
);

export default UserCard;
import UserCard from './components/UserCard';

const App = () => (
  <>
    <h1>User Data</h1>

    <UserCard user={user} />
  </>
);

export default App;
Notes
A React component is a function that returns HTML code. The component is used like an HTML element in the JSX, e.g.,
The HTML attributes attached to the component are passed to the function in a key-value props object. It's standard to use object destructuring to extract those property values, such as user in this case.
It's recommended to strongly type the props object, to quickly catch JSX errors. Defining a separate interface is more readable. There's usually no need to export the interface.
This function is simple enough to be written as a concise arrow function body with no curly braces or return call.
Major components are usually defined as the default export in a separate file. The name of the file should match the name of the component, including capitalization. Typically component definitions are put into a subdirectory called components.
Links
- See the section in importing for details on how to import this code.
- See https://dummyjson.com/users/5 for sample user data.
Creating a list of components
JSX syntax makes it easy to flip back and forth between HTML and JavaScript. This becomes handy when generating HTML from list data. Here is a component that display a list of users, given an object with user IDs and user objects.
import { type User } from '../utilities/firebase';

interface UserListProps {
  users: Record<string, User>
}

const UserList = ({ users }: UserListProps ) => (
  <ul>
  {
    Object.entries(users).map(([id, user]) => (
      <li key={id}>${user.firstName} ${user.lastName}</li>
    ))
  }
  <ul/>
);

export default UserList;
Notes
This is a good simple example of the value of TypeScript in designing code. A "list of users" could mean either an array of user objects or a key-value object with user IDs and users. TypeScript forces you to be explicit about this. Record is how you declare the type of an open-ended key-value object.
JavaScript inside JSX must be placed inside curly braces. The code must be an expression that returns a primitive value like a number or string, or more JSX. A map() works fine. A for loop would not work because it is not an expression.
A map() requires a list, not an object. There are
two ways to get a list from a key-value object.
Object.values()
returns just the values in an object.
Object.entries()
returns a list of key-value tuples, [key, value].
Either can be used. Object.entries() is necessary
if the ID is required and is not contained inside the value.
A component must return one HTML element or React component.
In React, each element in a list of components must have a key attribute. The key must be a unique identifier for the data. It should not be the array index. This code uses the user id field. The key is not passed in the props object to the component.
Read more on JSX syntax and list keys.
Links
- See data/users.php for sample user data.
- See defining a grid of cards for a better way to present a list of cards using a grid and Tailwind.
Defining React state
State is a central concept in React. You need state to implement almost any interactive element in a React app. State in React means any data that affects how a component renders. Without state, a component function would return the same thing every time. Without it, checkboxes would never stay clicked, menu selections would not stick, and input fields would always revert to empty.
Here is a tiny component with React state. It is a button that initially says Rock. If clicked, it changes to Paper. If clicked again, it changes to Scissors. If clicked again, it changes to Rock, and so on.
import { useState } from 'react';

const choices = ['Rock', 'Paper', 'Scissors'];

const Chooser = () => {
  const [choice, setChoice] = useState(0);

  const nextChoice = () => {
    setChoice((choice + 1) % choices.length);
  }

  return (
    <button onClick={nextChoice}>{choices[choice]}</button>
  );
};

export default Chooser;
Notes
useState() creates and returns two things:
- a state variable choice to hold the index to what the button should say
- a function setChoice() to use to change that state
Calling setChoice() when the button is clicked changes the internal state. Changing a component's state variable causes React to re-render the component.
This is a critical pattern in React. Code does not change HTML directly. Code changes state, and changes to state trigger screen updates.
For more on React state, see the notes on state.
Defining radio buttons
The code in /src/components/RadioControl.tsx is a generic React component for a radio button group with some simple Tailwind styling for spacing.
The code in /src/components/RecipeCard.tsx shows how to use RadioControl to filter which recipes to show. The recipes, from DummyJSON, have an optional mealType property that is a list of strings describing when a recipe is appropriate. The
import type { Dispatch, SetStateAction } from "react"

interface RadioControlProps {
  name: string,
  options: string[],
  selected: string,
!!  setSelected: Dispatch<SetStateAction<string>>
}

const RadioControl = ({ name, options, selected, setSelected }: RadioControlProps) => (
  <div className="flex justify-center gap-1">
    { options.map(option  => (
        <div key={option}>
          <input type="radio" name={name} id={option} value={option}
                 checked={option === selected}
                 onChange={() => setSelected(option)}
          />
          <label className="ml-1 mr-1" htmlFor={option}>
            {option}
          </label>
        </div>
      ))
    }
  </div>
);

export default RadioControl;
>
const RecipeCards = ( ) => {
!!  const [selected, setSelected] = useState('');
  const [json, isLoading, error] = useJsonQuery('https://dummyjson.com/recipes');

  if (error) return <h1>Error loading recipes: {`${error}`}</h1>;
  if (isLoading) return <h1>Loading recipess...</h1>;
  if (!json) return <h1>No recipe data found</h1>;

  const result = parseRecipes(json);

  if (!result.success) {
    console.log(result.error);
    return <h1>Error loading recipes. See console log for details.</h1>
  }

  const recipes = result.data.recipes;
!!  const mealTypes = [...new Set(recipes.flatMap(recipe => recipe.mealType ?? []))].sort();
!!  const selectedRecipes = selected === '' ? recipes : recipes.filter(recipe => recipe.mealType && recipe.mealType.includes(selected))

  return (
    <div className="container mx-auto px-4 w-svw">
      <h1 className="text-2xl">Our Top Recipes</h1>
!!      <RadioControl name="meal-type" options={mealTypes} selected={selected} setSelected={setSelected}/>
      <div className="grid grid-cols-[repeat(auto-fill,_minmax(200px,_1fr))] gap-4 px-4">
!!        { selectedRecipes.map(recipe => <RecipeCard key={recipe.id} recipe={recipe} />) }
      </div>
    </div>
  )
}
Notes
RadioControl is an example of a controlled component. What is checked is controlled by a React variable, not by the HTML component. When a radio button is checked, React re-renders all of them. This is simple and fine for small forms. It is less efficient than letting the browser use its native code to update what's checked. If you have a complex form, use a form library. They implement the logic needed to work with uncontrolled components for greater efficiency.
Dispatch<SetStateAction<string>> is the React type for the setter
function of a useState variable containing a string.
The selected state variable in RecipeCards must be created before the lines that call return, because hooks can't be called conditionally.
The list of meal types is collected from the entire list of recipes, using flatMap() to get a flat list, Set to get the unique names, the spread operator to convert to the set to a list, and sort() to alphabetize the list.
The set of recipes to show is filtered if and only if there is a selection.
Defining modal dialogs
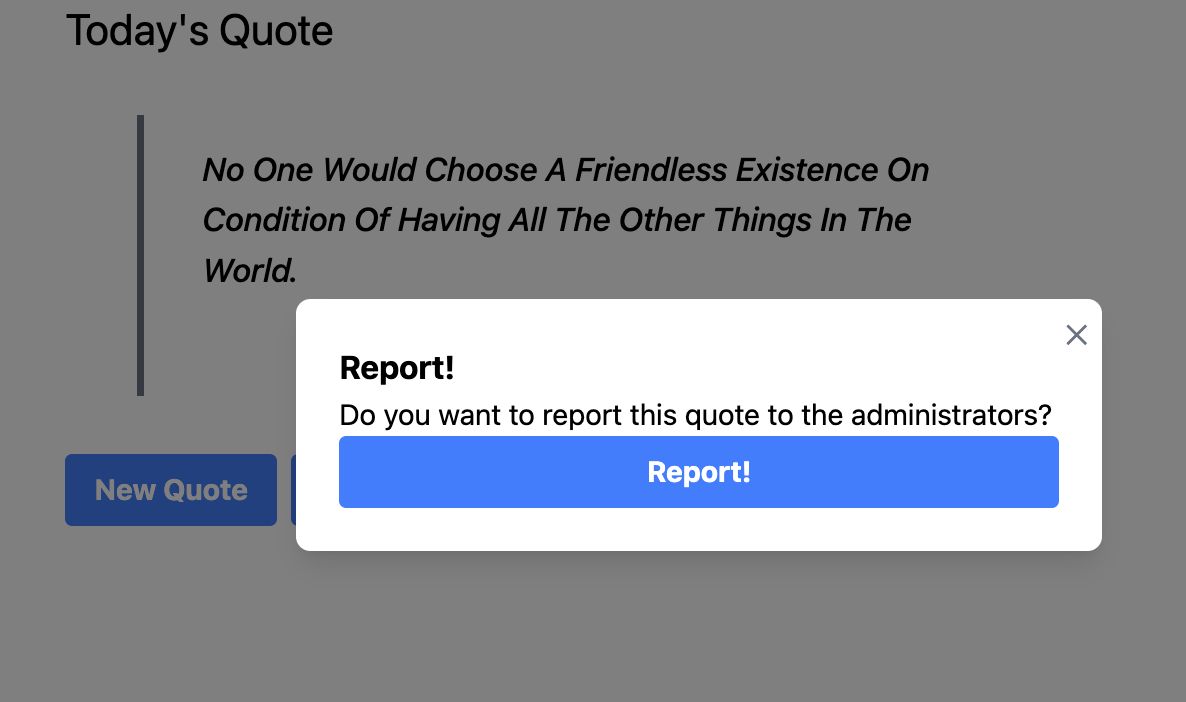
The code below in /src/components/Modal.tsx is simple implementation of a generic modal dialog in React using Tailwind. It can be used to show messages, temporary display of data like a shopping cart, and so on. "Modal" means that until it is closed, nothing else can be clicked on.
The content of the modal is any HTML / React you want. The code in /src/components/QuoteCard.tsx shows a toy example of a modal that ask if the user wants to report a quote. The user can click Report! or છ to cancel. The toy code just prints the quote on the console.
import { type PropsWithChildren } from 'react'

interface ModalProps {
  isOpen: boolean;
  onClose: () => void;
}

!!const Modal = ({ isOpen, onClose, children }: PropsWithChildren<ModalProps>) => (
  !isOpen ? null : (
!!    <div className="fixed inset-0 flex items-center justify-center bg-black/75"
!!         onClick={onClose}>
      <div className="bg-white rounded-lg shadow-lg p-6 max-w-md w-full relative ">
        <button className="absolute top-2 right-2 text-gray-500 hover:text-gray-700"
                onClick={onClose}>
          ✕
        </button>
        {children}
      </div>
    </div>
  )
);

export default Modal;
>
import { useState } from 'react';
import { useJsonQuery } from '../utilities/fetch';
import { Button } from './Button';
import Modal from './Modal';
import type { Quote, QuoteCollection } from '../types/quotes';

const noQuote: Quote = { id: 0, quote: 'I have nothing to say.', author: 'Oliver Hardy'};

const pickQuote = (coll: QuoteCollection) => (
  coll.quotes.length === 0 ? noQuote : coll.quotes[Math.floor(Math.random() * coll.quotes.length)]
);

interface ReportModalProps {
  quote: Quote;
  isOpen: boolean;
  onClose: () => void
}

const ReportModal = ({ quote, isOpen, onClose }: ReportModalProps) => (
!!  <Modal isOpen={isOpen} onClose={onClose}>
    <div className="flex flex-col">
      <h2 className="text-lg font-bold">Report!</h2>
      <p>Do you want to report this quote to the administrators?</p>

      <Button text="Report!" onClick={() => { console.log(quote); onClose() } } />
    </div>
!!  </Modal>
);

const QuoteCard = ( ) => {
  const [json, isLoading, error] = useJsonQuery('https://dummyjson.com/quotes');
  const [quote, setQuote] = useState<Quote>(noQuote);
!!  const [modalOpen, setModalOpen] = useState(false);

  if (error) return <h1>Error loading user data: {`${error}`}</h1>;
  if (isLoading) return <h1>Loading user data...</h1>;
  if (!json) return <h1>No user data found</h1>;

  const collection = json as QuoteCollection;

  const newQuote = () => { if (collection.quotes.length > 0) {
      setQuote(pickQuote(collection))
    }
  }

  return (
    <div className="container mx-auto px-4 w-svw">
      <h1 className="text-2xl">Today's Quote</h1>
      <blockquote className="border-l-4 border-gray-500 italic my-8 pl-4 md:pl-8 py-4 mx-4 md:mx-10 max-w-md">
          <p className="text-lg font-medium">{quote?.quote}</p>
          <cite className="block text-right mt-4 text-gray-600">- {quote?.author}</cite>
      </blockquote>

      <div className="flex gap-2">
        <Button text='New Quote' onClick={newQuote} />
!!        <Button text='Share Quote' onClick={() => setModalOpen(true)} />
      </div>

!!      <ReportModal quote={quote} isOpen={modalOpen} onClose={() => setModalOpen(false)} />

    </div>
  )
}
export default QuoteCard;
>
Notes
Modal uses the React children prop so that any React components can nest it inside it. It uses the React type adapter, PropsWithChildren, to add the proper type for nested components.
The Tailwind CSS for the modal code is adapted from Create Modal Dialogs UI using React and Tailwind CSS , updated to Tailwind 4.
Like many implementations of modal dialog boxes, the dialog box fades the rest of the user interface and disables clicking there. This is done in this code with a fixed position div that covers the screen. It has the Tailwind color class bg-black/75. This is a special syntax that means a black background with 75% opacity. This allows the hidden page to be partly visible. It is not the same as opacity-75. Opacity applies to the element, not its color, and affects all contained elements are affected. We don't want that here.
There is an onClick property to close the modal on the div that covers the background. That way, clicking anywhere outside the modal box will close it.
The heart of any React modal implementation is a state variable that says whether the modal is open or not, and a setter function to change that state. That state is created by the component that uses the modal. In this example, that is QuoteCard.
Importing code, data, and assets
import is used in React to load a wide variety of assets.
Import a component that is a default export. Note that there are no curly braces. Do not include the file extension.
import UserCard from './components/UserCard';
Import functions exported from a file. Do not include the file extension.
import { area, perimeter } from '../utilities/geometry';
Import data from a JSON file into a variable. Do include the file extension.
import users from './data/users.json';
Import, i.e., load and define, CSS. Do include the file extension.
import './UserCard.css';
Load a local image file and store its URL in a variable. Do include the file extension.
import logoUrl from './images/small-log.png';
Import paths
The path to use to import something will depend on the relative locations of data being imported and the code doing the import.
To import from an installed Node library, just give the module name, e.g.,
import { Link } from '@tanstack/react-router';
To import from a file in your application directory, give a relative path. To import something in or below the directory with the code calling import, start the path with period-slash. To import something in a sibling directory, start the path with two periods and a slash.
| To import.. | Into... | Use the path... |
|---|---|---|
| src/components/UserCard.tsx | src/App.tsx | './components/UserCard' |
| src/components/UserCard.tsx | src/components/ContactList.tsx | './UserCard' |
| src/utilities/triangle.tsx | src/components/Triangle.tsx | '../utilities/triangle' |
Fetching JSON data
Fetching data from an external source -- a local file, a network call, a database -- should be done asynchronously, so that the app doesn't freeze up while waiting for the data to arrive. To do this in React, define a custom hook that creates a React state variable that holds the data fetched. Initially the data is some placeholder that can be rendered immediately. The hook code waits for the real data to appear or an error to occur. When that happens, the hook updates the state variable, triggering a re-render. The waiting and updating are encapsulated in the hook. The app code does not worry about waiting. It just renders whatever is in the state variable.
Here is code for a generic custom React hook to asynchronously fetch JSON data from the web. The API is a fairly common one. useJsonQuery() takes a string containing a URL and returns a tuple with three elements:
- the JSON retrieved
- a boolean that is true until the fetching is finished
- an error object
When the fetch is finished with either data or an error, the variables are updated accordingly. Since the fetching may take some time, the code in useEffect() returns a cleanup function that React will call if the user navigates away or the dependencies change. The cleanup function here sets isMounted to false to avoid trying to set out-of-date component state variables.
The code in App.tsx uses useJsonQuery() to fetch a JSON object with a list of quotes from DummyJSON and display a randomly selected one, using the CSS for the quotes from here.
import { useEffect, useState } from 'react';

type JsonQueryResult = [unknown, boolean, Error | null];

export function useJsonQuery(url: string): JsonQueryResult {
  const [data, setData] = useState<unknown>();
  const [loading, setLoading] = useState(true);
  const [error, setError] = useState<Error | null>(null);

  useEffect(() => {
    let isMounted = true;

    const fetchData = async () => {
      setLoading(true);
      setData(undefined);
      setError(null);

      try {
        const response = await fetch(url);
        if (!response.ok) {
          throw new Error(`HTTP error ${response.status}`);
        }
        const json = await response.json();
        if (isMounted) {
          setData(json);
        }
      } catch (err) {
        if (isMounted) {
          setError(err as Error);
        }
      } finally {
        if (isMounted) {
          setLoading(false);
        }
      }
    };

    fetchData();

    return () => {
      isMounted = false;
    };
  }, [url]);

  return [data, loading, error];
};
import { useJsonQuery } from './utilities/fetch';

interface quote {
  id: number,
  quote: 'string',
  author: 'string'
}

interface quoteCollection {
  quotes: quote[]
}

const pickQuote = (coll: quoteCollection) => (
  coll.quotes.length === 0 ? null : coll.quotes[Math.floor(Math.random() * coll.quotes.length)]
);

const App = () => {
  const [json, isLoading, error] = useJsonQuery('https://dummyjson.com/quotes');

  if (error) return <h1>Error loading user data: {`${error}`}</h1>;
  if (isLoading) return <h1>Loading user data...</h1>;
  if (!json) return <h1>No user data found</h1>;

  const collection = json as quoteCollection;
  const pick = pickQuote(collection) || { id: 0, quote: 'I have nothing to say.', author: 'Oliver Hardy'}

  return (
    <div className="container mx-auto px-4 w-svw">
      <h1 className="text-2xl">Today's Quote</h1>
        <blockquote className="border-l-4 border-gray-500 italic my-8 pl-4 md:pl-8 py-4 mx-4 md:mx-10 max-w-md">
            <p className="text-lg font-medium">{pick.quote}</p>
            <cite className="block text-right mt-4 text-gray-600">- {pick.author}</cite>
        </blockquote>
    </div>
  )
}
export default App;
Notes
The nested definition of fetchData() inside useEffect() is necessary. For why, see the links.
The return value for useJsonQuery() is designed to be compatible with more powerful libraries such as Tanstack Query (formerly React Query), and with the useDataQuery() hook to fetch data from the Firebase Realtime Database.
Links
- Using Async functions in 'useEffect'
- To add typing to data fetched, see Add types to external data
Basic list selection
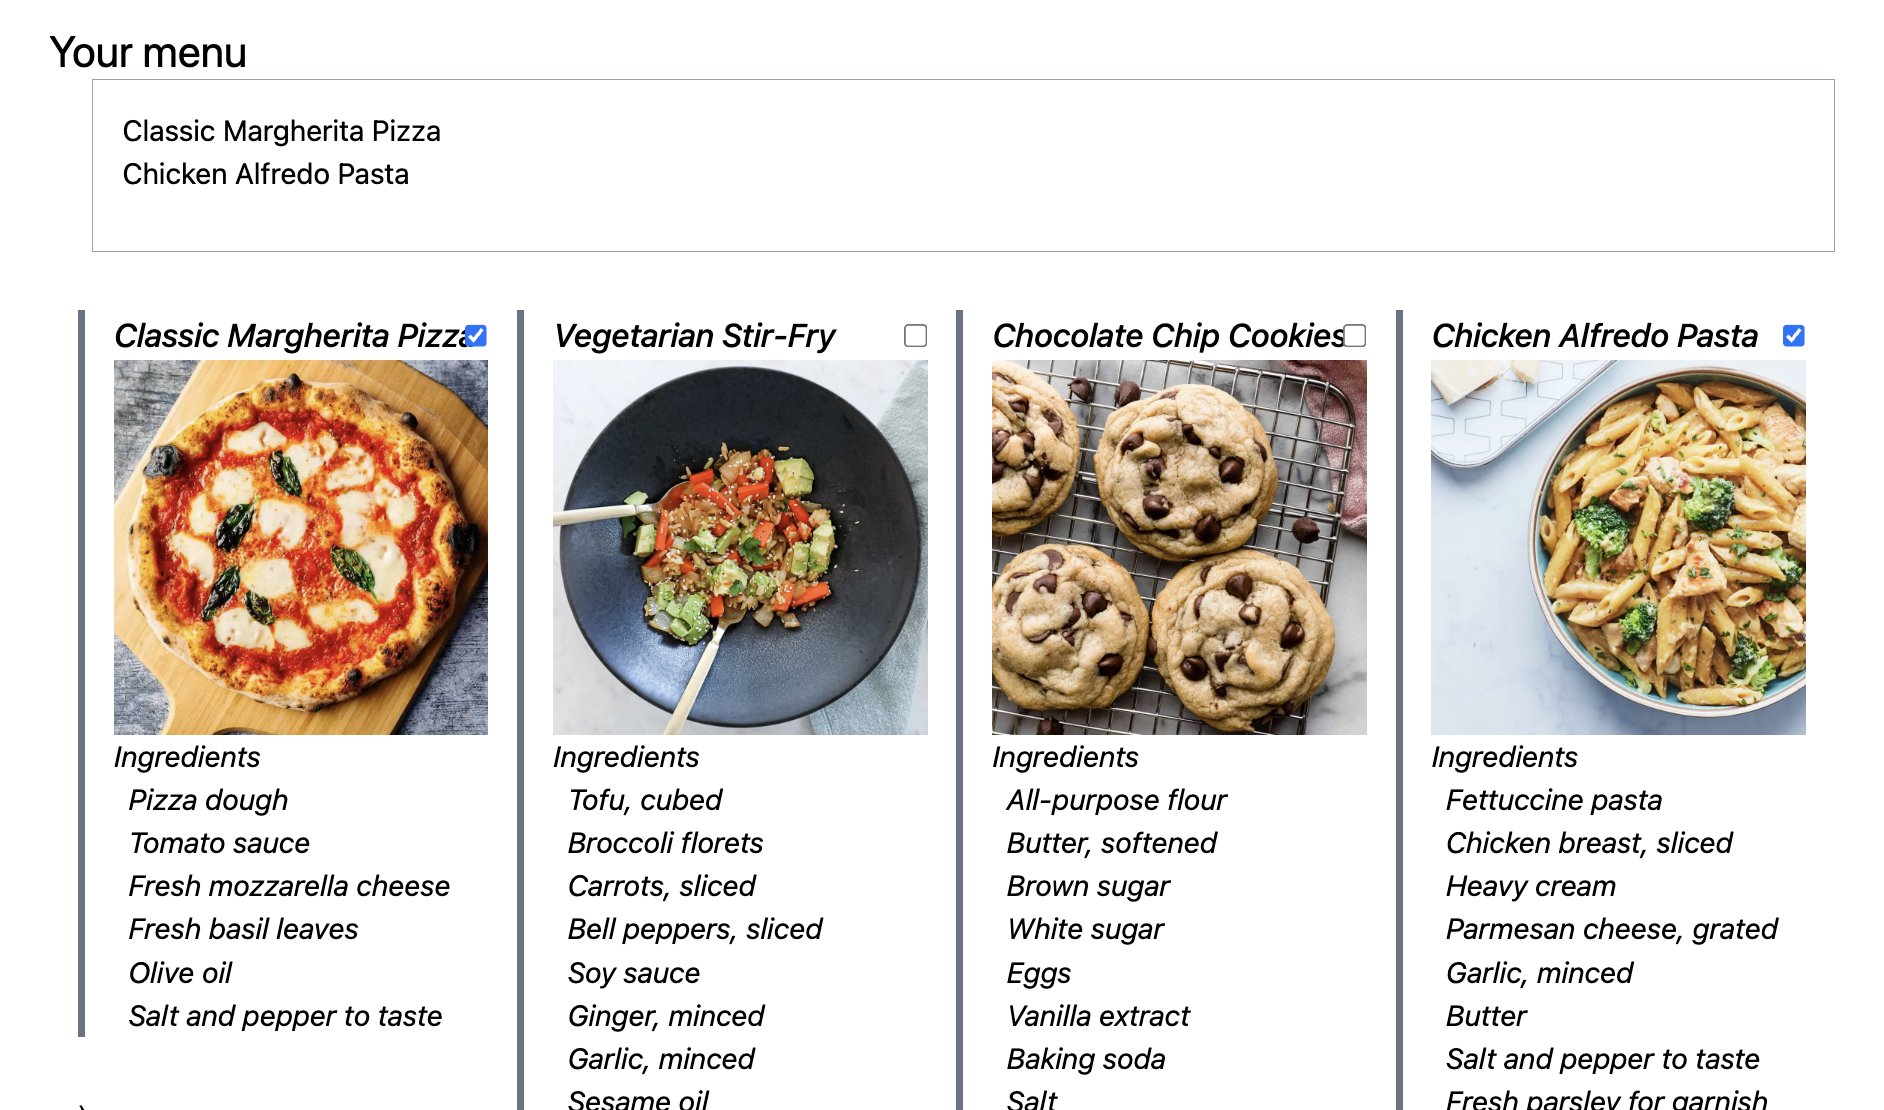
A common task is to display a list of items that the user can select and unselect. The code below is an example of a menu planner that displays a list of recipes that can be selected to plan a menu for a big dinner.
import { useState } from 'react';
import RecipeCard from './RecipeCard';
import { type Recipe } from '../types/recipes';

const toggleList = <T,>(x: T, lst: T[]): T[] => (
  lst.includes(x) ? lst.filter(y => y !== x) : [...lst, x]
);

interface RecipeSelectorProps {
  recipes: Recipe[]
}

const RecipeSelector = ({recipes}: RecipeSelectorProps) => {
  const [menu, setMenu] = useState<Recipe[]>([]);

  const toggleMenu = (item: Recipe) => {
    setMenu(menu => toggleList(item, menu));
  };

  return (
    <div className="container mx-auto px-4 w-svw">
      <h1 className="text-2xl">Your menu</h1>
      <ul className="ml-6 h-24 overflow-auto border border-gray-400 p-4">
        {
          menu.map(recipe => <li key={`menu-${recipe.id}`}>{recipe.name}</li>)
        }
      </ul>
      <div className="grid grid-cols-[repeat(auto-fill,_minmax(200px,_1fr))] gap-4 px-4">
        {
          recipes.map(recipe => (
            <div key={recipe.id} className="relative">
              <RecipeCard recipe={recipe} />)
              <input type="checkbox" onChange={() => togglemenu(recipe)}
                className="absolute top-10 right-0 z-10 border-2 border-white rounded-sm checked:bg-blue-500 checked:border-blue-500" />
            </div>
          ))
        }
      </div>
    </div>
  )
};

export default RecipeSelector;
Notes
The utility function toggleList() takes an item and a list of items of the same type. If the item was not in the list, a new list is returned with the item added. If the item was in the list, a new list is returned with the item removed. New lists are created so that React will recognize the change in state. Calling push() to add the item, or splice to remove it would not work.
toggleList() is used in toggleSelected(), to updates the list of selected recipes.
Components generated by a map() must have a key that identfies the relevant data. It should not be the array index. A problem arises when the same is used to generate more than one list. In this code, we have a list of all recipes and a list of selected recipes. Using the recipe ID can't be used with both lists. To avoid duplicate keys, the code uses template strings to create variant keys for the two lists.
This component forgets what items have been selected if the component is unmounted and later remounted.
Links
- Using context to remember state -- shows a slightly different UI for list selection and how to remember the list of selected items if the component is unmounted.
Better app navigation with routes
Classic React apps are typically single-page web apps (SPAs). That means that the user interacts with just one HTML page. Instead of loading a new page when the user clicks on a link or a button, React code changes what content is included, i.e., mounted, on the existing page. There is a pro and con here:
- Loading a new HTML page also loads new JavaScript. Any data in JavaScript variables is lost. An SPA avoids this.
- Loading a new HTML page puts the URL in the browser history. This lets users go backwards to previous screens and bookmark favorites. An SPA needs extra code to create URLs and manage the browser history to support this.
Routing libraries like React Router and Tanstack Router make it possible for SPAs to associate different screens with different URLs. We'll use Tanstack Router here as it has more extensive type safety features, with file-based routing because it scales better as the number of pages or screens increases.
There are three packages to install for Tanstack Router:
- the main package @tanstack/react-router
- @tanstack/router-plugin for file-based routing
- @tanstack/react-router-devtools to get an on-screen route debugging component when running in development mode
npm i @tanstack/react-router @tanstack/react-router-devtools
npm i -D @tanstack/router-plugin
See the Tanstack instructions for how to configure Vite.
Then you change main.tsx to load a router instead of App.tsx. The router will determine what screen to load. Replace the boilerplate code in main.tsx that loads App.tsx with the following boilerplate that loads a router component.
import { StrictMode } from 'react'
import ReactDOM from 'react-dom/client';
import { RouterProvider, createRouter } from '@tanstack/react-router'
import './index.css'

// Import the generated route tree
import { routeTree } from './routeTree.gen'

// Create a new router instance
const router = createRouter({ routeTree })

// Register the router instance for type safety
declare module '@tanstack/react-router' {
  interface Register {
    router: typeof router
  }
}

// Render the app
const rootElement = document.getElementById('root')!
if (!rootElement.innerHTML) {
  const root = ReactDOM.createRoot(rootElement)
  root.render(
    <StrictMode>
      <RouterProvider router={router} />
    </StrictMode>,
  )
}
This code imports routeTree from a file that the router-plugin will generate after you create your route files. It creates a router object with that data, then wraps a RouterProvider component around your code to provide access to router functions.
You build your app by defining route files in the directory /src/routes. The names of the files and directories become part of the URL, just as with a classic web site. The files contain the React components. The router displays the components based what routes are matched by the current URL.
When the router plugin is running, it will update the route tree and types when you add or rename files. If you make changes when it is not running, you may get TypeScript errors. If it is running and you try to change a route string to something that doesn't match the file name, the plug-in will change it back!
What you used to put in your top-level App component now goes into one of two route files:
- /src/routes/__root.tsx -- This is the root route. It has the React content that will appear on all screens, such as a logo and a navigation bar.
- /src/routes/index.tsx -- This is a route defined for the path /. It has the content you show when the app starts.
The files below demonstrate routes for an app where
- the URL / shows a small home page describing what the app does, with a navigation bar
- the URL /recipes shows a set of recipe cards
- the URL /quote/12 shows quote #12 and a button to jump randomly to another quote
Notes on how this works follows the code.
import { createRootRoute, Link, Outlet } from '@tanstack/react-router'
import { TanStackRouterDevtools } from '@tanstack/react-router-devtools'

export const Route = createRootRoute({
!!  component: () => (
    <>
      <div className="p-2 flex gap-4">
        <Link to="/" className="[&.active]:font-bold">
          Home
        </Link>{' | '}
        <Link to="/recipes" className="[&.active]:font-bold">
          Recipes
        </Link>{' | '}
        <Link to="/quote/$index" params={{index: '0'}} className="[&.active]:font-bold">
          Quote
        </Link>
      </div>
      <hr className="my-4" />
!!      <Outlet />
!!      <TanStackRouterDevtools />
    </>
  ),
!!  notFoundComponent: () => (
    <div className="h-screen flex items-center justify-center text-6xl">
     I looked for that page, I really did! 😭
    </div>
  )
});
import { createFileRoute } from '@tanstack/react-router'

const Index = () => (
  div className="flex flex-col h-screen justify-center items-center">
    div className=" p-4 border-2 border-blue-600 rounded-lg">
      h1 className="text-xl font-bold my-2">Welcome!/h1>
      p className="text-lg">This is a small collection of React examples./p>
      p className="text-lg">Use the navigation bar at the top to visit each one./p>
    /div>
  /div>
);

export const Route = createFileRoute('/')({
  component: Index,
});
import { createFileRoute } from '@tanstack/react-router'
import RecipeCards from '../components/RecipeCards';


export const Route = createFileRoute('/recipes/')({
  component: RecipeCards
});
import { createFileRoute } from '@tanstack/react-router'
import { useNavigate, useParams } from '@tanstack/react-router';
import { useJsonQuery } from '../utilities/fetch';
import { validateQuoteCollection, type Quote } from '../types/quotes';
import RandomQuote from '../components/RandomQuote';

// randomly return a number between 1 and N inclusive
const pick = (n: number) => Math.floor(Math.random() * n);

const RandomQuotePage = ( ) => {
  const navigate = useNavigate();
  const { index } = useParams({ from: '/quote/$index' });
  const [json, isLoading, error] = useJsonQuery('https://dummyjson.com/quotes');

  if (error) return <h1>Error loading data: {`${error}`}</h1>;
  if (isLoading) return <h1>Loading data...</h1>;
  if (!json) return <h1>No data found</h1>;

  const validation = validateQuoteCollection(json);

   if (!validation.success) {
    console.log(validation.error);
    return <h1>Error loading quote. See console log for details.</h1>
  }

  const quotes = validation.data.quotes
  const quote = quotes[(parseInt(index) || 1) - 1]

  const goRandom = () => (
    navigate({to: `/random/${pick(quotes.length)}`})
  )

  return (
    <RandomQuote quote={quote} random={goRandom} />
  )
};

export const Route = createFileRoute('/random/$index')({
  component: RandomQuotePage
});
Notes
__root.tsx is a required file. It must have exactly that name, starting with two underbars. It calls createRootRoute() to define the root route, which becomes the top level of your app. There can be only one root route. Some key points about the code in this file:
- The component property specifies the JSX to frame all content. In this code, that JSX includes a navigation bar, using the Tanstack Router Link component. A navigation bar is common but not required.
- The JSX uses the Outlet component to say where to put content from any child component. More on this below. If no component is given, <Outlet /> is assumed.
- The JSX also includes the TanStackRouterDevtools component. This component only appears when running in development mode. Common, not required.
- The notFoundComponent property specifies a component to show when an unknown route is given. 404 screens are not required but can be more user-friendly than a routing error message. They can also be a source of fun.
The others files define three routes using createFileRoute(). With file-based routing, the file names are used to make the route URLs. Use simple lower-case short names, not camel-case React component names. Code in index.tsx is used when the route is /.
The router uses the components from all route strings registered with createFileRoute() that match the current URL, plus the root route. Routes ending with a slash only match URLs that exactly match the route. These are called index routes. Otherwise, a route matches any URL that begins with the route.
| URL | Routes that would match |
|---|---|
/posts | /posts, /posts/ |
/posts/12 | /posts, /posts/$index |
/settings/profile | /settings, /settings/profile |
/ | / |
Components from routes are combined from left to right, starting with the root route. A component is a child of the component to its left and inserted whereever <Outlet /> appears in the parent component.
In the example code, /src/routes/recipes.tsx is an index route that displays a list of RecipeCards. It would not match a URL like /recipes/12.
/src/routes/random.$index.tsx is a route with a dynamic path parameter. It will match a URL like /random/7 and display quote #7. This code demonstrates several things:
- Using a dollar sign in a file name to indicate a dynamic path parameter.
- Using a dotted file name rather than a slash to create just a single file, rather a file inside the subdirectory random. This is called a flat route file name.
- Using the useParams() hook to get the string value of the path parameter from the URL.
- Parsing the string to get the number, if present, or zero.
- Using the useNavigate() hook to get a navigate function that can be called to go to a new URL.
- Defining a goRandom() function that can be passed to a component that displays the quote and a button that will go another quote.
The RandomQuote component would use goRandom() like this
...
interface RandomQuoteProps {
  quote: Quote,
  random: () => void
}

const RandomQuote = ( {quote, random }: RandomQuoteProps) => (
    ...

    <Button onClick={random}>New quote</Button>
...
Links
- Installing Tanstack Router with Vite
- React Routing Concepts -- There are many options for route URLs. You can have "pathless" components that wrap around other component swithout adding to the route URL. You can have optional path parameters. You can have a component that "un-nests" so that a URL like /posts/12/edit can open an edit form component that is not inside the component for /posts/12.
- File-based routing -- a detailed table of how file names map to routes and how the associated components are nested.
- The code for RecipeCards
Using context to remember state over routes
State variables created with hooks like useState() are local to the components that create them. Local state is lost when the component is unmounted when the user navigates to another screen. If you need to avoid that, you must create the state in some container of the component that is not unmounted. This raises the question of how to pass that state to the component.
The simplest way is to pass the state in the container to component in a property. This works in many cases, but has two limitations. If the component that needs the state is deeply nested, the prop state must be added to all the intermediate components as well. This is called prop drilling. More challenging is how to pass state to routes. Routes created with createFileRoute associate a URL with a component, not a component with properties.
A more standard approach, independent of routing, is to use React context to share data between components without prop drilling. When state variables in the context change, all components that use the context will be re-rendered.
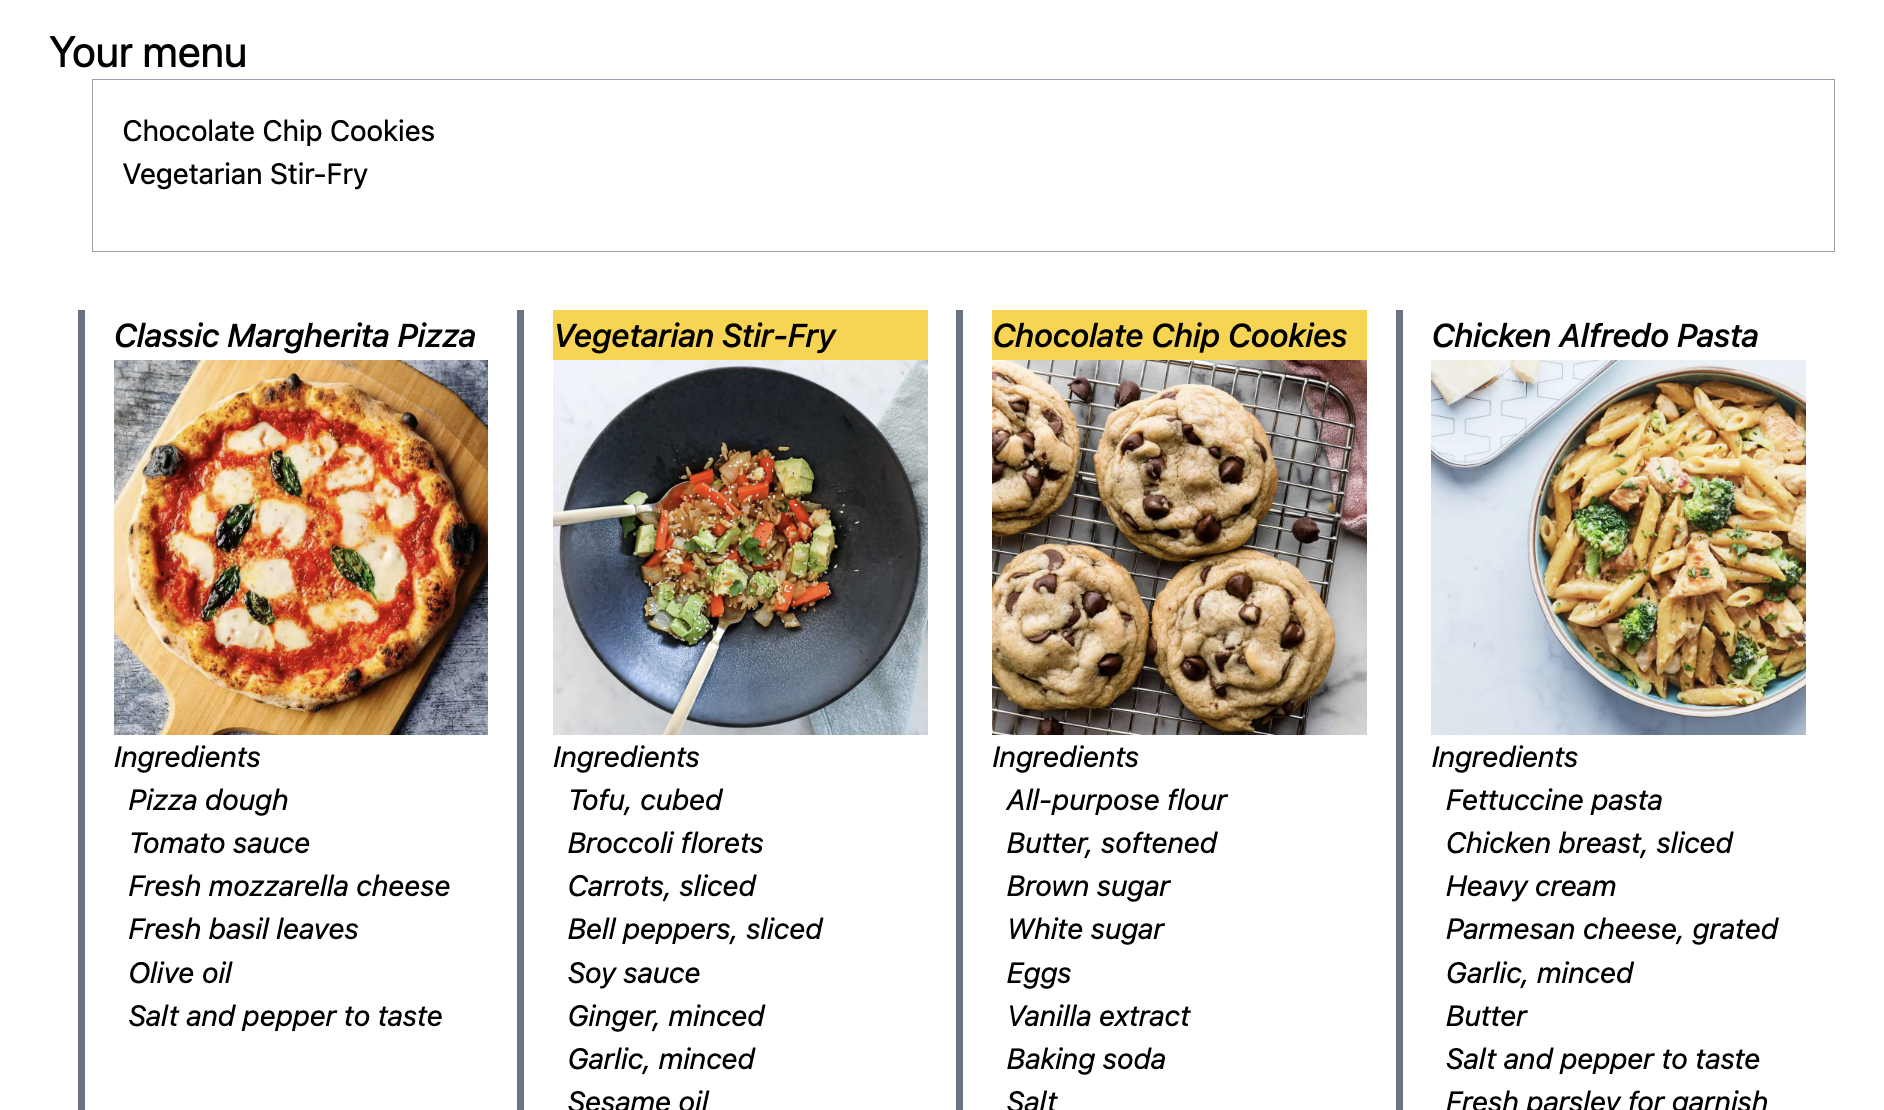
The code below implements a version of a recipe selector with two differences:
- The user interface uses selectable recipe cards, rather than checkboxes.
- The list of selected items is kept in a context that doesn't disappear if the user navigates to another screen and back.
First, here are the files for doing the recipe selector user interface:
- /src/components/RecipeCard.tsx defines a selectable recipe card
- /src/components/RecipeSelector.tsx defines the selector
import { type Recipe } from '../types/recipes';

interface RecipeCardProps {
  recipe: Recipe;
  selected: boolean;
  select: (recipe: Recipe) => void;
}

const RecipeCard = ({ recipe, selected, select }: RecipeCardProps ) => (
  <div className="border-l-4 border-gray-500 italic my-8 pl-4" onClick={() => select(recipe)}>
    <h2 className={`text-lg font-medium ${ selected ? 'bg-amber-300 ': 'bg-white' }`}>{recipe.name}</h2>
    { recipe.image ? <img src={recipe.image} /> : '' }
    <h4>Ingredients</h4>
    <ul>{recipe.ingredients.map((item, i) => <li key={i} className="ml-2">{item}</li>)}</ul>
  </div>
);

export default RecipeCard;
import RecipeCard from './RecipeCardSelectable';
import { useMenu } from '../state/MenuContext';

const RecipeSelector = () => {
  const { recipes, menu, toggleMenu } = useMenu();

  return (
    <div className="container mx-auto px-4 w-svw">
      <h1 className="text-2xl">Your menu</h1>
      <ul className="ml-6 h-24 overflow-auto border border-gray-400 p-4">
        {
          menu.map(recipe => <li key={`menu-${recipe.id}`}>{recipe.name}</li>)
        }
      </ul>
      <div className="grid grid-cols-[repeat(auto-fill,_minmax(200px,_1fr))] gap-4 px-4">
        {
          recipes.map(recipe => (
            <RecipeCard key={recipe.id} recipe={recipe} selected={menu.includes(recipe)} select={toggleMenu} />
          ))
        }
      </div>
    </div>
  )
};

export default RecipeSelector;
Notes
There are just a few changes to the user interface code compared to the code using checkboxes:
- RecipeCard is modified to be selectable. It takes
two additional props:
- selected which is true if the card is currently selected
- select which can be called to select/unselect the card
- RecipeCard picks a different style when it is selected.
- RecipeCard has an onClick event handler that calls the select function.
- RecipeSelector is changed to pass selected and select to RecipeCard.
The bigger change to RecipeSelector is the removal of local state. Instead creating a local list of selected items with useState(), it gets that list by calling the hook useMenu(). The files below define this hook and sets up the React context it uses:
- /src/state/MenuContext.ts creates the context object and type and defines useMenu() to return it.
- /src/state/MenuContextProvider.tsx defines a component that will provide the context to all its child components.
- /src/main.tsx wraps the application code inside a MenuContextProvider.
import { createContext, useContext } from 'react';
import { type Recipe } from '../types/recipes';

interface MenuContextType {
  recipes: Recipe[];
  menu: Recipe[];
  toggleMenu: (recipe: Recipe) => void
}

export const MenuContext = createContext<MenuContextType>(null!);

export const useMenu = () => {
  return useContext(MenuContext);
};
import { useMemo, useState, type PropsWithChildren } from "react";
import { useJsonQuery } from '../utilities/fetch';
import { validateRecipes, type Recipe } from '../types/recipes';
import { MenuContext } from "./MenuContext";

const toggleList = <T,>(x: T, lst: T[]): T[] => (
  lst.includes(x) ? lst.filter(y => y !== x) : [...lst, x]
);

const getRecipes = (json: unknown) => {
  const validation = validateRecipes(json);

    if (!validation.success) {
      console.log(validation.error)
    };

    return (!validation.data?.recipes) ? [] : validation.data.recipes;
};

export const MenuContextProvider = ({ children }: PropsWithChildren) => {
  const [json] = useJsonQuery('https://dummyjson.com/recipes');
  const recipes = useMemo(() => getRecipes(json), [json]);
  const [menu, setMenu] = useState<Recipe[]>([]);

  const toggleMenu = (item: Recipe) => {
    setMenu(menu => toggleList(item, menu));
  };

  return (
    <MenuContext.Provider value={{ recipes, menu, toggleMenu }}>
      {children}
    </MenuContext.Provider>
  );
};
import { StrictMode } from 'react'
import ReactDOM from 'react-dom/client';
import { RouterProvider, createRouter } from '@tanstack/react-router'
!!import { MenuContextProvider } from './state/MenuContextProvider';
...

// Import the generated route tree
import { routeTree } from './routeTree.gen'
..
.
// Create a new router instance
const router = createRouter(...)

// Register the router instance for type safety
declare module '@tanstack/react-router' {
  interface Register {
    router: typeof router
  }
}

export const App = () => {
  ...

  return (
!!    <MenuContextProvider>
      <RouterProvider router={router} context={{ auth, profile }} />
!!    </MenuContextProvider>
  )
}

// Render the app
const rootElement = document.getElementById('root')!
if (!rootElement.innerHTML) {
  const root = ReactDOM.createRoot(rootElement)
  root.render(
    <StrictMode>
      <App />
    </StrictMode>,
  )
}
Notes
MenuContext.ts creates a context that will contain the list of all recipes, the list of those selected, and the selection function. For efficiency and modularity, contexts should focus on one particular set of data. Do not create one context to hold all shared state. If you do that, then everytime any shared state changes, all components using that shared context -- probably the entire app -- will be re-rendered, rather than just the components that need that particular state.
Note that the context is initialized to null with the TypeScript syntax null!. This tells TypeScript that MenuContext will definitely be something other than null in code that uses it.
MenuContextProvider.tsx does all the work that used to be in RecipeSelector and elsewhere to set up the menu state. It gets the validated list of recipes, creates the state for the list of selected recipes, and defines the toggle function. If anything fails, there will be an empty list of recipes.
MenuContextProvider.tsx calls useMemo() when validating the list of all recipes, so that this is only recalculated if the JSON data changes.
For main.tsx, we show just the code that is needed to provide the menu context so that it isn't unmounted and forgotten when changing routes. With this code, if you start to make a menu plan, switch to another screen, and then return, the menu plan is still available.
In Tanstack Router, state could be passed in the router context. For example, user authentication state can be passed around with router context. But this solution requires adding code to explicitly invalidate the router context whenever the state changes. React context is a more general solution.
Links
- React: Context API vs Zustand vs Redux -- describes three approaches to sharing state across components: React Context, Zustand, and Redux
Adding Firestore
To add the Firestore Database to an app:
- use the Firebase web console to enable Firestore for your project
- install the Firestore package
- add code to initialize Firestore in the app
See Hosting an app on a public server for how to create a Firebase project and install the Firebase CLI tools.
To enable Firestore for your Firebase project, follow these instructions. When Firebase asks about security, we select Test Mode, so that you can test code to read and store data without setting up authentication. Firebase only allows this mode for a relatively short period of time. See these Firebase notes for information on how to change the security rules later.
To call Firebase functions in an app, install the Firebase library in your app project. Since this install can take a while, I find it useful to tell it to report what's happening, to make sure it's not hung.
npm install firebase --loglevel verboseThen initialize Firestore or Realtime database, depending on which you are using.
firebase init firestorefirebase init databaseThis adds an entry for the database to your firebase.json file and crestes a database.rules.json file. The rules file is for defining security rules.
Here is the code that needs to be included in the app to initialize interactions with Firebase, including database calls.
import { initializeApp } from 'firebase/app';

const firebaseConfig = {
  apiKey: "...",
  authDomain: "...",
  databaseURL: "...",
  projectId: "...",
  storageBucket: "....",
  messagingSenderId: "...",
  appId: "..."
};

const firebase = initializeApp(firebaseConfig);
To get the firebaseConfig configuration object, go to the project on the Firebase web console. Open Project Overview | Project Settings | General. Scroll down and click on the name of the web app, then click on the Config radio button.
Notes
All calls to Firebase functions are placed into src/utilities/firebase.js for easier updating.
Adding a Firebase Realtime Database
To add the Firebase Realtime Database to an app:
- enable the database service for the Firebase project in the cloud
- install the Firebase library in the app
- add code to initialize firebase in the app
See Hosting an app on a public server for how to create a Firebase project and install the Firebase CLI tools.
To enable the Realtime database for your Firebase project, follow these instructions. When Firebase asks about security, we select Test Mode, so that you can test code to read and store data without setting up authentication. Firebase only allows this mode for a relatively short period of time. See these Firebase notes for information on how to change the security rules later.
To call Firebase functions in an app, install the Firebase library in your app project.
npm install firebaseThen initialize the database.
firebase init databaseThis adds an entry for the database to your firebase.json file and crestes a database.rules.json file. The rules file is for defining security rules.
Here is the code that needs to be included in the app to initialize interactions with Firebase, including database calls.
import { initializeApp } from 'firebase/app';

const firebaseConfig = {
  apiKey: "...",
  authDomain: "...",
  databaseURL: "...",
  projectId: "...",
  storageBucket: "....",
  messagingSenderId: "...",
  appId: "..."
};

const firebase = initializeApp(firebaseConfig);
To get the firebaseConfig configuration object, go to the project on the Firebase web console. Open Project Overview | Project Settings | General. Scroll down and click on the name of the web app, then click on the Config radio button.
Notes
All calls to Firebase functions are placed into src/utilities/firebase.js for easier updating.
Organizing Firebase Realtime data
A Realtime Database is one big JSON object. Here is an example Firebase-friendly JSON object for posts and users. This is a re-organized version of the data at DummyJSON.
{
  "users": {
      "users-1": {
          "id": "users-1",
          "firstName": "Terry",
          "lastName": "Medhurst",
          ...
      },
      "users-2": {
          "id": "users-2",
          "firstName": "Sheldon",
          "lastName": "Quigley",
          ...
      },
      ...
  },
  "posts": {
      "posts-1": {
          "id": "posts-1",
          "title": "His mother had always taught him",
          "body": "His mother had always taught him not to ever think of himself as better than others. He'd tried to live by this motto. He never looked down on those who were less fortunate or who had less money than him. But the stupidity of the group of people he was talking to made him change his mind.",
          "userId": "users-9",
          "tags": [
              "history",
              "american",
              "crime"
          ],
          "reactions": 2
      },
      "posts-2": {
          "id": "posts-2",
          "title": "He was an expert but not in a discipline",
          "body": "He was an expert but not in a discipline that anyone could fully appreciate. He knew how to hold the cone just right so that the soft server ice-cream fell into it at the precise angle to form a perfect cone each and every time. It had taken years to perfect and he could now do it without even putting any thought behind it.",
          "userId": "users-13",
          "tags": [
              "french",
              "fiction",
              "english"
          ],
          "reactions": 2
      },
      ...
  }
}
Notes
Every updatable piece of data has
a unique stable path. For example, the age of Sheldon
Quiqley will always be /users/user-2/age.
Avoid arrays.
If an array of users was used, the index to Sheldon might change
if users were added or deleted or the list was re-sorted.
Put a list that changes frequently at the top-level so that you can easily track it.
If you have a file with the JSON that works, you can import it into Firebase using the web console.
Read the documentation for how to JSON data to support efficient querying and updating.
Defining Firestore query hooks
The code below in /src/utilities/firebase.ts defines custom React hooks for getting documents and collections from a Firestore database.
The sample code in /src/components/Catalog.tsx shows how to use this hook to connect a page to live data on Firebase.
import { useCallback, useEffect, useState } from 'react';
import { initializeApp } from "firebase/app";
import { getDatabase, onValue, push, ref, update } from 'firebase/database';

const firebaseConfig = {
  // project configuration data from Firebase console
};

// Initialize Firebase
const firebase = initializeApp(firebaseConfig);
const database = getDatabase(firebase);

export const useDataQuery = (path: string): [unknown, boolean, Error | undefined] => {
  const [data, setData] = useState();
  const [loading, setLoading] = useState(false);
  const [error, setError] = useState<Error>();

  useEffect(() => {
    setData(undefined);
    setLoading(true);
    setError(undefined);
    return onValue(ref(database, path), (snapshot) => {
        setData( snapshot.val() );
        setLoading(false);
      }, (error) => {
        setError(error);
        setLoading(false);
      }
    );
  }, [ path ]);

  return [ data, loading, error ];
};
import Banner from './Banner';
import ProductList from './ProductList';
import type { Catalog } from '../types/products';
import { parseCatalog } from '../types/products';
import { useDataQuery } from '../utilities/firebase';

const Catalog = () => {
!!const [json, isLoading, error] = useDataQuery('/catalog');

  if (error) return <h1>Loading error: {error.message}</h1>;
  if (isLoading) return <h1>Loading...</h1>;
  if (!json) return <h1>No data found</h1>;

  const result = parseCatalog(json);

  if (!result.success) {
    console.log(result.error);
    return <h1>Data errors founds. See console log for details.</h1>
  }

  const catalog = result.data as Catalog;

  return (
    <div className="container mx-auto px-4 w-svw">
      <Banner title={catalog.title} />
      <ProductList products={catalog.products} />
    </div>
  )
}

export default Catalog;
Notes
useDataQuery() calls the Firebase function onValue() to subscribe to a location, or reference, in the database. Firebase will call the function passed to onValue() initially and then again every time there's a change to data at that location. Firebase passes the function a snapshot object. The snapshot's val() method gets the actual data.
Both hooks create listeners that are called whenever the data on the Firestore changes. When Firestore sends updates, the listeners are called. They copy that new data to local React state. That triggers re-rendering. That means that the user interface is always in synch with the data in Firestore. That means that multi-user updates to Firestore are handled automatically.
onValue() starts a listener for data changes and returns a function to call to stop listening. useEffect() returns that function. When useEffect() returns a function, React calls it when the component containing the useEffect() is unmounted. This avoids zombie listeners running when they're no longer needed.
The useEffect() in useDataQuery() has path in its dependency array, so that it will only create a new listener when the component is mounted or path changes.
useDataQuery() was designed to easily replace a call to useJsonQuery(), but with additional functionality. With useDataQuery():
- because this is a database, it can be updated;
- new data will be fetched whenever the database changes, triggering a re-render to update your page with no additional code
Links
- Implementing user profiles -- example code using useDataQuery().
- Implementing an edit form -- example code using useDataUpdate().
- To Realtime or not? -- a video from Firebase on why you should use listeners by default, not one-time queries
- Connecting to an external system with useEffect()
- Using Zod to validate data
- Explicitly type returned tuples -- why the hooks need explicit return types
Defining Firestore update hooks
The code below in /src/utilities/firebase.ts defines some custom React hooks for updating data in a Firebase Realtime database.
The code fragment in /src/components/ProductEditor.tsx shows how data from a form could be validated and sent to Firebase using one of the hooks. What the form looks like and how the data in it would be collected into a product object are omitted since there are so many different ways to do that.
import { useCallback, useEffect, useState } from 'react';
import { initializeApp } from "firebase/app";
import { getDatabase, push, ref, update } from 'firebase/database';

const firebaseConfig = {
  // project configuration data from Firebase console
};

// Initialize Firebase
const firebase = initializeApp(firebaseConfig);
const database = getDatabase(firebase);

const timestampMessage = (message: string) => (
  `${new Date().toLocaleString()}: ${message}`
);

// store a value under a path
export const useDataUpdate = (path: string): [(value:object) => void, string | undefined, Error | undefined] => {
  const [message, setMessage] = useState();
  const [error, setError] = useState();
  const updateData = useCallback((value: object) => {
    update(ref(database, path), value)
    .then(() => {
      setMessage(timestampMessage('Update succeeded'));
    })
    .catch((error: Error) => {
      setMessage(timestampMessage('Update failed'));
      setError(error);
    })
  }, [path]);

  return [updateData, message, error];
};

// add a value under a Firebase-generated key
export const useDataPush = (path: string): [(value:object) => void, string | undefined, Error | undefined] => {
  const [message, setMessage] = useState();
  const [error, setError] = useState();
  const pushData = useCallback((value: object) => {
    push(ref(database, path), value)
    .then(() => {
      setMessage(timestampMessage('Update succeeded'));
    })
    .catch((error: Error) => {
      setMessage(timestampMessage('Update failed'));
      setError(error);
    })
  }, [path]);

  return [pushData, message, error];
};
import { useDataUpdate } from '../utilities/firebase';
import { validateProduct } from '../types/products';
import type { Product } from '../types/products';

const ProductEditor = (({ product }: ProductEditorProps)) => {
  const [update, result] = useDataUpdate('/products');

  const handleSubmit = (event: React.FormEvent<HTMLFormElement>) {
    event.preventDefault();
    const data = collectDataFromForm(event.currentTarget);
!!    const validation = validateProduct(data);
    if (!validation.success) {
      alert(validation.error.issues.join(';'))
      return;
    }
    if (confirm(`Update {product.name}?`)) {
 !!     update({ [product.id]: validation.data })
    }
  };

  return (
    <h1>Editing {product.name}</h1>
    <form ... onSubmit={handleSubmit}>
      ...
    </form>
  )
}

export default ProductEditor;
Notes
The data update hooks, useDataUpdate() and useDataPush(), both return a tuple with a function to store a value at a given location in the database, and a state variable with a message on what happened, and an error object if something went wrong. A component might choose to show the message only when there is an error object.
useDataUpdate() returns a function that calls update() internally. Use it when storing data under keys that you generate, such as a product ID. The example code passes an object with the product ID as key and the validated new product information.
useDataPush() returns a function that calls push() internally. Use it to store data under keys that you want Firebase to generate, such as customer orders.
Read about useState(), useEffect(), ref(), onValue(), and update(). There are many other functions for getting and changing data. When working with an app that adds items to a list, like posts to a social media site, functions like onChildAdded() and push() are more appropriate than onValue() and update().
Links
- See Using a database hook and Implementing user profiles for example code using useDataQuery().
- See Implementing an edit form for example code using useDataUpdate().
- Using Zod to validate data
Defining a Realtime Database query hook
The code below in /src/utilities/firebase.ts defines a custom React hook for getting data from a Firebase Realtime database.
The sample code in /src/components/Catalog.tsx shows how to use this hook to connect a page to live data on Firebase.
import { useCallback, useEffect, useState } from 'react';
import { initializeApp } from "firebase/app";
import { getDatabase, onValue, push, ref, update } from 'firebase/database';

const firebaseConfig = {
  // project configuration data from Firebase console
};

// Initialize Firebase
const firebase = initializeApp(firebaseConfig);
const database = getDatabase(firebase);

export const useDataQuery = (path: string): [unknown, boolean, Error | undefined] => {
  const [data, setData] = useState();
  const [loading, setLoading] = useState(false);
  const [error, setError] = useState<Error>();

  useEffect(() => {
    setData(undefined);
    setLoading(true);
    setError(undefined);
    return onValue(ref(database, path), (snapshot) => {
        setData( snapshot.val() );
        setLoading(false);
      }, (error) => {
        setError(error);
        setLoading(false);
      }
    );
  }, [ path ]);

  return [ data, loading, error ];
};
import Banner from './Banner';
import ProductList from './ProductList';
import type { Catalog } from '../types/products';
import { parseCatalog } from '../types/products';
import { useDataQuery } from '../utilities/firebase';

const Catalog = () => {
!!const [json, isLoading, error] = useDataQuery('/catalog');

  if (error) return <h1>Loading error: {error.message}</h1>;
  if (isLoading) return <h1>Loading...</h1>;
  if (!json) return <h1>No data found</h1>;

  const result = parseCatalog(json);

  if (!result.success) {
    console.log(result.error);
    return <h1>Data errors founds. See console log for details.</h1>
  }

  const catalog = result.data as Catalog;

  return (
    <div className="container mx-auto px-4 w-svw">
      <Banner title={catalog.title} />
      <ProductList products={catalog.products} />
    </div>
  )
}

export default Catalog;
Notes
useDataQuery() calls the Firebase function onValue() to subscribe to a location, or reference, in the database. Firebase will call the function passed to onValue() initially and then again every time there's a change to data at that location. Firebase passes the function a snapshot object. The snapshot's val() method gets the actual data.
onValue() starts a listener for data changes and returns a function to call to stop listening. useEffect() returns that function. When useEffect() returns a function, React calls it when the component containing the useEffect() is unmounted. This avoids zombie listeners running when they're no longer needed.
The useEffect() in useDataQuery() has path in its dependency array, so that it will only create a new listener when the component is mounted or path changes.
useDataQuery() was designed to easily replace a call to useJsonQuery(), but with additional functionality. With useDataQuery():
- because this is a database, it can be updated;
- new data will be fetched whenever the database changes, triggering a re-render to update your page with no additional code
Links
- Implementing user profiles -- example code using useDataQuery().
- Implementing an edit form -- example code using useDataUpdate().
- Connecting to an external system with useEffect()
- Using Zod to validate data
- Explicitly type returned tuples -- why the hooks need explicit return types
Defining a Realtime Database update hook
The code below in /src/utilities/firebase.ts defines some custom React hooks for updating data in a Firebase Realtime database.
The code fragment in /src/components/ProductEditor.tsx shows how data from a form could be validated and sent to Firebase using one of the hooks. What the form looks like and how the data in it would be collected into a product object are omitted since there are so many different ways to do that.
import { useCallback, useEffect, useState } from 'react';
import { initializeApp } from "firebase/app";
import { getDatabase, push, ref, update } from 'firebase/database';

const firebaseConfig = {
  // project configuration data from Firebase console
};

// Initialize Firebase
const firebase = initializeApp(firebaseConfig);
const database = getDatabase(firebase);

const timestampMessage = (message: string) => (
  `${new Date().toLocaleString()}: ${message}`
);

// store a value under a path
export const useDataUpdate = (path: string): [(value:object) => void, string | undefined, Error | undefined] => {
  const [message, setMessage] = useState();
  const [error, setError] = useState();
  const updateData = useCallback((value: object) => {
    update(ref(database, path), value)
    .then(() => {
      setMessage(timestampMessage('Update succeeded'));
    })
    .catch((error: Error) => {
      setMessage(timestampMessage('Update failed'));
      setError(error);
    })
  }, [path]);

  return [updateData, message, error];
};

// add a value under a Firebase-generated key
export const useDataPush = (path: string): [(value:object) => void, string | undefined, Error | undefined] => {
  const [message, setMessage] = useState();
  const [error, setError] = useState();
  const pushData = useCallback((value: object) => {
    push(ref(database, path), value)
    .then(() => {
      setMessage(timestampMessage('Update succeeded'));
    })
    .catch((error: Error) => {
      setMessage(timestampMessage('Update failed'));
      setError(error);
    })
  }, [path]);

  return [pushData, message, error];
};
import { useDataUpdate } from '../utilities/firebase';
import { validateProduct } from '../types/products';
import type { Product } from '../types/products';

const ProductEditor = (({ product }: ProductEditorProps)) => {
  const [update, result] = useDataUpdate('/products');

  const handleSubmit = (event: React.FormEvent<HTMLFormElement>) {
    event.preventDefault();
    const data = collectDataFromForm(event.currentTarget);
!!    const validation = validateProduct(data);
    if (!validation.success) {
      alert(validation.error.issues.join(';'))
      return;
    }
    if (confirm(`Update {product.name}?`)) {
 !!     update({ [product.id]: validation.data })
    }
  };

  return (
    <h1>Editing {product.name}</h1>
    <form ... onSubmit={handleSubmit}>
      ...
    </form>
  )
}

export default ProductEditor;
Notes
The data update hooks, useDataUpdate() and useDataPush(), both return a tuple with a function to store a value at a given location in the database, and a state variable with a message on what happened, and an error object if something went wrong. A component might choose to show the message only when there is an error object.
useDataUpdate() returns a function that calls update() internally. Use it when storing data under keys that you generate, such as a product ID. The example code passes an object with the product ID as key and the validated new product information.
useDataPush() returns a function that calls push() internally. Use it to store data under keys that you want Firebase to generate, such as customer orders.
Read about useState(), useEffect(), ref(), onValue(), and update(). There are many other functions for getting and changing data. When working with an app that adds items to a list, like posts to a social media site, functions like onChildAdded() and push() are more appropriate than onValue() and update().
Links
- See Using a database hook and Implementing user profiles for example code using useDataQuery().
- See Implementing an edit form for example code using useDataUpdate().
- Using Zod to validate data
Forms in React
HTML forms start off simple. Need a form with an input field to hold an author of a quote? Just write
<input type="text" name="author" />
But bare form fields are ugly and not user friendly. They need labels and styling, like this:
The default styling for form controls is pretty ugly. Time to add padding, rounded corners, and such.
<label>
  <p className="text-lg font-bold">author</p>
  <input type="text" name="author" value={author} onChange={(evt) => setAuthor(evt.target.value)}
    className={`w-full rounded border border-gray-300 bg-inherit p-3 shadow shadow-gray-100 mt-2 appearance-none outline-none text-neutral-80`}
  />
</label>
Then we need code to move data from a form into React state variables. This will allow React to respond when a form is complete or when there is invalid data. Storing data in React state is usually done by attaching an onChange function to the field:
const [author, setAuthor] = useState('');
  ...
  <input type="text" name="author" value={author} onChange={(evt) => setAuthor(evt.target.value)} />
To do something with the form data when the user submits the form, attach an onSubmit function to the form. What that function does depends on your application. The following shows how a submit function gets data as an object, but just prints it out.
 const submit = (evt: React.FormEvent) => {
  evt.preventDefault();
  const data = Object.fromEntries(new FormData(evt.currentTarget).entries());
  console.log(data)
}
...
  <form onSubmit={submit}>
...
Browsers by default reload the page when a form is submitted.
The evt.preventDefault() prevents that.
Finally, what about validation? The onSubmit() function should not submit a form there is missing or bad data. At this point, things become complicated enough that it's best to use a React form library. By far the most popular is React Hook Form. Others that are currently in development and worth tracking are Tanstack Form and Conform. All three libraries support TypeScript and validation.
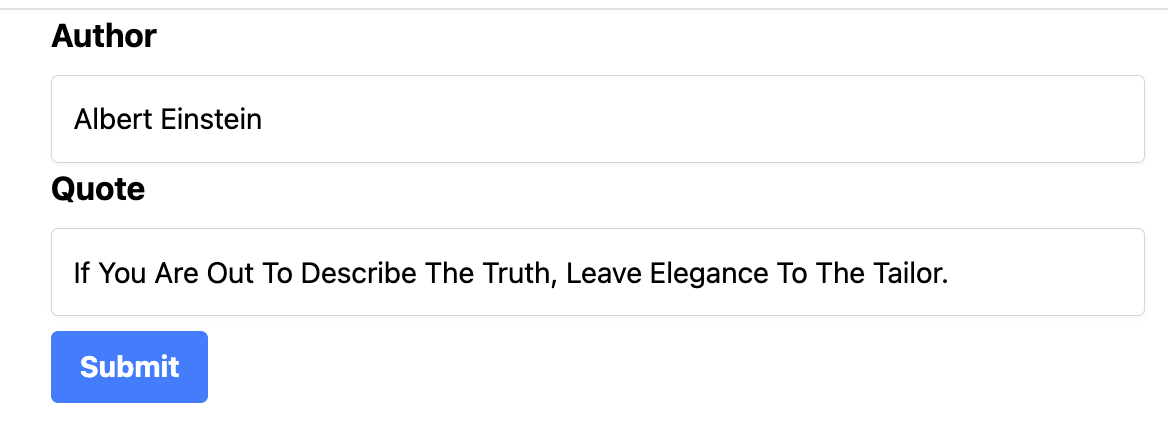
The code in /src/components/QuoteEditor.tsx gives an example of using React Hook Form to implement a simple form to edit a quotation, with simple validation, custom error messages, and immediate user feedback when a field is not correct. Notes on this code are below.
import { useForm, type SubmitHandler, type SubmitErrorHandler } from 'react-hook-form';
import Button from './Button';
import QuoteField from './QuoteField';
import { quoteResolver, type Quote } from '../types/quotes';

const QuoteEditor = ({quote}: { quote: Quote }) => {
  const { register, handleSubmit, formState: { errors, isSubmitting } } = useForm<Quote>({
    defaultValues: quote,
    mode: 'onChange',
    resolver: quoteResolver
  });

  const onSubmit: SubmitHandler<Quote> = async(data) => {
    alert(`Submitting ${JSON.stringify(data)}`)
    // Simulate a 2-second API call
    await new Promise(resolve => setTimeout(resolve, 2000));
  };

  const onError: SubmitErrorHandler<Quote> = () => {
    alert('Submissions prevented due to form errors')
  };

  return (
    <form onSubmit={handleSubmit(onSubmit, onError)}>
      <input type="number" {...register('id')} className="hidden" />
      <QuoteField name="author" label="Author" errors={errors} register={register} />
      <QuoteField name="quote" label="Quote" errors={errors} register={register} />
      <Button type="submit" disabled={isSubmitting}>Submit</Button>
    </form>
  )
};

export default QuoteEditor;
Notes
The key hook in React Hook Form is useForm(). It is called with an optional configuration object. useForm() returns an object with various functions and state variables to use in building the form. For our purposes, we need
- the function handleSubmit() to put in the form's submit handler
- the function register() to put on each input field to set up the code to collect the field's value into a form data object
- the state variable errors, which will hold information on errors in any field values
- the state variable isSubmitting, which can be used to disable the submit button while a form submission is in process, to prevent accidentally submitting the form twice.
The example code passes useForm() a configuration object to specify things:
- what values to use to initialize the form fields; in this case, the current quote data is used
- when to validate the form data and indicate errors; in this case, validation happens as data is entered
- what function to use to validate form data; see the links below for a link to the quote resolver
Next the code defines two dummy functions to call when the form is submitted. These can be named anything, but are commonly named onSubmit and onSubmitErrors.
- onSubmit() will be called by handleSubmit if there are no form errors. It is passed the form data. The example code simulates a slow network call to store data, but just prints the form data to the developer console.
- onSubmitErrors() will be called by handleSubmit if there are form errors. It is passed an object containing information about the errors. Form errors should be indicated to users during data entry. Printing the error object is primary for developers.
Now we get to the form itself. A hidden field is used to pass the quote ID. Users are not supposed to edit this. An input field of type number is used because we're assuming numeric IDs for quotes in the data base.
All the input fields call register(). register() returns an object with the following properties to add to the input field:
- name with the name passed to register()
- onChange with a function to call when the input field has focus and a key is typed
- onBlur with a function to call when the input field has focus and loses it
- ref with a React useRef reference, used internally by React Hook Form code to get input field data
What the onChange and onBlur functions do depends on whether the mode passed to useForm() was onChange, onBlur, or onSubmit (the default).
The spread operator is used to "splice" the properties returned by register into the form input field.
register() takes an object as an optional second argument that can be used to put constraints on the field value, e.g., that it is a number between 1 and 10, or a string that matches a regular expression pattern. Messages can be given to show the user when the constraints are violated.
The sample code uses a regular expression to require that both fields have at least one letter in them. Note that neither require() nor minLength are appropriate, since those constraints can be satisfied by just typing spaces.
Validation can alternatively be handled by a general data validation library such as Zod. See the Links.
Links
Enabling Google authentication
Here's how to enable authentication with Google, i.e., that users can click on a button and sign in with Google. This avoids the need for a separate database of passwords for an app.
- Go to the project page for your app on the Firebase web console.
- Click Authentication on the left under Build product category.
- Click the Sign-in method tab along the top.
- Click the Google line.
- In the panel that opens up, click Enable and enter any required information.
- Click Save.
Notes
See the section on implementing a sign in button for code using Google authentication.
There are other options you can enable. Email-based authentication is not hard to set up. Other third-party services like Facebook or Twitter will require you to set up a developer account and get an ID for your app.
Implementing authentication with Firebase
Third-party authentication services such as Firebase, Github, Facebook, and so on, take care of managing user names, emails. passwords, and so on. In particular, Firebase provides functions to call to let a user sign in and out, and a way to listen for changes in authentication status. The specifics of how Firebase does this can be encapsulated in a custom hook that returns the current authentication state as a React state variable. Components that call this hook will be re-rendered whenever the user signs in or out.
The example code below has the following files:
- /src/utilities/firebase.ts defines and exports functions and types to track the authentication state.
- /src/components/Banner.tsx shows a banner that displays the user's name, if one is logged in, and a button for signing in or signing out, depending on the authentication state.
import { useEffect, useState } from 'react';
import { flushSync } from 'react-dom'
import { initializeApp } from "firebase/app";
import { getAuth, GoogleAuthProvider, onAuthStateChanged, signInWithPopup, signOut, type NextOrObserver, type User} from 'firebase/auth';

const firebaseConfig = {
  ...
};

// Initialize Firebase
const firebase = initializeApp(firebaseConfig);
const auth = getAuth(firebase);

export const signInWithGoogle = () => {
  signInWithPopup(auth, new GoogleAuthProvider());
};

const firebaseSignOut = () => signOut(auth);

export { firebaseSignOut as signOut };

export interface AuthState {
  user: User | null,
  isAuthenticated: boolean,
  isInitialLoading: boolean
}

export const addAuthStateListener = (fn: NextOrObserver) => (
  onAuthStateChanged(auth, fn)
);

export const useAuthState = (): AuthState => {
  const [user, setUser] = useState(auth.currentUser)
  const [isInitialLoading, setIsInitialLoading] = useState(true)
  const isAuthenticated = !!user;

  useEffect(() => addAuthStateListener((user) => {
      flushSync(() => {
        setUser(user);
        setIsInitialLoading(false);
      })
    }), [])

  return {user, isAuthenticated, isInitialLoading };
};
>
import Button from './Button'
import { signInWithGoogle, signOut, useAuthState } from '../utilities/firebase'


export const Banner = () => {
  const { user } = useAuthState();

  return (
    <>
      <div className="p-2 flex gap-4">
        <span className="text-xl text-blue-400">
          Welcome, { user ? user.displayName : 'guest' }!
        </span>
        <span className="ml-auto">
          {
            user
            ? <Button onClick={signOut}>Sign Out</Button>
            : <Button onClick={signInWithGoogle}>Sign In</Button>
          }
        </span>
      </div>
      <hr className="my-4" />
    </>
  );
};
Notes
Calling signInWithGoogle pops up a dialog box that lets a user sign in with Google. It uses the general signInWithPopup() function that takes an "auth object" that holds data about the state of authentication, and an authentication provider. In this case, the code passes it the Google authentication provider.
To encapsulate Firebase details, a version of signOut() is defined and exported that does not take the Firebase auth instance.
addAuthStateListener() listens for changes in authentication. When that happens it passes the current user to the function it was given. addAuthStateListener() returns the "unsubscribe" function to call to stop listening.
useAuthState() is a custom React hook that returns an AuthState. If isInitialLoading is true, it means it is not yet known if there is a user or not. Otherwise, user will be either null or a Firebase UserInfo object with a UID (user ID), display name, and email address. The UID is a unique string managed by the authentication provider (Google, Facebook, ...). Any component that calls useAuthState() will be re-rendered whenever authentication changes.
It's important that the useEffect() returns the "unsubscribe" function to stop listening. React calls this cleanup code.
flushSync() is a low-level React function. It is rarely needed. It is used here to make sure that changes in authentication are reflected as soon as possible in the user interface.
The Banner code uses useAuthState() to get the user if any. It displays "Welcome, guest!" and a sign in button if there is no user, otherwise it displays a "Welcome, user name" and a sign out button.
Links
- the Firebase authentication page -- includes different authentication functions that are available
- Connecting to an external system with useEffect()
- flushSync() documentation
- Implementing authenticated routes
Implementing authenticated routes
React components can respond to changes in user authentication with a custom hook, such as useAuthState(). There's a problem though when a route has to decide whether to load a component or not based on authentication. Tanstack routes for example have a beforeLoading property with code to call before loading a component. Unfortunately, hooks like useAuthState() can only be called in components and hooks. They can't be called in beforeLoading code. To get around this, Tanstack Router provides a context feature that can be used to pass data to routes.
The Tanstack router context is not the same as React context. Router context however is often used to call the hooks that access React contexts.
The files below show an example of setting up and using router context for authentication.
- /src/main.tsx is modified to create a router that includes the authentication state in a context object.
- /src/routes/__root.tsx creates a root router that includes context with authentication state.
- /src/components/Navigation.tsx is the component that the root route includes with all other components.
import { StrictMode } from 'react'
import ReactDOM from 'react-dom/client';
import { RouterProvider, createRouter } from '@tanstack/react-router'
!!import { useAuthState } from './utilities/firebase';
import './index.css'

// Import the generated route tree
import { routeTree } from './routeTree.gen'

// Create a new router instance
const router = createRouter({
  routeTree,
!!  context: {
!!    auth: undefined!, // context.auth is reset in App
  },
})

// Register the router instance for type safety
declare module '@tanstack/react-router' {
  interface Register {
    router: typeof router
  }
}

export const App = () => {
!!  const auth = useAuthState();

!!  // Show spinner while authentication is initially checked
!!  if (auth.isInitialLoading) {
!!    return (
!!      <div className="flex h-screen w-full items-center justify-center p-4">
!!        <div className="size-10 rounded-full border-4 border-gray-200 border-t-foreground animate-spin" />
!!      </div>
!!    )
!!  }

!!  return <RouterProvider router={router} context={{ auth }} />
}

// Render the app
const rootElement = document.getElementById('root')!
if (!rootElement.innerHTML) {
  const root = ReactDOM.createRoot(rootElement)
  root.render(
    <StrictMode>
      <App />
    </StrictMode>,
  )
}
import { useEffect } from 'react';
import { createRootRouteWithContext, useRouter } from '@tanstack/react-router'
import { addAuthStateListener, type AuthState } from '../utilities/firebase';
import Navigation from '../components/Navigation';

interface RouterContext {
  auth: AuthState
}

const Root = () => {
    const router = useRouter();

    useEffect(() => addAuthStateListener(() => router.invalidate()), [router]);

    return <Navigation />
};

export const Route = createRootRouteWithContext<RouterContext>()({
  component: Root,
  notFoundComponent: () => (
    <div className="h-screen flex items-center justify-center text-6xl">I looked for that page, I really did! 😭</div>
  )
});
import { Link, Outlet } from '@tanstack/react-router'
import Button from '../components/Button'
import { TanStackRouterDevtools } from '@tanstack/react-router-devtools'
import { signInWithGoogle, signOut, useAuthState } from '../utilities/firebase'

export const Navigation = () => {
  const authState = useAuthState();

  return (
    <>
      <div className="p-2 flex gap-4">
        <Link to="/" className="[&.active]:font-bold">
          Home
        </Link>{' | '}
        <Link to="/recipes" className="[&.active]:font-bold">
          Recipes
        </Link>{' | '}
        <Link to="/quote/$index" params={{index: '1'}} className="[&.active]:font-bold">
          Quote
        </Link>
        <span className="ml-auto">
          {
            authState.isAuthenticated
            ? <Button onClick={signOut}>Sign Out</Button>
            : <Button onClick={signInWithGoogle}>Sign In</Button>
          }
        </span>
      </div>
      <hr className="my-4" />
      <Outlet />
      <TanStackRouterDevtools />
    </>
  );
};
Notes
In /src/main.tsx, the function createRouter() is passed an object with a route tree and an initial context object with undefined authentication. The value undefined! is a way to tell TypeScript to assume that auth will not be undefined in any code that uses it, so that we don't need to write "if undefined" tests to pass type-checking. This is (reasonably) safe to do because the code to reset the context is in the same file, where App updates the context to contain the authentication state returned by useAuthState().
App shows placeholder until auth.isInitialLoading is false and we know if there is a user or not.
RouterProvider merges the object passed in the context property with the initial context. This replaces the undefined auth value with the one returned by useAuthState().
/src/routes/__root.tsx uses createRootRouteWithContext() to create a root route that holds a context object typed to contain the authentication state returned by our authentication hook. A context object can be created to hold anything.
It adds a listener that invalidates the router when the authentication state changes. Invalidation causes Tanstack to re-run route loading code, update the context with the new authentication state.
/src/components/Navigation.tsx shows the top-level route links, plus a sign in button if no user is logged in, and a sign out button if there is a user logged in.
Protecting routes
With the authentication state in a router context, we can now set up routes that only a logged in user can access. For a smooth user experience,
- A user who is logged in can go directly to a protected route.
- A user who is not logged in who tries to go to a protected route is redirected to a login page. After login, they are automatically redirected to the protected route.
- A user who logs out while on a protected route is redirected to a login page.
We want the above to work no matter how a user tries to go to a protected route. They might click a link, use a bookmark, or type in a URL.
- /src/routes/quote_.$quoteId.edit.tsx is an example of a protected route. It is a form for editing quotes. A link to the form code is in the Links below.
- /src/routes/login.tsx is a route to a simple login page.
import { createFileRoute, redirect } from '@tanstack/react-router'
import QuoteEditor from '../components/QuoteEditor';
import { useJsonQuery } from '../utilities/fetch';
import { type Quote } from '../types/quotes';

const QuoteEditorPage = ( ) => {
  const { quoteId } = Route.useParams();
  const [json, isLoading, error] = useJsonQuery(`https://dummyjson.com/quotes/${quoteId}`);

  if (error) return <h1>Error loading quote: {`${error}`}</h1>;
  if (isLoading) return <h1>Loading quote...</h1>;
  if (!json) return <h1>No quote found</h1>;

  const quote = json as Quote;

  return (
    <div className="container mx-auto px-4 w-svw">
      <QuoteEditor quote={quote} />
    </div>
  )
}

export const Route = createFileRoute('/quote_/$quoteId/edit')({
!!  beforeLoad: ({ context, location }) => {
!!    if (!context.auth.isAuthenticated) {
!!      throw redirect({
!!        to: '/login',
!!        search: {
!!          redirect: location.href,
!!        },
!!      })
!!    }
!!  },
  component: QuoteEditorPage
});
import { createFileRoute, redirect } from '@tanstack/react-router'
import Button from '../components/Button';
import { signInWithGoogle } from '../utilities/firebase';
import * as z from 'zod';

const Login = () => (
  <div className="flex flex-col h-screen justify-center items-center">
    <Button onClick={signInWithGoogle}>Sign in with Google</Button>
  </div>
);

// if user exists, redirect to original page in search or home
// the validate ensures search.redirect is present, possibly ''
export const Route = createFileRoute('/login')({
  validateSearch: z.object({
    redirect: z.string().optional().catch(''),
  }),
  beforeLoad: ({ context, search }) => {
    if (context.auth.isAuthenticated) {
      throw redirect({ to: search.redirect || '/' })
    }
  },
  component: Login,
});
Notes
/src/routes/quote_.$quoteId.edit.tsx is an example of a non-nested route. That means a URL such as /quote/12/edit only shows the edit component. It does not show the component (if any) retrieved by /quote/12.
The key part here is the function in beforeLoading. That function called before the component is mounted. It is passed an object with various properties, including the router context and the current URL. If the authentication state in the context says there is no logged in user, then the component is not mounted. Instead the function redirects the user to the login page. It adds a search parameter redirect with the current URL so that the login page can return to this page after authentication.
/src/routes/login.tsx also has a beforeLoading function. If there is a user, then login immediately redirects the user to either the URL in the redirect search parameter, if any, or to the home screen.
Following the Tanstack example code, Zod is used to validate the search parameter redirect, if present.
Links
- Tanstack example code for authenticated routes with Firebase
- See Defining an authentication hook for the definition of useAuthState() and the functions for signing in and out.
- code for an edit form
Implementing user profiles
Here is a custom React hook that gets additional information from the database about the currently authenticated user, if any. Specifically, this code returns the user and whether they are an administrator. This code could be generalized to include other information about users stored in the database.
import { useAuthState, useDataQuery } from "./firebase";

export const useProfile = () => {
  const [user] = useAuthState();
  const [isAdmin, isLoading, error] =  useDataQuery(`/admins/${user?.uid || 'guest'}`);
  return [{ user, isAdmin }, isLoading, error];
};
Links
- See Implementing role-based authorization for example code using useProfile().
- See Role-based access in Database security rules for how to specify user roles in a Firebase Realtime database.
- See Defining an authentication book for the definition of useAuthState().
- See Defining a database hook for the definition of useDataQuery().
Notes
The code always does a database fetch. If there is no user, it uses
the dummy ID guest. This is because hooks
only work when the pattern of calls matches exactly the pattern of
components rendered. The following attempt to avoid a database call would violate
the Rules of Hooks:
export const useProfile = () => {
  const [user] = useAuthState();
  let [isAdmin, isLoading, error] = [false, false, null];
  if (user) {
    [isAdmin, isLoading, error] =  useDataQuery(`/admins/${user?.uid || 'guest'}`);
  }
  return [{ user, isAdmin }, isLoading, error];
};
Implementing role-based authorization
Role-based authorization means that the rules for who can do what in a system are specified in terms of roles, not user names. In a university enterprise system, there would be roles like student, instructor, and administrator. Roles might be quite specific, such as being a student or instructor in a specific course, or an administrator for financce for a specific department.
Implementing role-based authorization involves gettin authentication information first -- who is logged -- followed by getting usr role information from a database. User role information is often in a user profile. When no one is logged in, a default "guest" role is used to determine functionality. An example of role-based authorization is a user can see their profile, and edit things like addresses and phone number, but only an administrator can modify the roles in that user's profile.
The best way to manage role-based authorization is to define a hook that returns a user profile. This can then be accessed directly in components, e.g., to show an "edit profile" button only to an adminstrator, or in the beforeLoading code for a route to prevent non-administrators from accessing the user profile editor page.
import { useAuthState, useDataQuery } from "./firebase";

export const useProfile = () => {
  const {user} = useAuthState();
  const [isAdmin, isLoading, error] =  useDataQuery(`/admins/${user?.uid || 'guest'}`);
  return [{ user, isAdmin }, isLoading, error];
};
import { useProfile } from '../utilities/profile';
...
const AppRoutes = () => {
  const [profile, profileLoading, profileError] = useProfile();
  ...
  if (profileError) return <h1>Error loading profile: {`${profileError}`}</h1>;
  if (profileLoading) return <h1>Loading user profile</h1>;
  if (!profile) return <h1>No profile data</h1>;
  ...
  return (
    <BrowserRouter>
      ...
      <Routes>
        ...
        <Route path="/users/:id" element={<UserFromUrl profile={profile} users={users} />} />
        ...
      </Routes>
    </BrowserRouter>
  );
};
Here is a User component that includes a button to edit the user information only if the user profile says the current user is an administrator.
import { Link } from 'react-router-dom';

export const firstLastName = (user) => (
  user ? `${user.firstName} ${user.lastName}` : 'Unknown user'
);

const User = ({profile, user}) => (
  <div>
    <h3>
      { firstLastName(user) }
      {
        profile?.isAdmin &&
        <Link to={`/users/${user.id}/edit`} style={{fontSize: '0.7em', marginLeft: '2em'}}>
          <i className="bi bi-pencil"></i>
        </Link> }
      </h3>
    <p>Email: {user.email}</p>
    <p>Phone: {user.phone}</p>
  </div>
);

export default User;
Notes
Always include code to render useful information for all the possible values of state variables. Your code will always be asked to render the initial state values, even if for just a fraction of a second. If something goes wrong, you want tell the user something that they can report to you that will help debugging.
Links
- See Implementing user profiles for code that gets the profile for an authenticated user.
- See Implementing links with parameters for code to define links with parameters.
- See Bootstrap icons for how to use a Bootstrap icon, and Installing Bootstrap for how to install Bootstrap icons.
Database security rules
Firebase security rules protect your Firebase data from being modified by unauthorized users. There are two ways to edit your rules:
- You can go to the Realtime database page for your project on the Firebase web console. Click the Rules tab.
-
You can edit the file database.rules.json in your local
repository that was created when you ran
firebase init database.
The first option can be handy for testing, but the second option is where you should define your app's permanent security and validation rules. That makes the rules your app needs available to anyone working on the code. Any rules in the local file will overwrite any rules specified on the Firebase console.
Examples of security rules are given below. See the notes that follow for how these rules work.
Test mode access
The following rules let anyone read and change all data. Firebase allows database with rules like this for a short time for early development testing, but will eventually change the rules to deny access.
{
  "rules": {
    ".read": true,
    ".write": true
  }
}
Read-only access
The following rules give everyone read-only access to data stored under the key posts. No other data is accessible and none is writable. Data can be edited on the Firebase web console.
{
  "rules": {
    "posts": {
      ".read": true
    }
  }
  }
Authentication-enabled access
The following rule lets anyone posts, and logged-in user creaste posts, i.e., add something under the posts key. No other data is readable or writable.
{
  "rules": {
    "posts": {
      ".read": true,
      ".write": "auth !== null"
    }
  }
}
Identity-enabled access
The following rule does the above, and also lets a logged-in user update their personal user data but no one else's.
{
  "rules": {
    "posts": {
      ".read": true,
      ".write": "auth != null"
    },
    "users": {
      "$uid": {
        ".read": "auth != null && auth.uid == $uid",
        ".write": "auth != null && auth.uid == $uid"
      }
    }
  }
}
Role-based access
The following rules includes the above, but lets an administrator read and write any data.
{
  "rules": {
    ".read": "auth !== null && root.child('admins').child(auth.uid).exists()",
    ".write": "auth !== null && root.child('admins').child(auth.uid).exists()",
    "posts": {
      ".read": true,
      ".write": "auth != null"
    },
    "users": {
      "$uid": {
        ".read": "auth != null && auth.uid == $uid",
        ".write": "auth != null && auth.uid == $uid"
      }
    }
  }
}
The rules above assume that the database includes a top-level key admins under which there are entries with the login ID of every user that is an administrator, like this:
{
  "admins": {
    "user-id": true,
    ...
  },
  "posts": {
  ...
  },
  "users": {
  "user-id": {
    ...
  },
  ...
}
Notes
The user ID under admins and elsewhere need to be the UIDs managed by the authentication provider. If you are creating the admins manually, and Firebase is providing authentication, then you can get the UIDs from the Firebase web console, under Build | Authentication | Users. There is a "copy UID" button to make easy to copy the UID for placing elsewhere.
It takes time to get the hang of Firebase security rules. The page for editing rules has a Rules Playground that lets you test different request situations to see if your rules allow and deny what you want, before you publish and make them real.
A path to read or write data is evaluated from left to right. A path is given access as soon as "true" is found for the given operation (read or write). A path is denied access if the tree does not have a key for the next element of the path, or the path has been exhausted without finding "true".
The variable auth in a security rule will be set to a UserInfo object if the user has logged in.
A key in a security rule that begins with a dollar sign ($) is a variable. It will be set to the corresponding element being processed in the request path. Typically this is used with things like user IDs. If user data is stored under the user ID provided by your authentication provider, then the example rule above would be true if the user ID in the path matches the ID of the logged-in user.
Role-based access can be implemented using functions that access other parts of the database. The variable root has a RuleDataSnapshot of the root of the database. The snapshot child(path) method returns the snapshot under path. The exists() returns true if there is data for that key. The val() method returns the data in the snapshot. exists() is the same as val() != null.
Links
Server-side data validation
Here is an example of a Firebase server-side validation rule for posts that requires a non-empty title and body and a new post id. Validation rules appear in the same JSON tree as the database security rules.
{
  "posts": {
    ".read": true,
    "$postId": {
      ".write": "auth !== null && !data.exists()",
      ".validate": "newData.child('title').val().length > 0 && newData.child('body').val().length > 0"
    }
  }
}
Notes
Client-side validation of form data is important for users, but it does not replace server-side data validation. Without server-side validation it is very easy for your database to be corrupted and user data lost forever. This can be either accidentally caused by a bug in your client-side code, or intentionally caused by hackers bypassing your HTML form and submitting data via JavaScript directly.
Validation and security rules work together. Both must pass for data to be written.
The predefined variable data is bound to the data stored in the current location accessed by the path processed so far. In the example, !data.exists() is true only if this is a new post id.
The predefined variable newData refers to the data about to be stored. The first two expressions in the .validate rule test that there's data in the title and body. The last expression takes the user ID in the post and verifies that that user exists in the user
See Firebase validation rules and this collection of sample validation rules.